Highland Staff

Jan 182013
 

Well lookie here, sometimes those old Wish Lists do work, even if you have to buy the stuff yourself.   And then when you combine the Wish List with a New Year’s Resolution, you end up with the Tormek T-3 Sharpener from the High.  As I’ve said before, I was starting to get really tired of buying new tools because the old ones got dull.  Sharpening seems to be the answer, do you think?
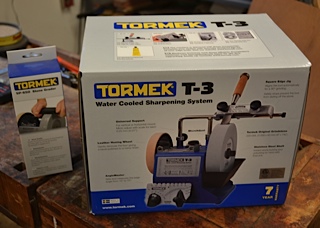
Tormek T-3

Last fall I went to a class in North Carolina and the instructor brought his T-3 for the students to use.  Since most students were fishermen and not woodworkers, trying to teach that bunch to sharpen would have been a real trial.  When I saw how it worked, it started to dawn on me that this little machine could be the answer to my sharpening trials.  Not willing to spring for the T-7, I settled on the T-3.

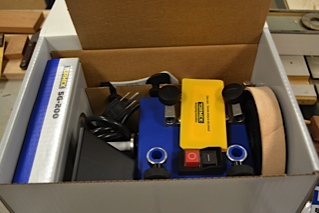
When I opened the package, there was a CD with instructions plus a guide book.  But the thing I really like was what was next.  That little yellow pack is a bundle of bandages with a caution on it.  I like that. That’s about how sharp I want my tools to be.

Unpacking

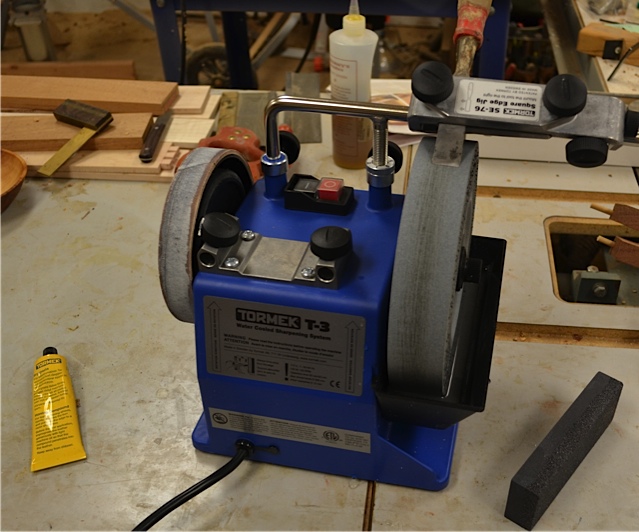
When I unpacked the rest of it, the grinding wheel was easy to install.  The big wheel  is a 200 grit, but I bought the dressing stone separately, and using it you can change the grit for the big stone.  Set the dressing stone on the wheel while it is running and if you use the coarse side, the wheel gets much rougher and faster cutting.  Turn the dressing stone over and the big wheel gets smoother and really polishes up an edge.

Unpacked, the box contains the square edge jig, the water tray, polishing paste, universal support guide bar and an angle setting gauge.  The leather honing wheel comes installed and just needs a little machine oil with some paste added to make it operable.
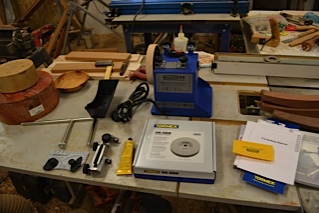
All the Pieces

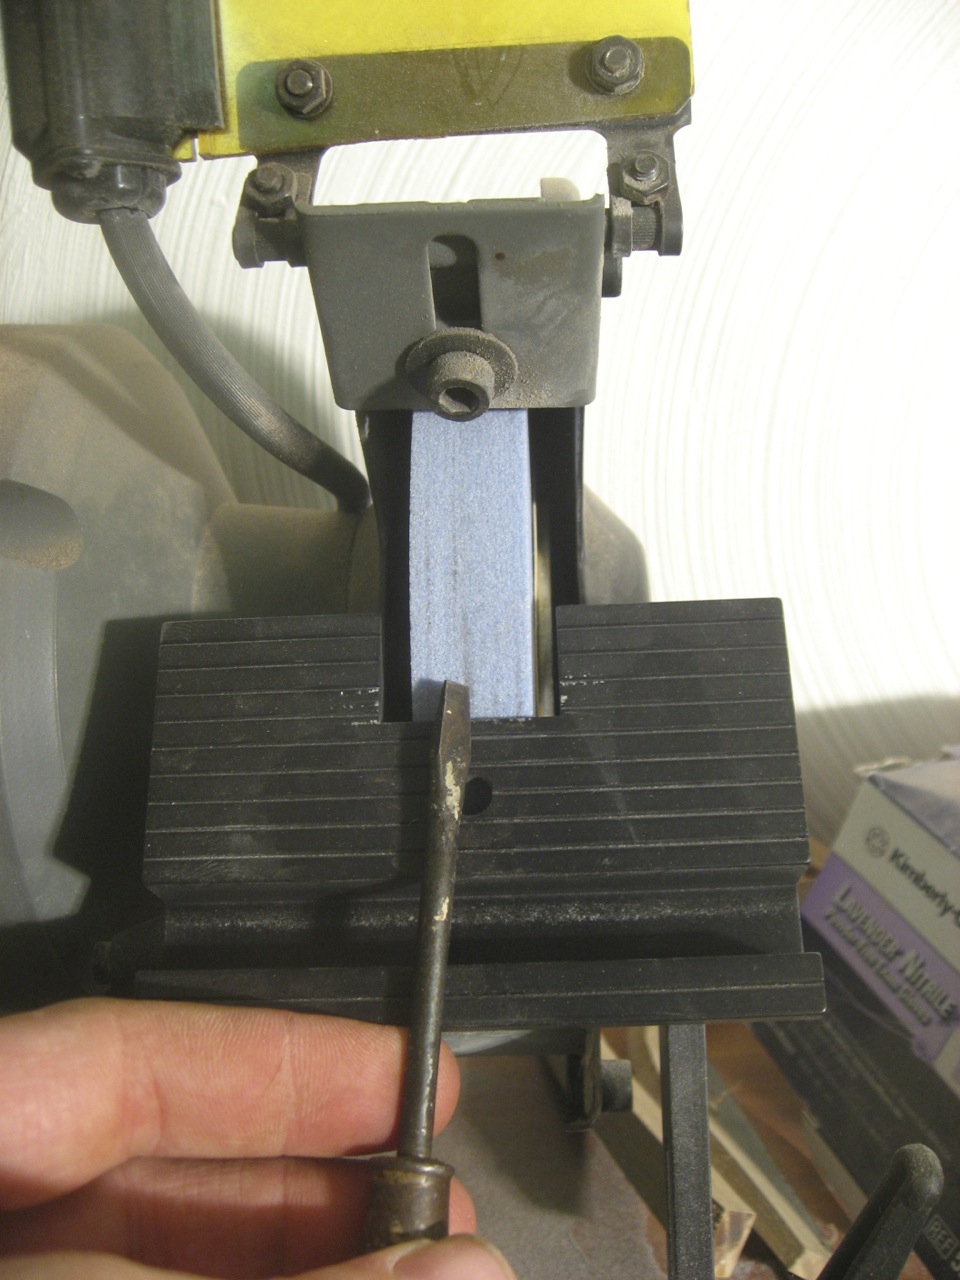
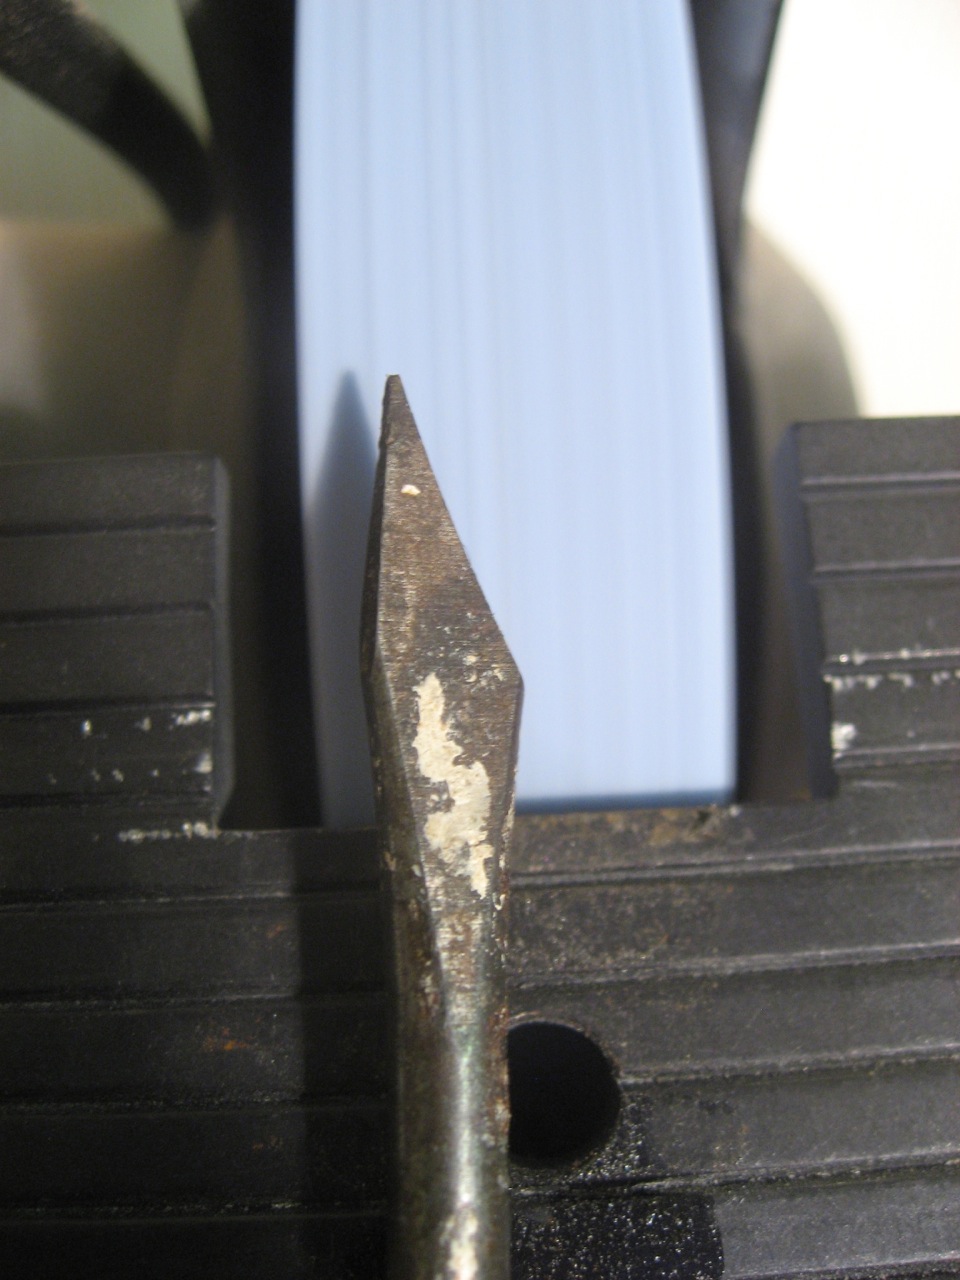
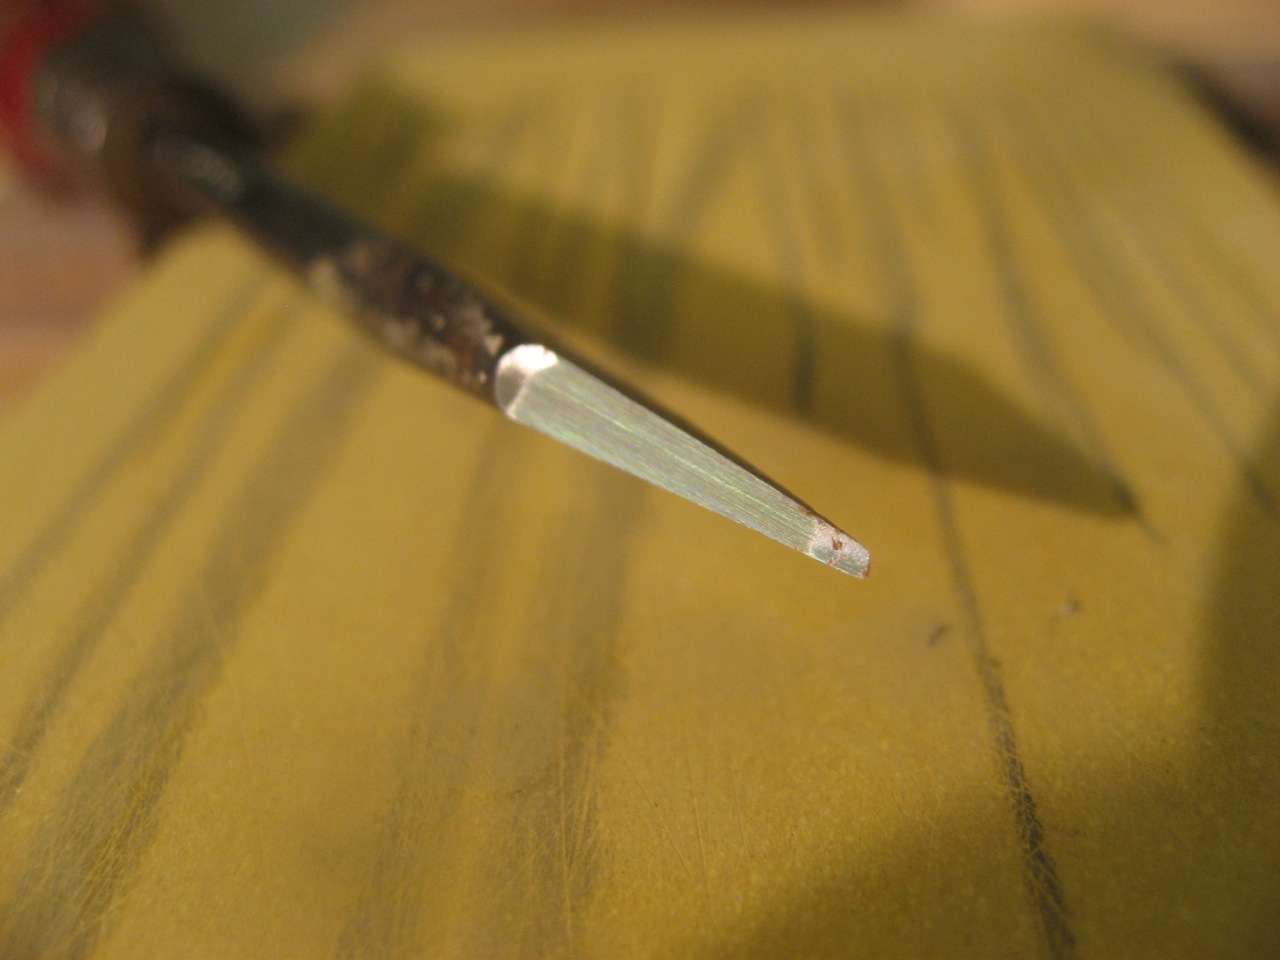
I picked up an old chisel which needed a lot of work and gave it a try.  The angle of the tool to the wheel is set by raising the guide bar up and down with the screw at the top of the body of the machine.  When you install the bar in the position shown, then the wheel is grinding towards the tool (clockwise), and the way you can tell when you are done is to feel the burr on the top of the edge.  No burr, and you ain’t there yet.  The tool in the picture was so bad, that I finally took it over to the half speed grinder and did a little shaping before putting it back on the Tormek.  When you finally get the burr, then take it out of the jig and gently use the leather honing wheel to smooth it out front and back, being very careful to not round the edge.

The guide bar can also be mounted on those front clamp holes and then the wheel will grind away from the tool.  I’m sure it makes a difference for some things, perhaps the smaller carving gouges.  Since the wheel turns slowly and runs constantly in water, there is no danger of burning the tool edge.  You do need to take the tray off when not using the machine so the water does not affect the wheel.

All Set to Go

They make an accessory kit for Wood Turners and another for Hand Tools.  This may be the perfect sharpening machine for the small shop.  Stop buying new tools just because the old ones are dull.

Jan 172013
 

I used a small trim router with a 3/32″ straight bit and template guide in order to make the grooves for my inlay. I would simply clamp my template to the material and run my router tight to the template – pretty straightforward stuff once you have the design, templates and material made!

Here you can see the template still in place and the inlay glued into the groove.

Template clamped, groove routed and inlay glued in place.

Template clamped, groove routed and inlay glued in place.

I’d square off (actually at a slight angle) one end of the inlay material to match the stopped groove. Glue was squeezed from a small syringe into the groove and then I’d shove in the inlay using a small wooden seam roller.

I left the inlay proud by maybe 1/32″ or so with a bandsawn face up.

Cherry inlay glued in place, about 1/32" proud

Cherry inlay glued in place, about 1/32" proud

From there it’s easy work to smooth out the small strips once the glue is mostly (or fully) dry. Here I used a really nice Hock Block Plane to do the work!

Using a Hock Block Plane to smooth down the inlay

Using a Hock Block Plane to smooth down the inlay

Jan 152013
 

When I had finished making the inlay material and tested it in sample grooves, I realized that I needed a very small chisel to square off the ends where multiple strips come together. I don”t have a 3/32″ chisel, so I made one.

I started with an old screwdriver and my grinding wheel.

Screwdriver meets grinding wheel to make a chisel

Screwdriver meets grinding wheel to make a chisel

After about 5 minutes, taking it slowly, I ended up with a concave curve very similar to what I get grinding any of my chisels. The picture below is a side view to show the concave curve left by the grinder. The right hand side is what was square to the grinding wheel when sparks were flying.

Grinding wheel leaves a concave curve to make a chisel

Grinding wheel leaves a concave curve to make a chisel

From there it was just a few strokes on the water stones to smooth the tip. Given the concave shape, the “chisel” rested on the stone at the very toe and heel so there”s very little metal to take to quickly hone.

Honing the tip of a concave curve chisel is quick

Honing the tip of a concave curve chisel is quick

Finally I took it on a test run. It got into the corners really nicely. (Yes, I realize I”m over my line on this test piece. Ha!)

Testing out a very small chisel to square a 3/32" groove.

Testing out a very small chisel to square a 3/32″ groove.

On to the real thing.

Jan 142013
 

In an earlier article, I mentioned how I had an alternate method to create tongue and groove joints with a backsaw, but recall I did suggest this option is really for those with good or better than average sawing skills. I just re-read my earlier article, and have to admit the four cuts I mentioned are only for the tongue. The groove will still require some additional work, including something to evacuate the wood for the groove, like a chisel or more preferably a router plane. One last pointer for this method, is to use a saw where the handle does not hang below, or even close to the teeth. This will limit your access on boards over twice the length of the saw plate. So let’s get started.

Starting Boards

First determine what you’ll use to remove the wood from the groove section of this joint. This will ultimately determine the minimum size of the groove. I even go so far as to place the evacuation tool on the wood, where I’ll create the tongue, and with it centered, make a small pen or pencil mark on each side of the cutting tool.

Next get your marking gauge, and set it so the cutter is on the mark, with the fence against the face of the wood. Before beginning to mark, check the gauge setting against both marks. If the marking gauge is outside of the second mark, use your current setting. If it is inside of the second mark, change the gauge so it references from the second mark. If you originally centered the evacuation tool well, then both marks will be the same, but it’s not critical, even though it helps to be somewhat close.

Once set, make a light mark with the marking gauge fence up against both faces. Come back and take multiple passes until the gauge line is fairly deep. Determine the planned length of the tongue, and mark similarly the depth on the two face sides and both ends.

Channel for Saw

If you’ve set your marks for the tongue wide enough so you will have some extra width in your tongue, you can just place your saw into your gauge lines and slowly work from each end, working towards the middle. Once the saw is tracking the full length of the board, you can make full strokes. (If you don’t think the tongue will have the extra width, use a chisel to remove a small wedge just outside both gauge lines, creating a channel for the saw.) Repeat the same sawing process on the opposite side of the tongue, until you’ve reached the full depth on both sides. Now, flip the board onto one of the sides, and using the saw, follow the marking gauge line to full shoulder depth. Repeat on the other face side.

One Side Done

Second tongue side done

Both sides finished

Tongue finished

Now it’s time to mark out our groove. If both joining boards are the same thickness, I base the groove width directly off of tongue thickness, minus just a bit. Truly, I never measure this difference, but once the marking gauge is set to reach a side of the tongue, adjust the micrometer no more than 1/8 of a turn deeper. Mark the groove board from both face sides, lightly at first, then deeper after the line is established. Saw the gauge lines to full depth, and then make one more saw kerf down the middle of the waste, again to full depth. I like to use a narrow chisel to work away some of the excess wood, making sure to pay close attention to grain direction. This is not the time you want to accidentally dive too deep, and have the grain catch for a huge split.

Groove marked with depth

Side saw cuts

Third saw cut

Ready for router plane!

Now I like to move the board into my face vise, and set the edge even with the bench top. I use the bench as my reference surface for my router plane, so all the weight of the plane is over the handle riding on the bench. Set the depth of cut by moving the iron up to the board to see how much you want to take in a pass. Shallow passes can take a while, but they usually don’t cause any problems. If I have a 1/4” or more to evacuate, then I’ll take a shaving similar in thickness to my fingernail. As long as you watch the grain direction, and make sure your board is level in the vise, you should be fine. This is what I did with this piece, but you might want to take a more cautious route. Continue this process until all of the excess wood is removed.

Check the fit of the tongue and groove. If everything fits great, thank your lucky stars and move on to the next part of your project. If not, don’t worry. We can fix anything! If the tongue is too thick, use the router plane, referencing the plane off of the face side of the board. This allows you to accurately remove very small shavings of wood, ultimately finding the perfect fit. If the fit is too loose, then another method is in order. In this case, you’ll glue some very thin pieces of wood onto both sides of the tongue. Since you’ll again use the router plane to make it fit perfectly, it’s a good idea to pay attention to the grain direction of the glued-on pieces. Wait until the glue dries completely before trying to size the tongue.  Once the glue has dried, take extremely thin shavings until the fit is to your liking. This potion of the fitting is based on the width of both the tongue and groove. If the tongue happens to be too long, just trim it back until it is the correct length, again with very small increments.

This method of making tongue and groove joints is doable, but you do have to take your time. Rushing can cause all sorts of problems.


Lee Laird has enjoyed woodworking for over 20 years. He is retired from the U.S.P.S. and works for Lie-Nielsen Toolworks as a show staff member, demonstrating tools and training customers. You can email him at lee@lie-nielsen.com or follow him on Twitter at twitter.com/is9582

Jan 112013
 

The inlay for the leg and top is 3/32″ wide – a choice based on looking at material with the actual workpieces. I also decided on cherry as a complementary wood with the walnut. Cherry can have some sap/mineral inclusions and dark grain lines – so I try as much as possible to cut around those: mostly by making a lot of strips and choosing the best ones!

I start by cutting right along the grain on my bandsaw, to try to have inlay that avoids crossing grain lines.

Cut along the grain lines to have consistent inlay material.

Cut along the grain lines to have consistent inlay material.

Then it”s on to re-sawing close to 3/32″ using the bandsaw with the fence. I cut multiple strips, keeping track of their order in case I want consecutive pieces later on.

The bandsaw cuts the inlay material slightly oversized.

The bandsaw cuts the inlay material slightly oversized.

Finally I surface both sides using my drum sander to dial in the exact thickness of the router bit (3/32″) – checking as I go.

A drum sander can easily dial in the inlay thickness to match the router bit

A drum sander can easily dial in the inlay thickness to match the router bit

Finally, I rip strips off, again on the bandsaw, a little oversized so they end up proud of the surface and I”ll flush them down with a hand plane.

Jan 042013
 

Well, it’s almost New Year’s Day once again and time for those pesky Resolutions. I went back and looked at the list from last year and I could just about copy that over again. Out of the twelve I posted last year, I get a full check on two of them, and a partial check on maybe three others. I did get the plywood out of the shop, and I picked up my rocker from the High so I can get that finished. I finished the second Shaker candle stand and donated it to a worthy cause and I bought the book for making my own mouldings. And I did go back and play that wonderful video with bass singer George Younce, though I have not signed up for the guitar lessons. Plus I went to the John Campbell Folk School and took the class I wanted in making a split bamboo fly rod. Be careful, I will show you the finished fly rod at the drop of a hat — it is beautiful, and very difficult to make.

For the New Year, I think I will make a few new resolutions and try to finish up some of those old ones which are still valid. Here goes:
  1. I am going to a class on woodcarving at Roy Underhill’s School in North Carolina in February. Mary May is the instructor and I have seen her on The Woodwright’s Shop on PBS. She is excellent. Maybe I can learn to carve an acanthus leaf. Perhaps even sharpen my carving tools, but I want to learn to carve this year.
  1. I am going to learn to sharpen. I am tired of constantly having to buy new tools simply because the old ones are dull. The only thing I really feel comfortable sharpening is my bowl gouge and that is because a I took a master class from Mike Mahoney a few years ago and he scoffed at what I had been doing and made me do it the way he does. I threw all the jigs out and now do it free hand. Maybe I can sharpen all the old tools and then I will have two of each.
  1. I see where Christopher Schwarz is coming to the High to teach a class in February. “Make your own Layout Tools with Christopher Schwarz” is the name of the class and where I have never taken a class with Chris, I do read his blog all the time and I think he would teach an excellent class. On the other hand, I just noticed it is already sold out, so you are going to have to look for another one. Highland has a constant stream of excellent classes and I will soon pick out another one.
  1. I hesitate to include the remaining resolutions from last year, but since they still stand, perhaps I should. I will include them here by reference.
  1. And one more resolution not related to woodworking — I am going to pay more attention to our people in the military this year. I will thank them when I see them; I will pay for lunch when I have an opportunity to do so; I will remember that they also serve who stand and wait. I was flying from Connecticut to Atlanta Christmas night after a visit with my son. There was a young woman sitting next to me and when the flight got a little bumpy, we started to talk. She was on her way back home after a visit to her family and she volunteered that her husband left just two weeks before Christmas for deployment to Afghanistan. They have been married six months. She was headed back to their house on a naval base in the Carolinas, by herself, late on Christmas night, to a dark, cold and very lonely place. It will be Christmas again before he comes home to his new wife. His name is Wade and he’s a Navy Corpsman. I’m going to remember that.

Happy New Year!!

Jan 022013
 

I’m sure most of you don’t know I had major back surgery in March. I’ll at least toss that out there, so you can have a reason to potentially give me mercy, when assessing my last year’s resolutions.

1. I have been working slowly on building a replica of a Gibson Les Paul guitar for quite a bit longer than is truly needed. I resolve to have it in playing shape by the end of March 2012 2013, at the latest. **I’m sure the year in my last resolution must have been a typo! 😉 Alright, it’s presently in some level of playing shape, but the March date is my expectation on having a completed/finished guitar. Just wait, I’m sure I’ll make this one!

2. It’s high time that I really learned how to spray a good finish on a project! I’ll practice with my brand new Earlex 5500 for the next week or so, and finally move up from 99% rag-applied oils to the big-boy finishes. You probably picked up on the fact that my guitar is waiting for a finish, huh? Ok, ok, right now that is the pressing issue as to why I need to learn to spray a great finish. But, once learned, I’ll never go back, unless I have a commission that demands that warm, friendly and refreshable finish. 😉

3. I’m planning to build a hanging tool cabinet, so I can both be more efficient, having my most-used tools close at hand and also getting my hand planes and other tools away from some dust. I plan to build this before the Lie-Nielsen Open House in July.

4. This last one is just barely on the fringe of woodworking. I will continue my physical training, to strengthen my body and to primarily regain my old walking gait. At first, it was an impossibility to do any woodworking, as I had to completely re-learn how to walk. I’m finally back to the point where I am spending multiple hours in my shop at a time, hand-planing, sharpening, building…you get the idea. With the continued treadmill and BowFlex work, it won’t be long until you mostly won’t be able to tell I even had surgery.

5. Ok, I know, I know, I said #4 was the last one, but I want to include one more from last year. I will continue to strive for progress in my writings (Blog articles, both Highland and personal), and hopefully provide valuable information and entertainment.

Happy Holidays to everyone!

To read more woodworking resolutions for 2013, CLICK HERE


Lee Laird has enjoyed woodworking for over 20 years. He is retired from the U.S.P.S. and works for Lie-Nielsen Toolworks as a show staff member, demonstrating tools and training customers. You can email him at lee@lie-nielsen.com or follow him on Twitter at twitter.com/is9582