Highland Staff

May 012013
 

Killing Me Slowly
By Steve Johnson

This is Woodworking Safety Day (formerly Woodworking Safety Week). It is also National Nurse Appreciation Week (I really hope that was pure coincidence!), Senior Corps Week, National Teacher Appreciation Week, International Compost Awareness Week (really?), and National Travel and Tourism Week. Regardless the competition, if the heightened awareness brought about by Woodworking Safety Day saves one finger or one eye it is worth all the ink and every keystroke on every blog, in every magazine, and on every woodworking club agenda.

The coverage of accidents and how to avoid them will likely be intense this week. But I have lately become equally interested in accidents that occur not with a shriek, a bang, or a buzz, but those that occur over a protracted period of time… the injuries that sneak up, like a thief in the night, and can rob us of health and vitality. I am talking about long-term exposure. In this column I have previously addressed noise and dust, two primary long-term exposure culprits. For this particular week of focus on safety, I want to address skin exposure.

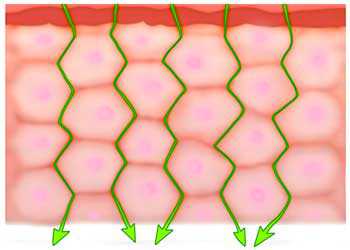
Figure 1 – Skin absorption occurs 3 ways: Intercellular lipid pathway, or between the cells


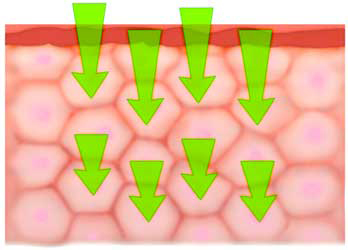
Figure 2 – Transcellular permeation, or through the cells


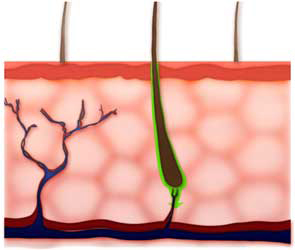
Figure 3 – Through the appendages (hair follicles, glands)

Somewhere along the way the skin’s ability to absorb pharmaceuticals and chemicals entered the collective consciousness. It was something we really did not think much about before, but an onslaught of advertisements for stop-smoking patches, birth control patches, localized pain relief patches, testosterone-boosting patches, and even those miracle footpads that were touted as able to remove toxins from our body, all contributed to our collective realization that our skin, our largest organ, is capable of, and in fact very efficient at, pulling chemicals (both good and bad) into our bodies and into our bloodstream.

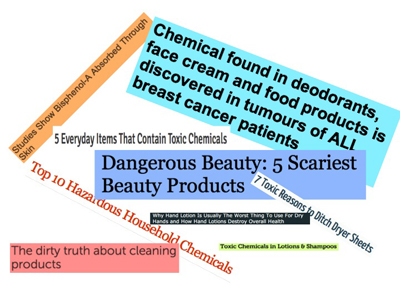
As this awareness has grown, some obvious marketing opportunities have been seized. Makers of lotions, potions and makeup have begun touting their more-natural or all-natural ingredients. Magazines warned us of parabens in our deodorant, lead in lipstick, sulfates in our toothpaste, and petroleum-based products in our hand cream. Fluoride, frequently the subject of grand conspiracy theories, hit the headlines again and the use of artificial colorings and sweeteners is being questioned; all-natural alternatives have begun to crowd the store shelves. But this is not merely marketing hype, and we woodworkers would be well advised to pay attention to the things that might be killing us slowly in addition to those things that could hurt us quickly.

The late great comedian George Carlin once said, “Scientists have announced that saliva causes cancer… but only when swallowed in small amounts over long periods of time.”

Funny, but like most of Carlin’s comedy, it is funny because there is a hint of truth. Our body is a complicated machine that burns fuel, expels waste, filters impurities, sifts between the necessary and unnecessary compounds, and occasionally does a little woodworking.

When we woodworkers dip a rag in solvent to wipe something, use our bare fingers to spread some oil, grease, putty, or solvent-based wood filler, or when we use harsh cleaners to scrub pitch from a saw blade, we do not get an immediate warning signal of pending danger. Instead, we may get a long-term cumulative impact that, like the thief in the night, sneaks up on us and intends us harm.

dtew4sm

So, while others address the slam-bang-crash side of safety, please give some thought to the long-term impact of dermal contact exposure. Wear gloves when handling chemicals and cleaners, read the label on that cream you slather on your chapped hands, and watch out for the fluoride… it really is a subversive plot!

Skin pathway illustrations from the Center for Disease Control. For more information, or to research the potential toxicity of chemicals in the products you use, consult the web sites of OSHA, the CDC, and download this document prepared by North Carolina Statue University. These are good starting points.


Apr 232013
 

On to the final step: applying and rubbing out the finish.  Whew, it’s been a long process getting here, but I’m thrilled with the construction.  The base has already been finished, so it’s just the top now.  I’m using Waterlox (the original version).  The underside will get 2-4 coats and the top somewhere around 6 or so – we’ll see how it goes.

I take the leaves off to be finished separately.  I start with the underside of the middle section and apply finish liberally, but not enough to run.  I stay just shy of the edges because I’ll reach under from the top and do that along with the top+edges.

Underside of the table with waterlox applied

I first apply Waterlox to the underside, fairly liberally

Once the finish is on, I flip it over and apply finish to the top.  I do this all at once – then allow the whole coat to dry.

Top with Waterlox applied

Right after a coat of Waterlox has been applied

When the coat is dry, I lightly sand with 320 grit paper and inspect for any blemishes. I definitely get some dirt in the finish but a low raking light reveals them and I can easily scuff them out with 220/320/400 grit paper.

Dirt Blemish in Waterlox Finish

A small piece of dirt got into the finish while drying

Dirt Blemish Removed

I easily remove the blemish in the finish with some fine sandpaper

I’m also working on the leaves at the same time as the main table, using the same process. Here you can see a leaf next to the table before I put on the first coat. What a difference in color!

Main table done, leaf unfinished

Waterlox applied to the main table next to an unfinished leaf

After about 6 coats of finish on top, I let it all dry for a week. The final step is to “rub out” the finish with some fine steel wool. In this case I’m using Liberon 0000 Steel Wool and take steady strokes back and forth with the grain.

Rub Out using Steel Wool

Using 0000 steel wool to rub out the table top finish

This process simply cuts down the fast-drying shiny spots in the finish – giving the whole top a consistent dullness. I wipe that down and then do another set of passes with the same steel wool but this time adding some wool lube – which makes even finer scratches. That leaves me with a low satin sheen which is good for this table. Some wax, buffing, and I’m done!

Stay tuned for final pictures…

Apr 162013
 

The other day I was looking at all the turning tools I have. Over the years, I have tried a lot of turning tools and I don’t care for most of them.

Woodturning Tools

Woodturning Tools

Look at the picture and you will see around 22 tools and I had to wipe a lot of dust off some of them to make the picture. There are all kind of tools from old Craftsman tools to some really modern stuff to the Elbo Hollowing Tool lying on the stool. In fact, I do about 90% of my work with one tool and that is the one on the far end of the lathe bed. I really like the 5/8” bowl gouge set in a changeable handle. I use Oneway’s Sure Grip Hosaluk 17-1/2″ Tool Handle from the High and I love the thing. I put the Oneway Mastercut 5/8” Bowl Gouge in the Handle and the whole rig weighs close to three pounds. That solid weight makes it very easy to hold steady and almost all vibration from the cut is eliminated. I can knock out a bowl in short order with this tool and I recently bought a new gouge since I have about ground the length off my old one.

blogtool

A few years ago when I went to the Master Class on bowl turning with Mike Mahoney at the High, I took some of my turning tools to the class. Mike scoffed at the cutting edge I had on my bowl gouge. I had learned to make that “fingernail grind” shape from the instructions that came with the Oneway Wolverine sharpening jig. Mike has a way of sharpening which uses the grinder platform set at the angle he likes and which I have adopted. He adjusts the platform to about 15 degrees and then sharpens freehand from the platform. Once you learn how, the process is quick and easy and I have gotten where I can do it in less than a minute. What I see many beginners do is buy all the sharpening jigs and fixtures they can get their hands on. That collecting process is good for Highland, but makes your sharpening life more difficult in the long run. How much simpler to start the grinder, put the gouge on the grinder table freehand and in a short time be done. For you beginners, if you have never turned with a sharp tool you have no idea what you are missing. Find somebody who has a sharp gouge you can borrow so you can see what it feels like. Come on down to the shop and I will be happy to loan you one of my gouges for a bit. Here’s a hint: If all you see are small chips and sawdust coming off the gouge, you need to sharpen. If you are turning green wood, you should be seeing a continuous stream of beautiful long curls flying up into the air. In fact, look back at the top picture and note the long shavings on top of the box behind the lathe. That is the joy of turning and what turners live for.

How many turning tools do you have and which is your favorite?

Apr 102013
 

All the details are cut and it’s time for the final sanding before applying finish. This is a really large surface to sand, so I pop on my earmuffs and get started because it’s just over an hour per grit!

Festool Sanding Discs

Ready to use these Festool 6″ Sanding Discs on the table!

My tools of choice are a new Festool 6″ ETS 150/3 hooked up my Festool CT 36 Dust Collector. It’s a great combination. I added the 6″ sander to my collection because it has 44% more surface are (than the 5″) and this is one large table!

I go slowly back and forth across the grain first – about 1′ every 10 seconds, overlapping each stroke about 1/3. I then go with the grain, end to end with the same motion. I use maybe 3-4 sanding discs per grit. You can see that when I go across the grain, the sander does leave stroke marks (pic below). This happened with all grits actually. You can’t see it once I went with the grain.

Festool ETS 150/3 Sanding Table Top

Note the cross-grain pattern moving the sander in that direction.

After using the 220 paper, I switch to hand-sanding. I made a small MDF block the same size as the new Festool Granat Handsanding Pads. I ran this over the table with the grain. I used 320 and then did a quick scuffing with a 400 also.

Festool Granat Hand Sanding Pad

Festool Granat Hand Sanding Pad with custom sized MDF backer

Whew, OK. Time for finish! Oh, and I did all that only on the top. The underside just got some scuffing where I wanted to smooth it, no more than 120 grit by hand. Just enough to make it smooth to the touch.

Apr 092013
 

Going back to New Hampshire next month to make another Windsor chair with Mike Dunbar. I enjoyed the trip a couple of years ago and I really like the chair I made while I was there. And since my son moved to Connecticut last fall, I can drive about two hours to his house for a visit on the way back to Atlanta.

Our Chair Class  July 2010

Our Chair Class July 2010

This time I am going to make a Philadelphia high back Windsor chair. Mike requires a sack back chair as a prerequisite to his other classes. Making the high back should be a challenge since last time the sack back took every bit of the full week we had scheduled. This time we have to get some stock and make seven spindles to specification ahead of the class. This will be my third Windsor, the last one being the child’s Windsor with Peter Galbert at a class at the High. It is still in the Store by the way — a highlight of my woodworking career. Go by and look at it next time you are at the Store. My name is on the bottom — they let me sign it.

Maloof on the left, Dunbar on the right, and (dare I say it) Chapman/Galbert in the center.

Maloof on the left, Dunbar on the right, and (dare I say it) Chapman/Galbert in the center.

Making a chair with Mike is fun. His shop is beautiful and well equipped, but I think he may have missed the classes on education technique and psychology. I say that because he has a Wall of Shame at the top front corner of the shop. If you really screw up a piece of your chair, he nails it up on the wall and puts your name on it as a warning to future students. Kinda like you might put a fake owl in your garden to keep the crows away. Course on the other hand, if you see another way to do something he is willing to listen, as evidenced by the tools you can buy on his web site which are named after the student who suggested the new method or technique. Maybe he actually did have some of those classes.

Spoke shaves are noisy, dusty and throw off lots of chips.  Safety first!!

Spoke shaves are noisy, dusty and throw off lots of chips. Safety first!!

I was watching Curtis Buchanan’s introductory video for his chair making studio and he has the most delightful illustration of what a Windsor chair seat is supposed to look like. I am a civil engineer by trade

and I have dealt with topographic contour maps my whole career. The shape of the seat of a chair is subtle and difficult and must be made by hand and if you have never seen one done right, it is not an easy task. Curtis has what is unabashedly a commercial on his web site. In fact, I laughed when he says at the beginning “This is a commercial and if you don’t want to see me sell you something, turn it off”. I like that. But anyway, he wanted a way to convey the subtle shape of the seat, so he made a seat blank of glued-up eighth inch thick plywood painted black, and then he carved the seat out of it same as he always does. The result is the edges of the plywood show up as black contour lines at a one eighth inch vertical spacing (contour interval for all you topo geeks) running all over the seat. I read it instantly and I love it. Go click on the video and look for the topo seat map at about 3:40.

Did you know the High sells many of the tools needed to make a Windsor chair by hand? Whether you need a drawknife, a froe, a scorp, a travisher, or a compass plane, the High has all of them. And if you don’t know what those things are or how to use them, go take a class whether it be from Curtis Buchanan, Peter Galbert, Mike Dunbar, Elia Bizarre or anybody else who makes a good chair. And if you don’t have time for a class,

Chair Kit -- Make your own!

Chair Kit — Make your own!

Then try the Windsor chair kit from the High and make one yourself at home. Look through the listings at all the chair tools, kits and plans we sell and pick one. You know that many say if you can make a chair, you can make anything! What kind of chair will you make?

Apr 082013
 

Lie-Nielsen makes some really sweet products, and of course I covet them. Their Router Planes are no exception: extremely high quality and well thought out.

Lie-Nielsen Router Planes

Small and Large, Open and Closed Throat Lie-Nielsen Router Planes

Router planes are in a class called “joinery planes” that help create and define joints in your woodworking projects. The router plane excels at making perfect flat-bottom grooves, dados, mortises, inlay, tenon cheeks, etc. Whenever you want a recessed area relative to a surface, the router plane’s blade helps make it perfectly flat for tight-fitting joint.

The small router plane is very straightforward – which I like. Just a flat reference surface (the bottom of the plane), a sharp blade and way to hold it in place (the adjuster screw). It’s a perfect size for small work: hinge recesses, inlay, or small work pieces or projects. It comes in two version: open throat (left) and closed throat (right).

Lie-Nielsen Small Router Planes

Open and Closed Throat Lie-Nielsen Small Router Planes

I used it to quickly create a perfectly flat bottom hinge mortise – so that my hinge will seat correctly and be flush to the stile. The blade came very sharp from Lie-Nielsen, I just polished it on an 8000 grit stone.

The open throat in theory allows you to see ahead of your work more clearly than the closed throat. However, in this small version I found it made no practical difference since you’re working in a very small area to begin with. The closed throat has the advantage of more reference surface and therefore I recommend going with that version.

It can be somewhat finicky to adjust the blade depth on the small router plane. As Lee Laird points out in his post, you can hand-tighten the adjuster screw and then use a small hammer to tap lightly into place. Or, use shims under the plane and drop the blade to the reference surface. In either case definitely make sure to tighten the adjuster screw with a screwdriver before use – I found hand-tightening alone to be insufficient to hold it in place.

The large router plane does the exact same thing as the small, but on larger work pieces and joints. It also has a few more parts to help the plane work easily including a depth adjuster and depth stop – details that just wouldn’t fit on the smaller plane.

Lie-Nielsen Large Router Plane

Details on the Lie-Nielsen Large Router Plane

The depth adjuster is very welcome after playing with the small router plane. And the depth stop is useful for working to a desired depth and keeping the setting for multiple workpieces. Of course, cleaning out a dado or groove is really straightforward with this router. But I really love cleaning up tenon cheeks with it – check out the video to see how!

The large plane also comes in a closed or open throat format.  In this case, I like the open throat since it does offer more view of the work piece and that outweighs any small gains on an increased reference surface.  The surface to the left and right of the blade is large enough and I don’t find myself typically without plenty of support for the plane.

Both of these router planes are very useful in a shop. They really do help you get tight joints that are difficult right off of machines. I typically pull them out for a few strokes after doing the bulk of wood removal with my machines – making for joints that’ll last forever.

Apr 022013
 

The last touches to the table are to smooth all the edges and corners before final sanding and finish prep. I generally like to add a 60 degree chamfer to my edges – something a little different than a typical 45. And a chamfer has a nice definition compared to a rounded-over edge.

For this table, I’m making the chamfer extremely small – just breaking the edge – about 1/8″ or so. I first define it with my marking gauge.

Layout is Key in Creating Chamfer

Using a marking gauge is the key to success on a crisp chamfer

Since it’s small, I just my Hock Tools block plane to chamfer to my layout lines. If I go over by a pass or so, it’s no big deal – taking small shavings at a time and keeping it consistently smooth along the 10′ edge is the key.

Hock Block Plane Creates a Bevel

I chamfer the top of the table with a Hock Tools block plane

The thickness of the top varies a bit due to flattening and stock removal. So, I use my marking gauge to measure a consistent distance down from the top and mark the edge. Then on the underside I chamfer to that lay-out line. Now the table looks like it’s a uniform thickness! The degree and width of the bottom bevel doesn’t matter at all – as long as I hit my layout line on the side.

Old Stanley Creates Bevel Edge

I use an old stanley plane to create a bevel on the underside edge

Finally I smooth the long edge of the table. That’s some long shaving!

Long Plane Shaving

A nice long block plane shaving from the edge of my table