Highland Staff

Aug 292013
 

The only context in which there are “good” vibrations may be in the Beach Boys’ song. For woodworkers, and in fact, tool users of any kind, there are only “bad” vibrations. Tool vibration can cause discomfort and potential long-term damage (look up Raynaud’s Phenomenon for more information). The human hand and arm is most sensitive to vibration in the 6 to 16 Hz frequency range, and workplace safety guidelines have been established as a function of vibration intensity, frequency and exposure time.

Tool vibration can be, and often is, used as a predictor of machine failure and in preventive maintenance. An example would be to measure a perfectly balanced and smooth running machine bearing on a regular basis, noting the change in vibration over time and using that measurement to predict when bearing failure will occur so as to replace the part ahead of time.

Vibration can be a source of noise, another work place exposure consideration, and the two measurements are often taken together.

Perhaps most importantly for woodworkers, vibration can be a good comparative data source to help us make well-informed purchasing decisions. The simple fact is, for any two similar pieces of equipment, the one with less vibration will usually be the heavier, better-built, smoother running, and more accurate machine.

Vibration measurement is a science well beyond the scope of this article and, frankly, my expertise. But used as a comparative tool, it can actually be fairly simple. Vibration is a measurement of distance, speed, and force of movement on three axes. In any one given axis, imagine vibration in this manner:

With your hand up in front of your face, move your hand quickly to the right. We will refer to that as positive movement, and the speed with which you move your hand is one measurement and how far you move your hand is another. Then stop moving your hand, reverse direction, and move it back to the left. In this example, that would be the negative movement, and again the speed and distance of movement would be measured. Those movements could be plotted on a graph, with the positive movement above the central line and the negative movement below the line.

Now imagine that the movements are plotted for motion in all three axes, left-to-right, up and down, and forward and back. The measurements of these motions would be an aggregate measure of vibration and would be plotted as amplitude waves, much like the waves on an oscilloscope.

The combination of all that data is usually expressed as the “root mean square velocity amplitude” or “RMS.” This is a bit of over-simplification, but for machine comparative purposes, it is really all we need to know. We know that sound pressure effects change as the frequency changes, but we are content with understanding the difference between a machine that produces 65 dB of sound and one that produces 75 dB of sound. Likewise, vibration energy changes at different frequencies, as does our response to that vibration energy, but for our purposes, it is sufficient to know that a machine producing 0.45 RMS is vibrating with significantly less force and intensity than one producing an RMS of 1.12 and that a machine producing 7.1 RMS would be considered “unacceptable” by ISO standards.

In the real world, day-to-day woodworking world, vibration measurements provided by manufacturers would give us a clear comparative between similar machines. Accessory manufacturers, such as saw blade makers, could provide us with RMS data for their blades on a specific machine type, compared to competitive blades on the same machine. Manufacturers could provide RMS data as a baseline, so that we could monitor our machine’s health and take corrective preventive maintenance steps before damage occurred to the machine. For hand-held equipment, such as sanders, saws, drills, etc., the RMS reading would allow us to gauge long-term operator comfort. I suspect if Festool made the RMS data available for their hand-held sanders, and other manufacturers did the same for their sanders, there would be little more, if any, conversation about the so-called “pricey” Festool equipment. The value and build-quality differential would be clear and unequivocal.

nickel test

Table saw manufacturers have long “wowed” us with the “nickel test.” A nickel standing on edge on a running table saw is just a way to demonstrate low vibration. Now who will be the first manufacturer to proudly (and bravely) list RMS in their machine specifications?

Aug 132013
 

OK, Luddites, how many blogs do you follow, besides this one of course? What’s a blog anyway? Blog is a contraction of “web log” and it is a way to post things on a regular basis on the internet so others can follow what you have to say or see what you are making. I just counted and I follow 19 mostly woodworking blogs. I really enjoy keeping up with other people on what kind of work they are doing and picking up suggestions on something I might want to make.

Screen Shot 2013-08-06 at 9.30.08 AM

You might well ask “BigT, with all the other work you do and the busy schedule you keep building buildings and making stuff and going to classes, how do you have time to check 19 blogs every day?” The answer is I don’t, so I use a Blog Aggregator to keep tabs on the blogs I enjoy. The particular aggregator I use is called “Shrook” and it is free and non-subscription. You can purchase a paid version which will work across all platforms and synchronize all your devices as to what you have read or not. Since I use a Mac, there may be others which are better for other machines, but I am no expert in those matters so you may have to search a little bit or ask your grandchildren. Just Google “Blog Aggregators” and a bunch will pop up.

Screen Shot 2013-08-06 at 9.35.45 AM

How do you find Blogs you like? Well, you might start with a really popular one like Lost Art Press. Then the key which you may not know is to go find the initials “RSS” usually hidden somewhere down in the bottom right corner of the page. RSS stands for “Rich Site Summary” or my preference “Really Simple Syndication”. On the Lost Art Press Blog, it is in the bottom right under “Subscribe via RSS”. Click that after you have Shrook or something like it loaded on your machine and you will get a window asking if you want to subscribe to this blog. Tell the window you do want to subscribe and it will set up your subscription for you. Add as many subscriptions as you want and then when you open Shrook, it will show you all the blog entries that are new and you haven’t read. If you aren’t subscribed to the High’s blog yet, scroll down and you can enter in your email or press this button:

Many bloggers have a blogroll over on the side of their entry to show the blogs that they follow and enjoy. If you go to Popular Woodworking’s Blog Network page you will find a list of around 40 blogs. You can pick and choose the ones you like. Click on some of those and dip in and get the flavor of a few and then subscribe if you like. Or not. Many of those will have their own blogroll and it just compounds and multiplies and pretty soon, you will not even have to time to cut the grass and your spouse will leave and your kids wil desert you and the house will start falling down around you, but as long as you have the computer running, that just means you have more time to read blogs. Enjoy!!

Aug 062013
 

134110
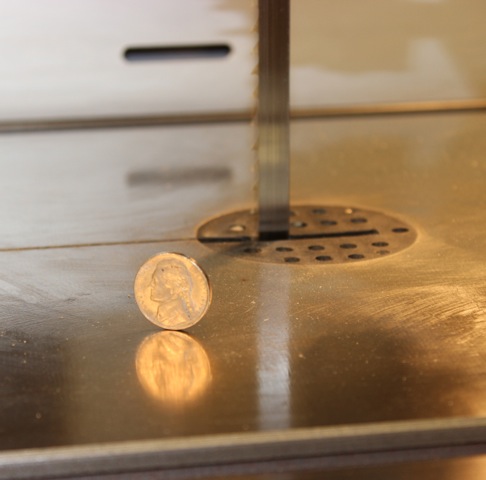
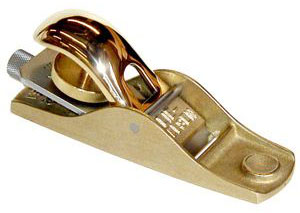
This month I’ll talk about the Lie-Nielsen Small Shoulder Plane (also known as the 041), which is the smallest of the three Shoulder Planes offered by Lie-Nielsen, based on the Record design. The 041 has a body cast from durable Ductile Iron with an adjustable mouth opening, a stylish cap made from beautiful Manganese Bronze and an A-2 tool steel blade. (Remember you can always polish the bronze cap, if you prefer to keep the brand-new bling.) The body of this plane is 5-3/4 inches long, 5/8 inch wide and weighs in at just under a pound and a half. While this design is based off of a Record, Lie-Nielsen has updated these planes for better functionality and feel.

Two of the functionality improvements include a much harder and thicker blade as well as a cap that contacts the blade much closer to the bevel. Both of these improvements work together to provide a better cut with very little, if any, chatter. The mouth geometry has also been modified to allow for better chip ejection and clearing, and the mouth adjustment is much easier. On the feel side of the equation (and actually this fits under functionality, too), the back end of the cap is raised a bit for a better grip during use.

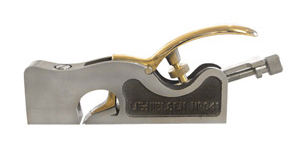
I find this style of Shoulder Plane is one of the easiest to setup, but occasionally a student will comment that they are a bit uncertain as to the adjustment procedure for the 041. I believe some of the uncertainty is likely due to the fact that while  bench and block style planes are pretty commonplace even for many non-woodworkers, the Shoulder Plane is seen with less regularity. I like to show the 041 side-by-side with the Lie-Nielsen Adjustable Mouth Block Plane (60 ½), directly comparing components and layout in order to help make it more comfortable. They immediately recognize both have a spin-wheel under their respective caps that applies downward pressure up close to the cutting edge of the blade when rotated clockwise. Both have a blade adjuster nut towards the back, that allows for precise adjustment of the blade both forward and backwards. Both planes also have a mechanism up front that allows the user to adjust the mouth opening in front of the blade. One minor difference is the 041 requires a screw driver to adjust the mouth opening, where the 60 ½ has a knob to release the mechanism and a lever that then controls the mouth. On the 041, you first need to turn the lock screw, located on the top of the body near the front end, a half turn counterclockwise to release it. Then using the adjustment screw on the front end of the body, turn it clockwise to close the mouth and counterclockwise to open. Make certain you watch the space between the blade and the mouth plate, so you don’t accidentally contact the blade, which will dull it. When you have the mouth size appropriate for the shaving thickness you intend to create, turn the lock screw a half turn clockwise, and it is ready for action. Most users are completely comfortable with this process after performing it a single time. As for the students I work with, after the quick comparison with the plane they already understand, it is as if they’ve met an old friend.

The A2 blade for the 041, which is .005” wider than the plane’s body, comes from the Toolworks with a 25 degree bevel to which I normally apply a 10 degree microbevel with my 1000/8000 grit honing stones. Many of you will recognize that is somewhat standard practice for me when setting up most planes, but the shape of this blade can cause a bit of a challenge for some. Since this blade has what I call a “neck”, which is less wide than the portion that has the bevel, I usually shift to my Kell honing guide.

041 blade sharpening Kell

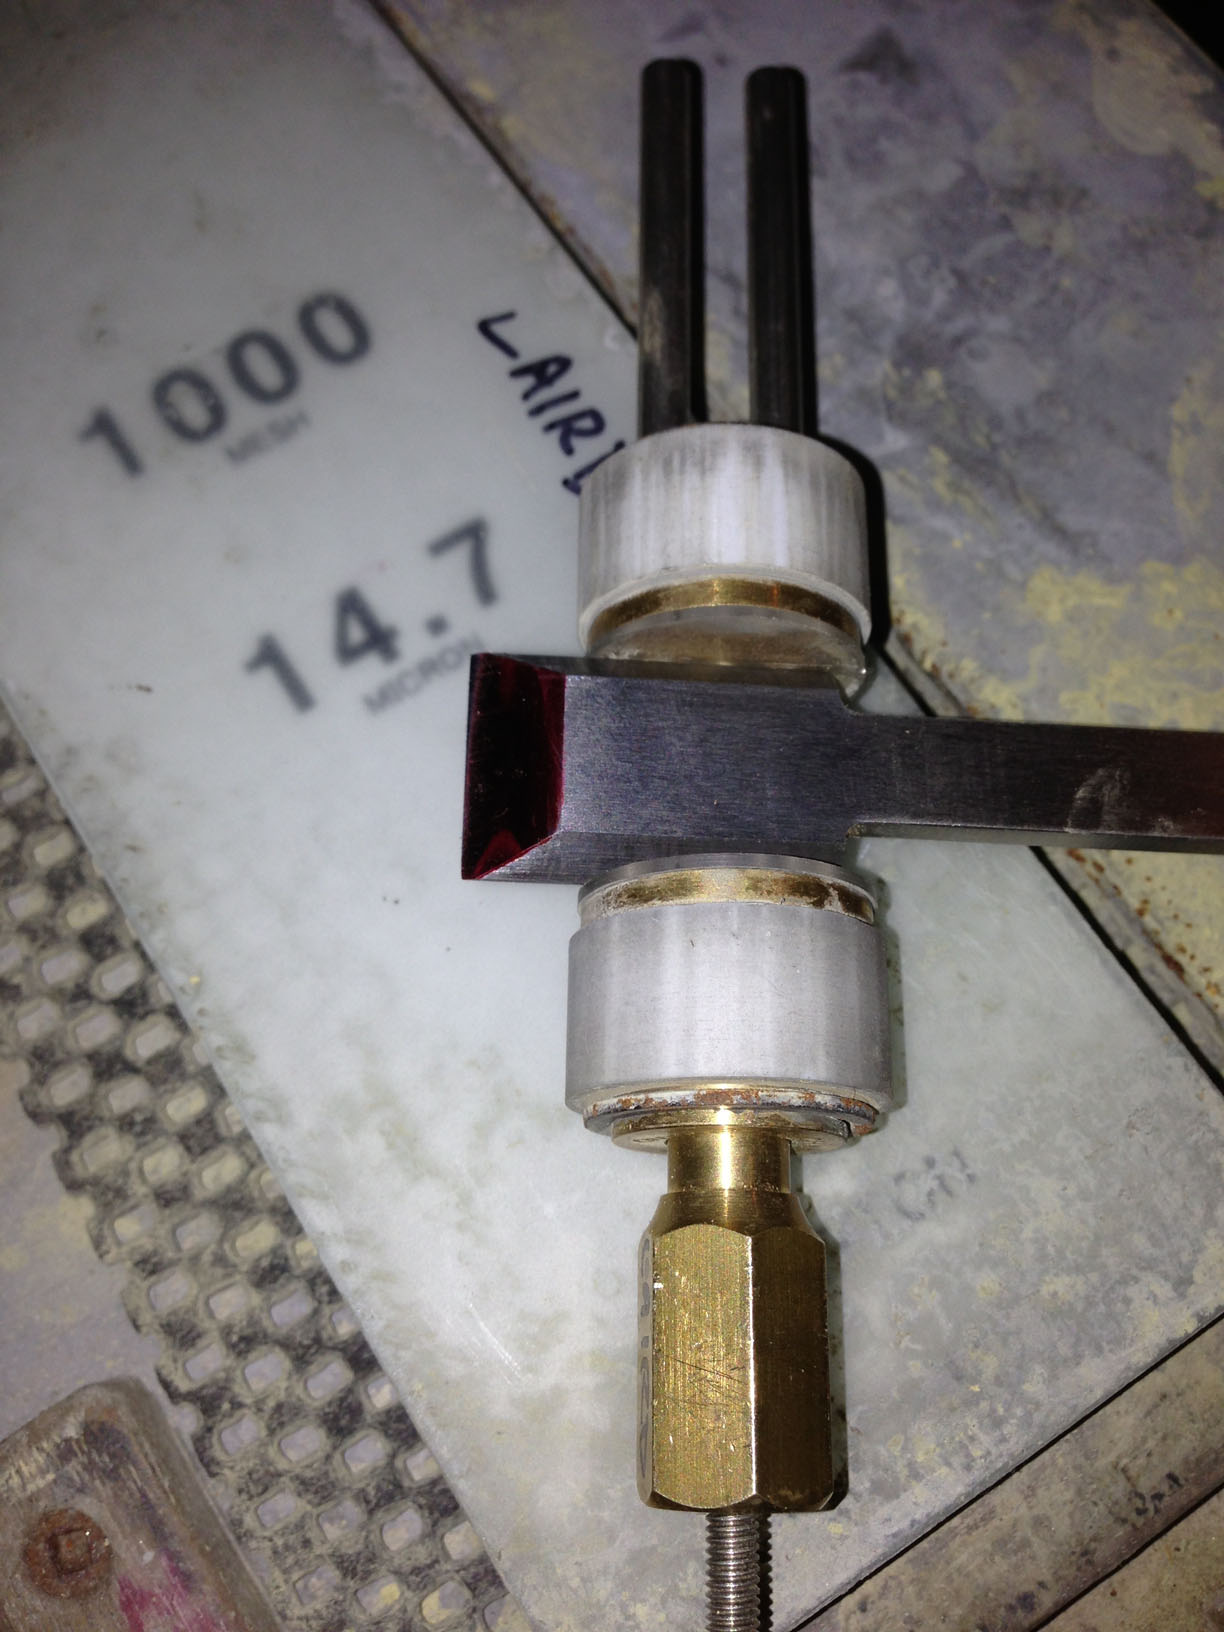
This guide excels at clamping parallel sides, and since the back of the blade sits on the two guide rods, with attentive setup there is minimal chance for the blade to rock. I mention this because the honing guide I normally use for plane blades, when using the lower contact points, can cause some blades to rock slightly depending on the dimensions of the blade being held. I certainly find it useful to have at least a couple of different styles of honing guides, as I’ve noticed most have their own “sweet spot” and operations at which they aren’t as adept.

When sharpening this blade, it is very important to retain the 90 degree reference of the cutting edge to the sides of the blade. The intent is normally to set the blade flush to whichever side you intend to use, allowing cutting up into a corner while preventing scoring beyond the edge of the body. With very little room available in which to compensate, by shifting the back of the blade over to one side or the other, a square cutting edge is usually optimum. One aspect of the sharpening process that may be overlooked by some novice woodworkers (and even some with many years under their belts), is the application of pressure applied with your fingers/hands. As an example, even with a blade firmly clamped into a honing guide, applying extra downward pressure on one side/corner of the blade will cause the sharpening media (stones/diamond plates/sandpaper) to remove more material on that side. While this technique is very useful when working to bring a blade back into square or when applying a camber, the unintentional application can certainly be detrimental. A light touch, finger positioning centralized on the blade, regular flattening of the sharpening media as well as regular practice can help to obtain and retain the original shape of the blade.

Be sure to regularly check your progress, as it is much easier to take extra strokes than to remove strokes. This is probably most important when building your chops, somewhat like learning to play the guitar, where you or your instructor closely and regularly check to make sure finger placement is good between each placement and the resultant tone is good. Start slow and check regularly and before long you’ll be playing like Les Paul in no time, er, I mean sharpening like the professionals!

As woodworkers, one of the things we usually check is the flatness of the plane’s sole. Unlike a bench plane, the 041’s mechanism that applies downward pressure to the blade to hold it securely can also slightly distort a portion of the plane’s sole. I’m sure you can imagine just how difficult it would be to make a plane take a thin shaving if it had a small bump in the sole just behind the mouth. When you reinstall the honed blade into the plane’s body, and turn the spin wheel on the cap, you can feel just when all slop disappears. This is what I call neutral tension and it is primarily useful in establishing where tension begins. As you continue to rotate the spin wheel on the cap clockwise from neutral tension, increasing the downward tension on the blade, the amount of bulge to the area of the sole below will increase. (The David Charlesworth: Furniture Making Techniques: Five Topics DVD provides step-by-step instruction on this adjustment/modification to this style shoulder plane. You know the old adage of a picture is worth a thousand words, right? Well, this video instruction is exponentially better yet, and you also get an additional four topics!)

After I reach the neutral tension position, I dial in approximately a ¼ clockwise turn as my “ready to use” position. If you plan to adjust your plane to remove the slight bulge, do so with it under consistent tension, so the sole will be flat during use. I use David Charlesworth’s idea of marking both the spin wheel and the body to create this consistency. When the spin wheel is in neutral tension, make a mark on the body and spin wheel, lined up with each other.

041 tension marks

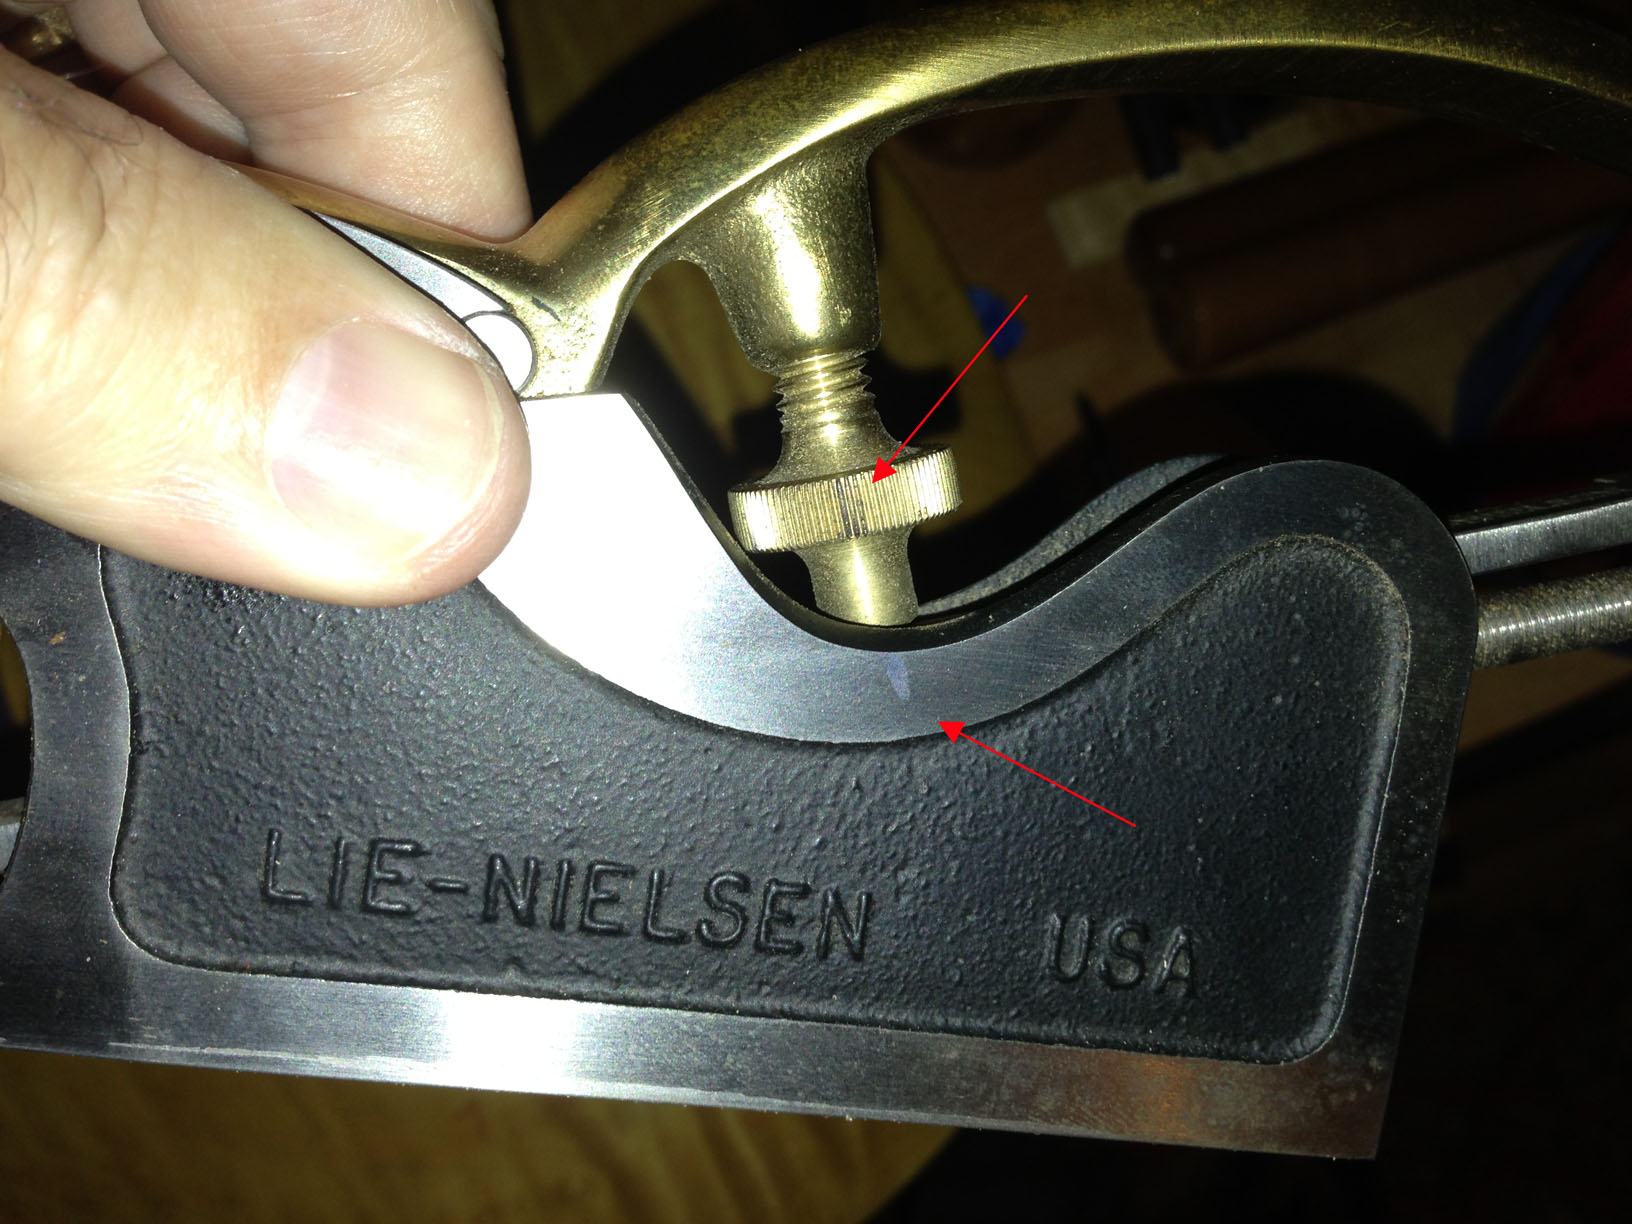
Rotate the spin wheel to the tension you wish to use, and make a second mark on the spin wheel, directly above the mark you made on the plane body. Now you have the positions for adjusting (neutral tension) and regular use. With the blade in the body, but retracted so the cutting edge is not exposed, rotate the spin wheel until you reach your ‘regular use’ tension mark. Securely attach some 600 or 800 grit sandpaper to a known flat surface, like a granite plate or a jointer bed. Apply black Sharpie to the sole of the plane on the front end, the rear and from the mouth backwards about an inch.

**CAUTION!! YOU CAN CAUSE DAMAGE TO YOUR PLANE!**

It is very, very important to apply consistent light downward pressure to the plane’s body without any rocking, while slowly moving forwards and backwards (in line with the plane’s sole, not side to side) across the sandpaper. Check the sole after every stroke or two, so you can prevent it from getting out of square. You should see the marker disappear equally across the width of the body, and may need to reapply the marker a couple of times to the front and rear before the throat area is complete. If you do not reapply the front and rear sections and continue to work, you lose the feedback it provides and you may as well just close your eyes and pray! When you have removed the marker from the throat area, you are finished. This is a one-time operation, so take your time and keep your focus. When finished, I like to apply a light coating of paste wax to the sole, removing it when it is dry. This really reduces the sliding friction during use and can last a long time.

Lie-Nielsen’s 041 is the baby brother of their Shoulder Plane family, and similar to my views on the choice of bench planes being relative to scale of operation or the size of the woodworker, the Small Shoulder Plane will be very handy for smaller scale work on tenons, rabbets, dados and more. With each side precisely 90 degrees to the sole, this style plane just may have the most precision surfaces on a single body, which facilitates excellent results. Once you have one of these planes, you’ll likely wonder why you didn’t have one before.

I hope you enjoyed the article and please let me know if you have any questions or comments.


Lee Laird has enjoyed woodworking for over 20 years. He is retired from the U.S.P.S. You can email him at lee@lie-nielsen.com or follow him on Twitter at twitter.com/is9582

Jul 162013
 
ln1

The beautiful Showroom entrance to Lie-Nielsen Toolworks in Warren, ME

This past weekend, several staff members from Highland Woodworking had the opportunity to attend the Lie-Nielsen Toolworks Open House at their factory showroom in Warren, Maine. The week prior to the Open House was dedicated to the Lie-Nielsen “dealer training”, where the expert staff at Lie-Nielsen taught attendees all about the use and creation of their heirloom quality tools. Both events were a great way to learn more about all of the Lie-Nielsen tools that we sell at Highland Woodworking, in addition to the culture and work that goes into the making of each tool.

LNfactory1sm

As you can see from this MAP of Lie-Nielsen, they fully utilized their spacious campus for the Open House, with most of the fun occurring both upstairs and downstairs in the Demonstration Building. In addition to the knowledgeable Lie-Nielsen staff showing off the use and care of all of their tools, the event also hosted 15 elite toolmakers and woodworkers from all over the world, who were there to demonstrate and share their own products and works within the hand tool realm.

Among the activities were:

A flower carving by Mary May.

A flower carving by Mary May.

cb1

Chris Becksvoort’s joinery-teaching-aid cabinet

  • Chris Becksvoort explaining his joinery-teaching-aid cabinet that shows how to deal with wood movement, a subject that is well-covered in his new Lost Art Press book “With The Grain: a Craftsman’s Guide to Understanding Wood.” (Highland will have this book in stock soon.)
toyohisa

Toyohisa Sugita with part of his jig that he invented.

  • Toyohisa Sugita of Japan demonstrating his clever magnetic jig for precise sawing of hand tool joints. (Still in prototype stage. Highland may carry this jig in the future.) His website is all in Japanese, but has a lot of great pictures of his various jigs.
kevindrake

Kevin Drake demonstrating his new line of wood turning tools.

  • Kevin Drake of Glen-Drake Toolworks demoing his new spindle turning skews as well as his unique dovetail saws, hammers and extremely popular Titemark Marking Gauge. (Highland is considering adding to our product line some of his other fine handtools as well).
  • Matt Bicksford showing off his exquisite 18th century reproduction British molding planes. His seminal book on the subject, Mouldings in Practice, was recently published by the Lost Art Press.
garrett

Garrett Hack working on his table top.

  • Garrett Hack, a furniture maker and contributor to Fine Woodworking magazine, had a demonstration bench where he was building a beautiful side table, featuring his famous inlay work.
Tom Lie-Nielsen trying out one of the bows made by a student at the Center for Furniture Craftmanship.

Tom Lie-Nielsen trying out one of the bows made by a student at the Center for Furniture Craftmanship.

  • Several instructors and students were on hand with their pieces from the Center for Furniture Craftmanship, which is located just a few miles from Lie-Nielsen Toolworks.
  • Also gracing the Open House was an exhibition of furniture entitled “Women in Woodworking” that included dramatic works by seven talented female craftsmen. Keep your eye out for a more detailed feature about this exhibition in a future entry on the Highland Woodworking blog.

CLICK HERE to visit our photo gallery from the demonstrations presented at the Lie-Nielsen Toolworks Open House.

CLICK HERE to visit our photo gallery of the Lie-Nielsen Factory Tour, showing the process of how they make their exquisite hand tools.


Jun 262013
 

I just got back from a week at John Campbell Folk School in North Carolina. I drove up about two and half hours from South Atlanta on Sunday and made it in time to register and attend the orientation. I met my classmates and the instructor and we went over to our classroom for our initial instruction before we came back to the dining hall for supper.

John C. Campbell Folk School is located in the lovely Great Smokey Mountains of western North Carolina near Murphy. It was founded in the1920’s and is still going strong with something like 800 classes taught each year. Instructors and students come from all over and live in dorms on the campus and have meals family style in the dining hall and then collect for a “Show and Tell” at the end of the week. Last week they had Marquetry, Woodturning, Woodcarving, Wool, Photography, Blacksmithing, Cooking, Native Flute, Collage, and Pottery as I recall.

Something to aspire to, but overwhelming on Day One.

Something to aspire to, but overwhelming on Day One.

I went to Campbell this time to take a course in carving the head of a carousel horse. The instructor was Ira Chaffin, who runs a sculpture studio over in Birmingham and is a skilled instructor endowed with loads of patience for a bunch of beginners. I learned that since carousels in America turn counterclockwise, the decorations are mostly on the right side of the horse to be visible to folks waiting in line. Horses are different sizes depending on the row — inside, middle, or outside, where they will travel. Outside horses are bigger since the outside row is longer.

Carving Blanks

Carving Blanks

We started the week with whatever tools we had all brought with us, along with tools furnished by the school, and Ira’s personal tools, plus band-aids all around. I personally started the week with a purist attitude about the tools. If you don’t use classic carving gouges and a wooden mallet, then you are not paying proper homage to the profession. Grinling Gibbons would have been proud. By the end of the week, if I had brought my chain saw, I would have been there with it. Anything to get the wood off and get a horse head.

Ira furnished a carving blank glued up out of two by basswood planks on which he traced a pattern. He cut the horse head on the blank which gave us a good start. After some discussion about grain and how to handle it with a chisel, we were off. One of us had no experience at all, one had lots of woodworking but little carving, and the other was in the class for the second time since she wanted to do some extra on her head. With only three students, we each had lots of instructor time.

Wednesday Morning

Wednesday Morning

The first day, we carved and carved and carved and then after that we carved some more. And after we had carved a while longer, it was time for lunch. Want to hear the cliches? “Carving is easy, go down to the skin and stop.” “I just look at the block of stone and take away everything that doesn’t belong.” Basswood is soft at the beginning of the day when the tools are sharp. As the day wears on, the tools start to lose their edge, and you get tired, then the wood gets tougher. By the end of day three, it is like carving walnut burl.

When you are just beginning, the biggest fear is carving off too much wood and getting to a place where you can’t recover. The only thing to do is to keep carving down until it gets right again and then you may only have a colt head instead of a horse head. I came up with a new invention, which I am going to try to have the High stock from now on. It answers that fear of too much removal perfectly. I call it the “WoodPutterBackerOner”. I could sell a million of ‘em. Especially at the wood carving school.

I had a great time, I got a decent horse out of it, I met some nice people and I got out of town for a week. I recommend it highly. By the way, I named mine Dan Patch after the song lyric from “The Music Man’ about trouble right here in River City “… stuck-up jockey boy sitting on Dan Patch”. You can look it up.

Class Photo Redenta, Marcie, Ira, Terry .

Class Photo
Redenta, Marcie, Ira, Terry
.

Jun 042013
 

I’ve been up north for a week working on a chair with Mike Dunbar at The Windsor Institute in Hampton, NH. I left Atlanta early on a Sunday morning and flew to Manchester, then drove about 45 miles south near the short coast line of New Hampshire. The Windsor Institute is a beautiful spot with a shop with room for 16 work stations. It is beautifully set up for making chairs and Mike, his wife Sue, and his assistant Don have this process down to a science.

Mike has a system where you must build a sack back Windsor as a prerequisite to any other chair, and then when you have built a certain number (six, I believe) of other chairs, you can obtain Royal Orders. I took sack back about three years ago so this time I was to build a Philadelphia High Back Windsor. Now usually I am pretty comfortable in a woodworking class and I can generally keep up, but when I got to this class, all but two of us had name tags beginning with “Sir”. I started to get a little worried and soon found basis for my concern. These guys were good and much experienced. I think one guy just waved his hands over the bench and the chair fell together. I never actually saw him make anything but he was always ahead of me.

Mike runs a class by making his own chair as a demo. He will perform a particular procedure on his chair and then the students try to duplicate his work on their own chair. Turns out the ratio is more than two of our hours to his one hour of work. He is so good at what he does and so efficient at it, that even this experienced bunch of chair makers had to work at it. And I was sweating it.

Steaming the Crests

Steaming the Crests

Everyone had already made the back spindles and brought them from home since there is not enough time within the class schedule for making them. We started early on by smoothing and leveling the seat blank and then having it cut out to the pattern. Next we made the the crest rail and carved the volutes on the ends and shaped the top of the rail before we stuck it in the steam box. People who have never tried steaming are always amazed to see how pliable a piece of wood can be when steamed only about twenty minutes. We pulled the crest out of the box and clamped it up in the pre-made forms and set them aside to dry for a few days while we raced ahead on the rest of the chair.

After we traced the pattern onto the seat blank, we started shaping the seat itself. This exercise started with a circular saw cut for depth and then an adze, a scorp, a handheld compass plane, a travisher (when have you ever used that word in a casual conversation?), a spoke shave, a draw knife, and lastly, a short break to get your breath back cause the room was starting to spin a little bit and we needed to open the windows to get some air.

The Master at work.

The Master at work.

One of the things which always fascinates me about chair making is the lines of sight drawn on the seat. They are taken from those ancient sea current and wave maps the Polynesians used to navigate the South Pacific to find those little tiny islands where they live. It is amazing to me how maps from the South Pacific can be used to get the angles for the legs of a chair seat. After we used the Map to drill pilot holes we reamed a tapered hole for the leg to fit it into and adjusted the angles to make the chair sit right. It turns out making a chair correctly has some of the basic principals of roadway design, as I learned in my previous life as a civil engineer. To wit: Pleasing to the eye, soothing to the bottom — applies to roads and chair seats alike. I love the shape of the seat and the way the legs project all the way through the seat and are wedged into place; and every time you sit on the seat, it tightens the connection; and the legs are held in place with only a little Elmer’s white glue and that wedge.

The Wall of Shame Seats broken, spindle cut short, seat shaped upside down.  Shame, Shame!

The Wall of Shame
Seats broken, spindle cut short, seat shaped upside down. Shame, Shame!

You better put the wedge in cross grain or your seat will end up with your name on it hung on the Wall of Shame in the corner of the shop and even your own Mother will laugh at you every time you come to visit –”Ha! Mike got you didn’t he?” I am very tempted to leave the tool marks and the Polynesian Map on my chair seat when I finish it. The seat “in the white” may be my favorite part of the chair.

The Chair Seat “In the White”

Somewhere along about the second or third day, me and the other non-Sir in the class were raised to the level of Master Chair Maker. We learned the secrets of our rank and how to recognize a fellow maker in any situation including the secret distress call reserved to chair makers. I felt very honored.

It takes a long time to tell, but as I recall, this narrative only took us to the end of the first day. We still have a long way to go, but I will continue next time.

Jun 032013
 

034205The Lie-Nielsen No. 102 is a low-angle bevel-up Block Plane, with the body available in Manganese Bronze.  The bronze body will not rust. The blade is made from A2 Tool Steel hardened to Rockwell 60-62, which holds a sharp edge for a long time. The No. 102 is 5 ¼” long and the blade is 1 ¼” wide and 1/8” thick.

The size of this block plane is one inch shorter than Lie-Nielsen’s No. 60-1/2 Adjustable Mouth Block Plane, and is a perfect fit in my hand, which could account for at least one of the reasons I reach for it so often. The No. 102 is amazingly solid and works wonderfully. I enjoy the added heft of the Manganese Bronze, as
I’ve observed that heavier planes have a much greater tendency to run on what I might call autopilot. Obviously, adding extra weight to a plane presumes the design is nicely balanced, or the additional weight could easily be counter-productive, but that is certainly not an issue on the No. 102. The extra mass helps keep the plane moving through the cut, with seemingly less effort once you get it started on its path. On planes with as small of a body as the No. 102, the added weight from the Manganese Bronze will have less of an effect than on the larger frames, but it is still an added benefit.

The low-angle Block Plane was originally designed for endgrain work, so it is no surprise that the Lie-Nielsen No. 102 is exceptional working on endgrain. To prevent accidentally chipping out or splintering the far edge of a board when working the endgrain, I always make sure to create a small chamfer on that edge. The chamfer is a very effective method to prevent these issues, without much work or loss of material. Start small, as you can always apply a bit more chamfer if you need to take more shavings, but it is hard to remove one that is too deep.

The small format of the No. 102 is also good for touching up a small isolated spot, even if the surface isn’t completely flat, as the length and width of the plane body can sometimes allow access that other planes could not reach. I even used my No. 102 on some of the outside curved edges on the Les Paul guitar I built, as some areas of those edges were endgrain, and also on the back side of the neck.

As with most bevel-up planes, the No. 102 has a great deal of flexibility relative to adjusting the cutting angle the wood will “see”. I’ll explain what I mean by providing a short example: The blade on the No. 102 comes from the Toolworks with a 25 degree bevel and is bedded at 12 degrees, which provides an effective cutting angle of 37 degrees. If you find the wood you’re working doesn’t respond well to this angle, you could apply a micro bevel from 1 degree all the way up to just shy of 53 degrees (since that added to the earlier 37 degrees would put it at 90 degrees), although I’d work my way up starting with a 10 degree microbevel and adding a slightly higher angle incrementally until I found the “sweet spot” for a specific wood. As info, this level of adjustment is not easily obtained on standard bench planes that have the blade’s bevel down. If you regularly transition between easier to work woods and woods that behave best with a higher cutting angle, it would make a great deal of sense to purchase a spare blade to leave with the higher microbevel, rather than repeatedly changing the angle from low to high and back.

There is also another replacement blade available, which is the Toothing Blade. This blade has small .030” teeth spaced .030” apart. This is very useful when working extremely figured wood that needs a decent amount removed. When dealing with wood of this type, it is extremely likely a regular blade will cause heavy tearout, if set to take even a somewhat heavy cut. With the Toothing Blade, the wood fibers aren’t allowed to work together against the blade, since each of the small teeth separate the sections from each other, ending with what looks like a lot of very small chips. The ending surface is very ridged and not at all like you might otherwise expect, but it is still very close to perfection. Reinstall a freshly sharpened regular blade and set for a very light shaving by using a thin piece of wood to verify the intended shaving thickness at each edge of the plane. Remember to trust your blade setting when you start to take passes over the toothed board, as it can seem like there is less happening initially, and a tendancy is to start advancing the blade. If you do that, you may end up overshooting and again have unintended tearout.

The Lie-Nielsen No. 102 is a great addition to any kit and I think you’ll find yourself using it perhaps even more than you might have anticipated. With the reasonable pricing for such a nice plane, you might want to get a second one for that friend that likes to borrow your tools, so yours will always be at hand.

I hope you enjoyed the article and please let me know if you have any questions or comments.


Lee Laird has enjoyed woodworking for over 20 years. He is retired from the U.S.P.S.