Highland Staff

Jul 102017
 

How do you feel when non-woodworkers call you a carpenter?

I suppose I was a woodworker in 7th grade, when I took wood shop in Mr. Boney’s South Park Junior High class, but I wasn’t very good at it. It seems I could never get anything square, or make good-looking joints. That was 1964, and I’m not even sure the term “woodworker” existed then. “Woodwork” dates to 1640-1650.

I was a framing and trim carpenter for a time after my Air Force stint. That was really fun work, and I learned a lot.

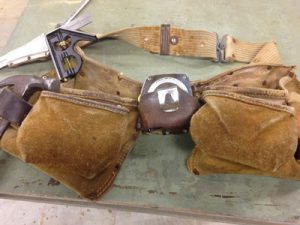
This was my very first nail apron, purchased from Sears. Our local Sears is scheduled to close its doors after 45 years in Edgewater Mall.

I remember a homeowner asking our foreman, Jack English, whether he knew any carpenters who could make her some bookshelves. One of my coworkers, older and more worldly than I, said, “What she wants is a cabinetmaker, not a carpenter.” I didn’t know that there was such a thing as a cabinetmaker, much less a difference, but I didn’t let my ignorance show, I just filed the information away for future use.

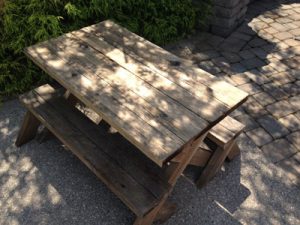
When I went to the University of Mississippi, Ole Miss, I was carrying a heavy class load, so there wasn’t time for a job, but I did spend some of my weekends making picnic tables to sell. Po’ Boy spruce studs were 10¢ each, and were straighter and had fewer barked edges than today’s studs at 33 times the price. Treated pine, with real arsenic, made a premium dining surface, unless you wanted to spring for heart cedar or redwood, and even that was affordable.

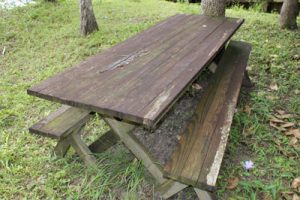
Today, 23 treated pine 2x4x8′ boards to make this picnic table and matching benches would cost you about $110.00. In the 70s, I sold the completed table with benches for about $50.

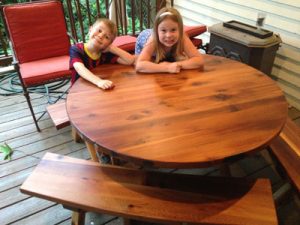
Cedar’s price has gone up a bit. When I made this rectangular heart cedar table for our eldest granddaughter, the wood cost about $200. But, it was pure heartwood, and has stood up well to brutal Kentucky summers and winters…

…The lumber for this little round job, with curved benches, on the other hand, cost around $400, and I had to do a lot of selecting to minimize sapwood use in crucial parts. Fortunately, it will live on a porch, where it will have a bit more protection from Kentucky weather, though it will still have to stand up to the two youngest grandchildren.

In the time between the end of the spring semester in Oxford, MS, and the fall start time in Auburn, AL, I needed income. I couldn’t make a long-term commitment to an auto mechanic’s job, and it didn’t occur to me to look for a nearby dairy farm, but there was a lot of home construction in Auburn, and it was easy to find a job on a home-building crew. So, for a time, I was a carpenter again.

We established in a previous poll that most woodworkers are DIYers. Therefore, we’re doing a lot of carpentry on our own homes and businesses, and maybe some for customers, too.

For me, then, I’m proud to be considered a carpenter. Still, when I think of my role as furniture-builder, I consider the difference between what my wife, Brenda, produces, which is fine art, versus what you can buy at a flea market, which are craft-level items. Not every piece of furniture I build rises to the level of art, but it’s always what I strive for.

In carpentry, on the other hand, art is not usually my goal, but I still give it my best.

Jul 092017
 

Welcome to “Tips From Sticks-In-The-Mud Woodshop.” I am a hobbyist who loves woodworking and writing for those who also love the craft. I have found some ways to accomplish tasks in the workshop that might be helpful to you, and I enjoy hearing your own problem-solving ideasPlease share them in the COMMENTS section of each tip.  If, in the process, I can also make you laugh, I have achieved 100% of my goals.

Sometimes you have a little job, but you just don’t want to do that job with a hand tool.

Take this little canoe repair. A crossmember needed a single rivet to supplement the existing rivets, but I ran out of the proper size and needed to put the canoe into storage instead of leaving it in the way until I went to the store.

Four rivets down, one to go. Darn the luck! I ran out of rivets when I originally repaired this crossmember, turning the final, single rivet installation into a separate job.

When I finally got the right fastener, I first reached for the manual rivet gun to pop it into place. Then, I remembered the pain in my arm, shoulder and neck from having hurt myself during a garage renovation project. That’s when I decided to put in a little effort now in order to achieve a long-term savings.

As you can read in my Highland Woodworking Blog post, after the injury I purchased an inexpensive, air-powered rivet tool. While it seems like overkill to pull out an air tool for one rivet, I’ve discovered that I can still aggravate that old injury with the wrong squeeze of my hand. The canoe repair was uneventful.

One of the ways I made it easy was by taking my air with me, instead of running a hose all the way to the canoe.

Enter: the portable air tank.

If your job isn’t too terribly big, you may be able to accomplish all you need to do with one good filling.

First, pump it as full as the attached gauge shows is safe. My compressor goes to 125 psi.

Fill the tank all the way, but don’t exceed the safe pressure limit.

Let your imagination fly! I finished my little riveting job in far less time than it took to set up, but, gained the two weeks that I would have been in pain. I’ve used the tank for impact wrenches and blowing small jobs that didn’t lend themselves to a brush or broom.

Of course, the original intention of an air tank purchase was to pump up flat tires, but it’s far more versatile than that!


Jim Randolph is a veterinarian in Long Beach, Mississippi. His earlier careers as lawn mower, dairy farmer, automobile mechanic, microwave communications electronics instructor and journeyman carpenter all influence his approach to woodworking. His favorite projects are furniture built for his wife, Brenda, and for their children and grandchildren. His and Brenda’s home, nicknamed Sticks-In-The-Mud, is built on pilings (sticks) near the wetlands (mud) on a bayou off Jourdan River. His shop is in the lower level of their home.Questions and comments on woodworking may be written below in the comments section. Questions about pet care should be directed to his blog on pet care, www.MyPetsDoctor.com. We regret that, because of high volume, not all inquiries can be answered personally.

Jun 282017
 

We are excited to be attending this year’s edition of the Lie-Nielsen Open House. The annual event never disappoints, with a great group of hand tool event staff showing off the latest additions to the Lie-Nielsen line. There will also be a diverse group of guest demonstrators present, showing off their wares and creations. And don’t forget to enter the Open House raffle for a chance to win one of three great prizes: a bevel edge chisel, a 102 low angle block plane or a honing guide.

The Saturday night lobster bake dinner may be sold out, but the rest of the open house is still well worth a visit. See you in Maine!

Jun 152017
 

Repair knots, cracks, bark inclusions and other defects in natural, live edge, wood tops. In this video Steve Johnson, the Down to Earth Woodworker, shows us how he fills knots and stabilizes bark inclusions with two-part epoxy… and he shows us how he messed one up and fixed his own mistake!

Jun 132017
 

Over the course of the past 36 years, Thomas Lie-Nielsen has become America’s preeminent toolmaker. His woodworking tools are highly sought-after today not only for their proven performance, but also for the superb standard of excellence incorporated in their manufacture, a quality that has been recognized by discriminating craftsmen worldwide. Highland Woodworking has taken delight in providing Lie-Nielsen Tools to our customers for almost three decades.

One does not have to be a professional craftsman to appreciate the beauty and functionality of these fine tools. Indeed, exposure to this level of quality has been an effective source of inspiration for many amateur woodworkers as they equip their workshops and refine their joinery skills.

In honor of Lie-Nielsen’s upcoming Open House celebration in Warren, Maine next month, we are sharing here our interview with Tom that first appeared in Wood News a number of years ago.

Click here to read

Click here to see Highland Woodworking’s wide selection of
Lie Nielsen Hand Tools

Jun 092017
 

In a previous article I wrote about updating a honing guide board so it would work with my new  Lie-Nielsen Honing Guide, and to make sure the angle blocks match the reality of my new tool. In this article, I’ll try to provide enough basic information so that anyone reading this can hopefully glean enough to start using the Honing Guide and the Honing Guide Board, for repeatable sharpening and honing.

First, lets talk about what all the rectangular blocks on the Honing Guide Board are for, and how it all works. On one edge you’ll see I have one block for 25-degrees, 30-degrees, and so on up to 40-degrees. These are the most commonly used angles in my shop, but there is still a block for 45-degrees on the left side, and one for 20-degrees on the back of the board. When you put a plane iron (or chisel for that matter) into a honing guide with its bevel facing down (towards the side of the honing guide that has the wheel), the cutting edge of the tool will make contact with the block for whichever angle I’ve chosen (30-degrees this time), while the front side of the honing guide is up against the front edge of the Honing Guide Board (Note: the protruding iron is also laying flat on the board between the block and the edge)

While the iron and guide are against their respective surfaces, tighten the honing guide so the iron is held securely. You have just set your iron for a specific angle. Each and every time you go through this process, as long as you have the cutting edge up against a block, the honing guide against the board’s front edge (as well as keeping the iron flat on the board), you will get repeatable results, like I mentioned earlier.

Before you let a tool touch a honing stone, make sure it is flat! An out-of-flat stone will transfer its shape to whatever you are sharpening and it is much easier and quicker to flatten the stones than to work to remove all the steel needed to get a tool back to flat.

Before I start sharpening, I put some dark Sharpie onto the bevel of the tool, just so I can confirm I’m sharpening at the correct angle.

With a splash of water on my 1000-grit stone, I set the honing guide’s wheel down onto the stone first, gently letting the iron’s cutting edge touch the stone. I set the iron/honing guide at the far end of the stone, with the iron’s cutting edge away from me. With no real downward pressure, I pull the iron/honing guide combo towards me. Just one stroke. Pick up the iron/honing guide and look at the iron’s bevel. Was the Sharpie removed from the existing micro-bevel?

If not, like you can see, take the iron/honing guide and move to the block for the next higher angle (35-degrees in this instance), slightly release the pressure on the honing guide, and then re-tighten when the cutting edge is against the block, as well as the honing guide against the front edge of the board. When I tested the setup with it set at the 35-degree block, all of the Sharpie was removed from the micro-bevel, with my one stroke test.

Since all of the Sharpie was removed, this indicates we have the correct angle to match the previous sharpening, and we can proceed to work on our 1000-grit stone and then our 8000-grit stone.

There are times when you purchase a new iron, where they may intentionally blunt the iron for safe shipping. I bring this up as some folks like to tell themselves that they should take ten strokes on the bevel, and then move to the next stone. Is this a good idea? I’ll let you decide, but I find a better method is to only shift to the next higher grit stone (1000-grit to the 8000-grit, for instance) when you can feel a burr all the way across the iron, on the back side of the bevel. To feel for this burr, hold the iron vertical with its cutting edge at the highest point, and this part is critical, you always move your finger lightly from low to high. (Note: You never want to move your finger along the cutting edge from side to side. This latter move can cut you extremely quickly.) If you do not yet feel a burr, you should go back to the 1000-grit stone and continue working until you do. Move to the 8000-grit stone when you feel a burr on the full width of the iron.

After you complete the sharpening/honing on both the 1000-grit stone and then the 8000-grit stone, the back of the iron also needs some attention. I use the David Charlesworth method called the ruler trick, where I use a very thin metal ruler laid along one edge of the 8000-grit stone.

The iron is removed from the honing guide for this, and placed so it is across the stone’s width, while resting on the ruler. Since the honing of the bevel created a small burr on the back of the iron, start with the cutting edge just hanging off of the stone, and move it straight back, so the cutting edge comes onto the stone, but no more than ¼” or so.

I repeat this process a couple of times, then shift to moving the iron up and down the stone, while the iron is still laying across the stone, and riding on the ruler. This creates a very small micro-bevel on the back of the iron, which only takes a few moments, taking the place of all the time spent honing the whole back of the iron, which literally has taken me hours.


Lee Laird has enjoyed woodworking for over 30 years. He is retired from the U.S.P.S. and worked for Lie-Nielsen Toolworks as a show staff member, demonstrating tools and training customers. You can email him at LeeLairdWoodworking@gmail.com or follow him on Twitter at twitter.com/LeeLairdWW

Jun 082017
 

In the June 2017 issue of Wood News, Forrest Bonner shares how he installed the 10 inch Eclipse Quick Release Bench Vise onto his 40 year old workbench.

When I made my workbench some 40-odd years ago, there were no readily available workbench plans as there are today. I had been reading Tage Frid and James Krenov and those books did have pictures, so I laboriously starting trying to scale a workbench based on them. It has served me well.

Click to read how Forrest improved an already great workbench with his new Eclipse Quick Release Bench Vise.