Highland Staff

Jun 052017
 

No Southern-fried Southern boy wants to be called a Yankee, but we share the characteristics of shrewdness and thrift. Thus, each month we include a money-saving tip. It’s OK if you call me “cheap.

Free stuff is everywhere! Especially on garbage day. Just this very morning I picked up some perfectly good spruce 2x4s sitting on top of someone’s garbage can.

We’ve previously discussed using carpet padding as a “router pad.” The same free pad makes a good, cheap cushion to stand on while you work. You can find it on at the curb on almost any trash day, when people change out their carpet. With a regular office stapler, you can put two (or even three) layers together for some extra padding. Why not? There is no limit, no “one to a customer,” you can take all you want.

Anything that relieves stress and fatigue will allow you to stay in the shop longer.

If you use the same material for your router pad, be sure to keep it separate, so that you don’t introduce dirt, and thus, scratches, into your work.

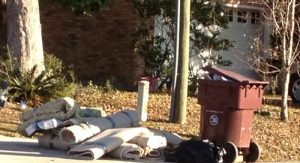
If you’re willing to swallow your pride, or get up before dawn so as not to be seen by your neighbors, there is an unlimited amount of carpet pad, free for the taking on trash pickup day.


Jim Randolph is a veterinarian in Long Beach, Mississippi. His earlier careers as lawn mower, dairy farmer, automobile mechanic, microwave communications electronics instructor and journeyman carpenter all influence his approach to woodworking. His favorite projects are furniture built for his wife, Brenda, and for their children and grandchildren. His and Brenda’s home, nicknamed Sticks-In-The-Mud, is built on pilings (sticks) near the wetlands (mud) on a bayou off Jourdan River. His shop is in the lower level of their home.Questions and comments on woodworking may be written below in the comments section. Questions about pet care should be directed to his blog on pet care, www.MyPetsDoctor.com. We regret that, because of high volume, not all inquiries can be answered personally.

Jun 022017
 

Welcome to “Tips From Sticks-In-The-Mud Woodshop.” I am a hobbyist who loves woodworking and writing for those who also love the craft. I have found some ways to accomplish tasks in the workshop that might be helpful to you, and I enjoy hearing your own problem-solving ideasPlease share them in the COMMENTS section of each tip.  If, in the process, I can also make you laugh, I have achieved 100% of my goals.

Linguists don’t agree on the exact origin of the word lag. It may have been a variation on “last,” or it may have originated from the Norwegian word lagga, meaning “go slowly.”

For woodworkers’ purposes, we mostly use the term in relation to lag bolts or screws, meaning a fastener without threads on the upper section of the shaft, which allows one or more of the fastened parts to not be constrained by that section of the shaft.

In this example, a properly-drilled hole would allow the threads of the lower part of the screw to engage wood block #3, while lagging, or slipping through blocks #1 and #2. All three blocks would be tightly bound together.

In this example, unless block #1 and block #2 are overdrilled, threads may engage block #2 and prevent a snug fit.

Here, the top piece of oak was predrilled with the same diameter pilot bit as the bottom piece, which allowed the threads to engage, holding the two pieces apart.

An alternative to using a lag fastener is to overdrill the workpiece, preventing the screw from engaging. That can be done with a drill bit of the appropriate size in a process called “lag technique.”

Even though this screw doesn’t have a lag (threadless) section, drilling a larger hole in the top piece of oak prevents thread engagement, allowing the two jointed surfaces to meet beautifully. The top piece of wood is ready for its countersink bit.

You drill a hole so that your screw can “lag” through one piece as you attach it the other. But, if you don’t have a drill bit handy or you don’t want to have to go down three flights of stairs just to make this one hole, here’s a way around that predicament:

Run a screw through the piece of wood you’re attaching. Drive it all the way in. If the wood is really soft you can often strip the threads it has created, and, voila, you have an unthreaded hole. If that doesn’t work, or if the wood is so soft that the head of the screw just continues to get deeper, reverse your drill and back the screw out.

All it took for this thin piece of oak to strip is a quick reversal of the drill-driver.

When only the tip is in the hole, continue to run the drill in reverse, but push down like you were driving the screw in. In most cases it will push right through the wood, creating the hole you seek.

Note: this is a good technique for a DIY construction project, not recommended for fine furniture!

One of the best things about a drill index is having an accurate hole to help determine which bit to use for a specific screw. If the threads engage in the index, they will engage in the wood. If the screw slides through the hole, that bit will work for lag effect.


Jim Randolph is a veterinarian in Long Beach, Mississippi. His earlier careers as lawn mower, dairy farmer, automobile mechanic, microwave communications electronics instructor and journeyman carpenter all influence his approach to woodworking. His favorite projects are furniture built for his wife, Brenda, and for their children and grandchildren. His and Brenda’s home, nicknamed Sticks-In-The-Mud, is built on pilings (sticks) near the wetlands (mud) on a bayou off Jourdan River. His shop is in the lower level of their home.Questions and comments on woodworking may be written below in the comments section. Questions about pet care should be directed to his blog on pet care, www.MyPetsDoctor.com. We regret that, because of high volume, not all inquiries can be answered personally.

May 312017
 

Jay Brown’s dad was one of the most inspirational people in his woodworking career. Starting with the ‘tater bin’ they built together when Jay was in his 20’s, the father-son team collaborated on more than one woodworking shop, including their ‘dream shop’, featured in the April issue of Wood News.

Take a closer look at the shop Jay has dedicated to his dad.

May 232017
 

In the May 2017 issue of Festool Heaven, Jim Randolph shares a quick story on how his first use of the Festool Vecturo oscillating tool helped finish a challenging job quickly and easily.

I’d had my new Festool Vecturo for only 24 hours before I had a job for it…After several hours of clerical work, I was ready for some woodworking. A DIY job would be as close as I could get. When our plumber Terry assessed a job we asked him to do at the office, his first lament was that one of the framing members for this AC air-handler platform was right in the way of reaching the bathtub faucet inside this wall.

Our answer? “We can fix that!”

Click to read how Jim used his new Festool Vecturo for a quick and easy fix.

May 182017
 

I’m building a pencil post bed for our master bedroom. The four posts, cut from curly maple, were chamfered to a tapered octagonal shape, first on the table saw and then with a 45° chamfer bit using a jig that allowed me to use a handheld router. The router created a nice rounded transition at the point where the chamfers meet the square bottoms of the posts. That would have looked fine as it was, but I decided to add a traditional bit of decorative detail in the form of lamb’s tongues. Lamb’s tongues are, in effect, stops at the end of a chamfer, followed by an ogee shape.

Completed lamb’s tongues

My bed posts are 2-3/4 X 2-3/4″ at the bottom, tapering to 1-1/2″ wide at the top. At the transition point, the chamfers are 7/8″ wide.

The transition left by the chamfer bit

I made a wooden template in the shape of an ogee based on 7/8″ intersecting arcs.

The template

I drew lines marking the location of the stops at the end of the transitions and the baselines that extended out from the edge of the chamfers, then marked the shape of the lamb’s tongue on both sides of the leg.

Marked up leg ready to cut

I found that some adaptation was needed from one chamfer to another, since the width of the chamfers sometimes varied slightly.

Once marked, I made a vertical saw cut at the stop line with a Veritas 14 ppi crosscut saw, being careful not to overcut the baselines. Then, using a Shenandoah Tool Works 1 lb. mallet and a sharp 3/4″ bench chisel, I cut away the waste between the chamfer and the stop with the chisel bevel down.

Chopping the waste from the chamfer

I smoothed the chamfer up to the stop with the chisel held flat and bevel up and followed this with a Lie-Nielsen chisel plane and a card scraper to finish the surface. The goal is to get a sharply-defined stop at the edge of the ogee.

I then cut the ogees carefully by wasting away most of the wood with the mallet and chisel, again being careful not to overcut the line.

Chopping the waste from the lamb’s tongue

I followed this with a #9 and #13 Auriou rasp, then sanded the surface to 180 grit to eliminate any marks from the rasps. The result: a nice traditional detail to dress up my bed posts.


Norm Reid is a woodworker, writer, and woodworking instructor living in the Blue Ridge Mountains with his wife, a woodshop full of power and hand tools and four cats who think they are cabinetmaker’s assistants. He is the author of the forthcoming book Choosing and Using Handplanes. He can be contacted at nreid@fcc.net.

May 162017
 

What is the Actual Effect of Woodworking on Your Brain?

by Bob Rummer


For many of us woodworking is a chosen leisure activity that we take up because it makes us “feel good.” There may be challenges, frustrations, and hard work involved but overall woodworking makes us happy. Now, I am not a psychologist, but I have read a lot of scientific literature on this topic and would like to share some general perspectives on woodworking and your mental health.

Click here to read more

May 112017
 

Do you, like me, find hand tool woodworking intriguing? Do you wonder how the old masters went about their work? Are you curious to know what lessons can be applied to today’s practices? If so, With All the Precision Possible is the book you’ve been waiting for.

Andre-Jacob Roubo, 18th century Parisian joiner, wrote many works detailing then-current and past woodworking methods and tools, including his much-celebrated and previously-translated work on marquetry. But for cabinetmakers, this tome contains the material you will most want to devour.

Click here to read more