Highland Staff

Oct 182018
 

Moxon-style vises are especially useful for raising a workpiece to a comfortable height above your workbench to help facilitate precision sawing of joinery.

In the video below, Justin Moon takes a closer look at the Acer Ferrous Toolworks Moxon Vise Kit, an affordable, all-wooden version of the Moxon Vise.

Click to find out more information about the Acer Ferrous Moxon Vise Kit, available at Highland Woodworking.

Oct 112018
 

In the October 2018 issue of Wood News, Norm Reid reviewed John Brown’s book, Welsh Stick Chairs.

This book is sure to satisfy woodworkers of all backgrounds including hand tool enthusiasts, chairmakers and history buffs. The Author, John Brown, shares the history and how-to of making Welsh Stick Chairs in this easy-to-read paperback full of woodworking inspiration.

Click here to read the rest of Norm’s review

Oct 082018
 

No Southern-fried Southern boy wants to be called a Yankee, but we share the characteristics of shrewdness and thrift. Thus, each month we include a money-saving tip. It’s OK if you call me “cheap.

Brenda wanted a jewelry display hung on the wall outside her bathroom recently. Since it was pretty heavy, we wanted to engage studs with our fasteners, if possible.

Gathering everything we would need for the task, including the stud finder, we went to work.

“Ideally, I want it here,” she said, “but, if we need to go a little one way or the other to hit a stud, I’m OK with that.”

I popped the 9- volt battery into the unit and set out in search of some solid wood.

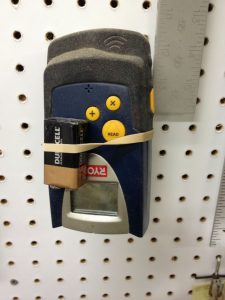
This stud finder has been in our family for a long, long time. While it’s not the modern unit that finds steel studs, electrical wiring and water pipes, it’s pretty consistent most of the time. Most. But not this day.

When the old unit kept giving me wacky, unreproducible results, I figured the finder had outlived its usefulness and needed to be replaced. A quick search on HighlandWoodworking.com showed me that Highland doesn’t stock them. I looked at a few other sources, read a bunch of reviews, and sent an email to Steve Johnson to see which one he uses. He said, “None of them work,” which meant I was going old school.

First, I measured where the framing should be, but rapping knuckles on the wall, listening for a “hollow-solid-hollow” sound told me I could forget about studs on 16″ centers. It’s a narrow wall and an HVAC plenum is behind it, which led me to believe it was built “unconventionally.” Or, maybe the “Unhandy Handyman” was here on that day of construction.

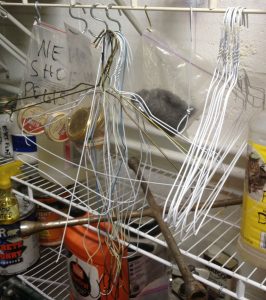
Plan C was to start drilling holes in search of studs. However, if you do this, you want your holes as inconspicuous as possible. Enter the lowly coat hanger as stud finder.

You can get at least 3 “drill bits” out of a single coat hanger, depending on what length you need.

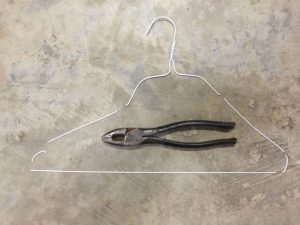
Coat hangers are soft. You can cut them with lineman’s pliers, or even the shear in your slip- joint pliers. Since I was going through 5/8″ drywall, a short piece was good. Still, you need enough length to be able to feel the difference in resistance between air and wood.

Choose your location. If you have an idea where the studs are, start as close to one edge as you can. Also crucial, if the item you’re hanging can hide the holes you make, you’ll be saving a step: no filling necessary!

Next, define the edges of the stud by feeling with your homemade drill bit. Ideally, you’d like to be exactly in the middle of the stud with your hanging screw.

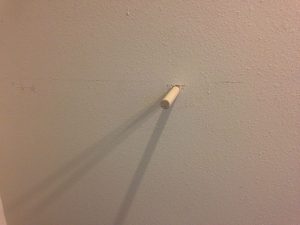
When I was in the beginning phases of hanging this floating shelf,  I needed to locate studs exactly, so that I could have our dowels perfectly centered. The stud finder got us close, and tiny coat hanger drill bits fine-tuned the edges. The little holes are hidden behind the floating shelf.

Did I mention that coat hanger drill bits are free?


Jim Randolph is a veterinarian in Long Beach, Mississippi. His earlier careers as lawn mower, dairy farmer, automobile mechanic, microwave communications electronics instructor and journeyman carpenter all influence his approach to woodworking. His favorite projects are furniture built for his wife, Brenda, and for their children and grandchildren. His and Brenda’s home, nicknamed Sticks-In-The-Mud, is built on pilings (sticks) near the wetlands (mud) on a bayou off Jourdan River. His shop is in the lower level of their home.Questions and comments on woodworking may be written below in the comments section. Questions about pet care should be directed to his blog on pet care, www.MyPetsDoctor.com. We regret that, because of high volume, not all inquiries can be answered personally.

Oct 052018
 

Welcome to “Tips From Sticks-In-The-Mud Woodshop.” I am a hobbyist who loves woodworking and writing for those who also love the craft. I have found some ways to accomplish tasks in the workshop that might be helpful to you, and I enjoy hearing your own problem-solving ideasPlease share them in the COMMENTS section of each tip.  If, in the process, I can also make you laugh, I have achieved 100% of my goals.

This was the funnest little project to make.

I got the idea from my sweet Brenda. She wanted a little carrier for some artist equipment, and she suggested making it from steel food cans. As usual, I fulfilled her request, with overkill.

Getting the cans was the easy part. I like beans. I eat all kinds of beans. Some of the beans come in big cans, some small. Maybe the best part was emptying the cans.

After running them through the dishwasher a couple of times to ensure no food particles remained, I dried them thoroughly.

Nothing ruins a metal project faster than rust, so step one was several coats of Rust-Oleum Rusty Metal Primer.

Brenda is the female version of “The Man In Black,”  and she likes her accents black, too. Therefore, the choice of colors for the project was limited. To one.

“Rickety ” and “overkill” don’t go together, so the project had to be stable. It was easy to pre-drill the top of the can into its 2×4 centerpiece, but it took a little more effort to stabilize the bottom. The top location was secured with a sheet metal screw. I measured 3-1/4″ down from the top of each can, drilled a 3/16″ hole from the outside of the can, then reinstalled all of the cans. (If you have a right-angle chuck you could do this in situ.) With a stubby pencil I marked through the holes onto the 2×4, then drilled 3/16″ holes in it, and secured 1-3/4″ bolts with a nut. For the two end cans I used a right-angle Phillips screwdriver and put sheet metal screws in both holes. Since Brenda has dainty hands, a screen door handle worked fine for carrying.

Brenda’s little artist carry-all has her fully equipped for off-site work.

That was the inspiration for my hand-sanding carry-all. The scale is bigger, so I asked the family that owns our favorite Mexican restaurant to save me some tomato cans. Otherwise, the process was about the same. The handle is from a Stihl string trimmer. I saved a handle from an old Craftsman trimmer that I liked better for eating weeds.

My hand-sanding version of the carry-all

Each can has a job. The one labelled “HDW” holds hardware: a pair of indestructible scissors for cutting used sanding disks into quadrants, a rod for lifting used sandpaper from the prongs of hand-sanding blocks, an air nozzle for blowing dust from whatever is being sanded, a pencil, and sometimes not-currently-used sanding blocks. The other cans are labelled by grit and hold a pre-loaded sanding block and a ZipLoc bag with the corresponding grit and quarter-sheets of sandpaper already cut to fit the block. The bottom of this page tells you how to get even more free sandpaper and an easy way to know which ZipLoc it goes in.

If you need some beans eaten so you can have empty cans, send them on over…


Jim Randolph is a veterinarian in Long Beach, Mississippi. His earlier careers as lawn mower, dairy farmer, automobile mechanic, microwave communications electronics instructor and journeyman carpenter all influence his approach to woodworking. His favorite projects are furniture built for his wife, Brenda, and for their children and grandchildren. His and Brenda’s home, nicknamed Sticks-In-The-Mud, is built on pilings (sticks) near the wetlands (mud) on a bayou off Jourdan River. His shop is in the lower level of their home.Questions and comments on woodworking may be written below in the comments section. Questions about pet care should be directed to his blog on pet care, www.MyPetsDoctor.com. We regret that, because of high volume, not all inquiries can be answered personally.

Oct 042018
 

I like a clean garage.  I was cleaning my garage yesterday. After two years. It’s not that it didn’t need to be cleaned before then, I just didn’t have time to get to it. My usual routine is to clean after every project, before starting another. I rarely clean while a project is in progress, no matter how long the project or how slow the progress.

These days, spending hours upon hours in the shop takes a toll. After two decades of controlling plantar fasciitis with prescription orthotics and being completely pain free, that all changed a few months ago. I’ve been visiting my podiatrist and doing the exercises he gave me, but I’m not back to where I was.

As if that weren’t enough, I’ve developed a bum left knee.

When I clean, there is a lot of walking involved, as I’ll pick up one or more items that are out of place and move it/them to the correct location. That adds up to a lot of walking in a day, even before I start the tedious task of vacuuming.

Compare that to a typical day at work. We open at 8. We close at 7. Although I spend the middle of the day running errands, eating, writing and studying, most of the rest of the day I’m on my feet. And, I rarely have significant pain at the end of a day in the clinic.

The difference? Construction, I believe. Even though our home is built on three levels and sits on pilings, the garage has a concrete slab floor.

Concrete is stable and durable, but it can be hard on the feet and legs.

The clinic, a 150-year-old former dwelling, is built like most homes of the era: wooden frame sitting on piers, about 1-1⁄2 feet off the ground with a wood floor. The amount of give this type of floor has makes, I think, a huge difference in one’s ability to be on their feet for an extended period of time.

This building may be old, but it’s very comfortable to work in. To say nothing of homey.

Of course, there are many brands and styles of pads that can be put on a concrete floor to make it kinder to one’s feet and legs.

I have also considered installing a false floor with 2 x 4 stringers and plywood for more give. However, that would be very involved.

What about you? What kind of floor does your shop have? Tell us in the comments why you like or dislike your floor.


To see more of Jim’s shop, click here to see view our September 2018 Show Us Your Workshop in Wood News Online.


Jim Randolph is a veterinarian in Long Beach, Mississippi. His earlier careers as lawn mower, dairy farmer, automobile mechanic, microwave communications electronics instructor and journeyman carpenter all influence his approach to woodworking. His favorite projects are furniture built for his wife, Brenda, and for their children and grandchildren. His and Brenda’s home, nicknamed Sticks-In-The-Mud, is built on pilings (sticks) near the wetlands (mud) on a bayou off Jourdan River. His shop is in the lower level of their home.Questions and comments on woodworking may be written below in the comments section. Questions about pet care should be directed to his blog on pet care, www.MyPetsDoctor.com. We regret that, because of high volume, not all inquiries can be answered personally.

Oct 012018
 

Congratulations to the winner of our 2018 SawStop Router Table Giveaway, Mike Ness from Riner, VA. Mike was able to choose between three different models of the SawStop Router Table, either the Standalone Router Table, the Benchtop Router Table, or the table that mounts on a pre-purchased SawStop Tablesaw.  Mike chose the Standalone model, which he says will be a great addition to his shop. Also included with his win was a SawStop Router Lift and a SawStop Downdraft Dust Collection Box.

Thank you to everyone who entered. Be sure to subscribe to our Highland Woodworking email list to receive notification of when our next contest begins!

Sep 272018
 

We Want to Feature YOU in Wood News Online!

In each issue of Wood News, our monthly online woodworking magazine, we feature our readers’ workshops, woodworking and woodcarving projects, together with a little information about their woodworking and how they got started.

We are currently looking for more of our customers to submit their workshops, woodworking and woodcarving projects to be featured in future issues of Wood News Online. We invite you to SEND US PHOTOS of your woodworking shops and projects along with captions and a brief history and description of your shop or woodworking. (Email photos at 800×600 resolution.) Receive a $50 Highland Woodworking store credit if we show your submission in a future issue of Wood News Online.

Some example of past submissions:


Phil Dail’s
Birdhouses and Tables

Meridian, MS


Jim Hall’s 18th Century Inspired Projects


Robert Sellers’
Eagle Carvings


Joseph Butler’s
Character Carvings

Sparks, NV


Bob Nisbet’s Shop
Goleta, CA


Michael Foster’s Shop
Springfield, VT

Click here to see more reader submissions, and then send in your own!