Highland Staff

Oct 122017
 

Editor’s Note: This heartfelt story was submitted by Lynda Cheldelin Fell, the wife of one of our customers. The moment we read it, we knew it needed to be shared with the rest of our woodworking community! 

In 2009, our 15-year-old daughter, Aly, a competitive swimmer and straight-A student, was tragically killed in a car accident while returning home from a swim meet.

Overcome with grief, my dear sweet husband, Jamie, buried his heartache. Managing commercial development projects, he escaped into 80-hour work weeks, more wine, more food, and less talking. His blood pressure shot up, his cholesterol went off the chart, and the perfect storm arrived on June 4, 2012.

Just minutes after we returned home from town, Jamie began drooling. A strange look came over his face. I asked if he was okay, but no words came. He couldn’t answer.

My soulmate and hero, my strong adorable, funny, brilliant partner in life, father of our children, and rock of my world was having a major stroke. At age 46, he was suddenly unable to speak, read, write, or walk. My world had come to a complete standstill.

Jamie was hospitalized for 17 days. When he finally came home, we faced an uncertain future of outpatient physical, occupational, and speech therapies to help Jamie relearn activities of daily living. Our days became filled with appointment after appointment with catnaps in between.

Little by little, Jamie’s hard work and determination paid off. He graduated from the wheelchair to a walker to a cane to solid footing. He relearned how to feed himself, bathe, pour a glass of water, and change his shirt.

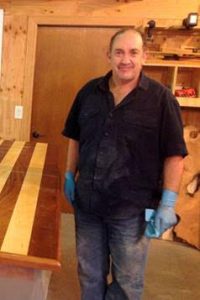
It’s been five years now since the devastating stroke that robbed us of so much. Although Jamie has regained mobility, his entire right side remains numb. The speech center in his brain, which was destroyed by the stroke, is permanently affected. But his mind remains keen, and his intelligence isn’t wasted. He keeps it active by puttering around in his workshop—a workshop that once sat neglected due to an overworked scheduled. Now with nothing but time on his hands, my dear sweet hubby turns his pain into passion by making beautiful one-of-a-kind gifts for family and friends.

Slow moving and frequent rest periods prevent Jamie from making gifts as gainful employment, but delighting others with his woodworking brings joy to his day. A natural craftsman at heart, his attention to detail is unparalleled, and it’s evident that everything he creates with his hands comes right from his heart.

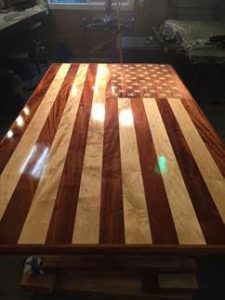
The American flag table below was a wedding gift to our niece. It took Jamie nearly a year, but his patience and determination produced a wedding gift unlike any other. A second American flag table is now underway for another newlywed niece.

Through losing our daughter and Jamie’s devastating stroke, his workshop has become a symbol of our own personal silver lining: what once sat neglected due to an overworked schedule is now a source of pride and joy—and serves as a powerful reminder that obstacles are often opportunities in disguise.

Oct 112017
 

Are you thinking of upgrading the sharpening process in your shop, but don’t want to break the bank? Consider the Tormek T-4 Sharpening System, available at Highland Woodworking.

And for a limited time, you can get the Bushcraft Limited Edition T-4, that includes a $40 Knife Jig, $20 Axe Jig and a $49 Mora Kansbol knife, all for $425 while limited supplies last (a $93 net savings!)

In the video below, Steve Johnson takes a closer look at the Tormek T-4, walking us through the new sharpening process he has adopted for his shop.

Oct 052017


In the October 2017 issue of Wood News, Jack McKee shares a wonderful design he created for a set of ‘Builder Boards’, a great tool to inspire a kid’s imagination.

Years ago, when I was working at a Montessori school, I designed a set of notched boards that kids can use to build their own playhouse, or even better, as children taught me later, to build from their own imagination. There was quite a bit of interest so I wrote up a set of plans and called them Builder Boards.

Click to read how Jack developed the design for Builder Boards and how you can create a set too!

You can also purchase Jack’s book on how to make your own set of Builder Boards.

Oct 032017
 

The dairy farm I grew up on was pretty self-sufficient.

We grew most of what we ate, from meat to grain to vegetables and, of course, milk and butter.

We grew much of what the cows ate, too.

My Uncle Sam, and his two brothers Bee and Charles, milked separately but farmed together. Their homes were within a mile of each other. Combined, their herds ran about 100 head.

There was plenty of rich, bottomland pasture to graze the cattle on grass in the spring, summer and fall. But, come winter, the only way milk production could be maintained was to supplement. That meant we spent much of the spring and summer growing corn and sorghum to turn into silage in the fall. (Uncle Sam used to love to joke that Yankees called it ensilage.)

We had two in-ground silos and three trailers to move the fresh-cut vegetation from the field to storage.

Think we bought those trailers?

Think again. Think self-sufficiency. Back in those days the only “treated lumber” was creosote-infused. Not only would creosote have been toxic to the cows, we probably couldn’t have afforded it anyway.

Thus, the wood on the trailers had to be replaced periodically. The acids and sugars in the silage took their toll. To get the lumber, the brothers would take a day off, select the best trailer, hitch it behind one of the pickups, and amble off to a sawmill in the middle Mississippi, Big Black River swamp. If I was lucky, one of my friends got to go along. On the first of these trips I made, Junior Cain, a neighbor kid from down the road came along.

We rode in the bed of the pickup. No one thought that was dangerous then, and we never got hurt. On the back roads we sat on the lowered tailgate, big clay gravel rocks banging into our feet. We thought it was great. And completely normal.

The brothers would negotiate their best price for a certain amount of wood, load it into the trailer, and back home we would go.

But, what are you going to do with two little kids while the negotiating and sawing were going on? Why, do what grownups did with kids in those days: cut them loose to their own devices.

And, by “devices,” I don’t mean iPads.

The swamp sawmills had massive six-foot diameter circular saw blades and conveyor belts that piled the sawdust into mountains. And, what kid doesn’t like to climb a mountain?

Junior and I climbed to the top, rolled to the bottom and repeated dozens of times. We had sawdust chips in body parts where the sun didn’t shine. We were a mess, but the grownups didn’t care. We were in the bed of the truck, remember?

All that fun was a fond memory until, a couple of days later, I began to scratch. I was itchy on my head. I was itchy on my toes. And, I was itchy everywhere in between.

Everywhere.

Imagine the embarrassment of a just-prepubescent boy having his Aunt Polly put calamine lotion on every part of his body.

All that swamp sawmill lumber had been gift-wrapped in poison oak, poison ivy, poison sumac, and maybe some poisonous plants that hadn’t been named yet. Everything went into the sawdust, of course. And inside our clothes and shoes.

However, an interesting thing happened. I became hyposensitized to all those plants. I could go into the backyard right now, pull poison ivy off the trees with my bare hands and never react.

There’s another thing I remember about that sawmill lumber. It was hard! Even in later years, when I had good coordination and experience driving nails, I would still bend half of the spikes I hammered. I never knew what species went into those trailers, but I’m guessing the sawyers cut whatever got in their way: oak, hickory, cypress.

Whatever it was, it was sturdy, and lasted for years, even under the heavy use of farm life.

What would we furniture builders give to have some of that wide, old-growth lumber today?


Jim Randolph is a veterinarian in Long Beach, Mississippi. His earlier careers as lawn mower, dairy farmer, automobile mechanic, microwave communications electronics instructor and journeyman carpenter all influence his approach to woodworking. His favorite projects are furniture built for his wife, Brenda, and for their children and grandchildren. His and Brenda’s home, nicknamed Sticks-In-The-Mud, is built on pilings (sticks) near the wetlands (mud) on a bayou off Jourdan River. His shop is in the lower level of their home.Questions and comments on woodworking may be written below in the comments section. Questions about pet care should be directed to his blog on pet care, www.MyPetsDoctor.com. We regret that, because of high volume, not all inquiries can be answered personally.

Oct 022017
 

No Southern-fried Southern boy wants to be called a Yankee, but we share the characteristics of shrewdness and thrift. Thus, each month we include a money-saving tip. It’s OK if you call me “cheap.

Years ago a painter gave me some really good advice. We were discussing cleaning paint brushes and I asked him about water temperature. His advice was, “warm is fine, but never let hot water hit the bristles.” I have been amazed ever since at the difference it makes using warm water to clean brushes, compared to cold water. A gentle stroking with a hand scrubber is good for persistent, dried paint.

Stubborn, dried paint comes off easily with soap, warm water, and a few strokes of a semi-stiff brush, but always go with the bristles.

Another tip: Make that final rinse with an outdoor garden hose. It will blast away any remaining soap.

If you have used an oil-based finish, and have cleaned the brush in solvent, wash it at least two more times with soap and warm water. Alan Noel says “lather it up, rinse and repeat until the lather is absolutely snow white.”

Then hit it with the hose, always in the direction of the bristles, never against them. I like to use the highest volume setting on the wand head. On the wand pictured, that’s shown as “bucket filler.” That setting provides a lot of water without the blasting action of one of the jet settings.

This wand’s maximum volume setting is called “bucket filler.” A jet-like setting will provide more force, but you want a lot of water flow to wash the soap away and still be gentle.

After your last rinse, slap the brush against your fanned-open fingers to dislodge as much remaining water as possible.

Spread your fingers as far as you can, then slap the brush back and forth, removing as much water as possible. Afterward, gently shape the bristles again.

Brush manufacturers advise us to save the packaging our fine brushes come in. Storing them in the original packaging helps them retain their proper shape and keeps the edge bristles from developing “flyaway hair.” Heaven forbid!

Original packaging will always be a perfect fit for storing good paint brushes.

To make their storage a little tighter and enforce the shape, I first wrap a little used paper towel around the brush. It helps with absorption and drying, also.

If you don’t have the original package, wrap the paper towel around, then keep the towel closed with painter’s tape. Always store brushes vertically, business end down. Standing a brush on its head sends water into the ferrule, where it will eventually cause corrosion and brush failure.

This older brush still needs help keeping its shape, but it didn’t come in a nice package. We’ve supplemented its support with some paper towel and blue tape


Jim Randolph is a veterinarian in Long Beach, Mississippi. His earlier careers as lawn mower, dairy farmer, automobile mechanic, microwave communications electronics instructor and journeyman carpenter all influence his approach to woodworking. His favorite projects are furniture built for his wife, Brenda, and for their children and grandchildren. His and Brenda’s home, nicknamed Sticks-In-The-Mud, is built on pilings (sticks) near the wetlands (mud) on a bayou off Jourdan River. His shop is in the lower level of their home.Questions and comments on woodworking may be written below in the comments section. Questions about pet care should be directed to his blog on pet care, www.MyPetsDoctor.com. We regret that, because of high volume, not all inquiries can be answered personally.

Oct 012017
 

Welcome to “Tips From Sticks-In-The-Mud Woodshop.” I am a hobbyist who loves woodworking and writing for those who also love the craft. I have found some ways to accomplish tasks in the workshop that might be helpful to you, and I enjoy hearing your own problem-solving ideasPlease share them in the COMMENTS section of each tip.  If, in the process, I can also make you laugh, I have achieved 100% of my goals.

When you open a can of paint there is always paint on the lid. Some of that paint is usable. If you wash the lid of your paint can each time you open it, all of the paint will be usable.

And, I mean, wash it thoroughly. Doing so will allow you to use it as a palette, which is especially useful for small projects.

I put an entire coat on this stool with just the paint inside the lid.

And for tightwads like me, who cannot stand to allow anything to go to waste, it’s a good feeling, like putting a little money in the bank.

If you use all of the paint on the lid and have more painting to do, give the lid a quick rinse or immerse it in water to prevent the paint from drying before you get to cleaning it.

Wash the lid when you wash your brush. Take Steve Johnson’s advice and don’t use the kitchen sink for washing brushes! When you’re ready for definitive cleaning, scrub that baby with a stiff brush and soap. Tap it back onto the can firmly. Speaking of which, cleaning the lid will make it easier to remove next time!


Jim Randolph is a veterinarian in Long Beach, Mississippi. His earlier careers as lawn mower, dairy farmer, automobile mechanic, microwave communications electronics instructor and journeyman carpenter all influence his approach to woodworking. His favorite projects are furniture built for his wife, Brenda, and for their children and grandchildren. His and Brenda’s home, nicknamed Sticks-In-The-Mud, is built on pilings (sticks) near the wetlands (mud) on a bayou off Jourdan River. His shop is in the lower level of their home.Questions and comments on woodworking may be written below in the comments section. Questions about pet care should be directed to his blog on pet care, www.MyPetsDoctor.com. We regret that, because of high volume, not all inquiries can be answered personally.

Sep 252017
 

To help us remember the dizzying array of Festool Abrasives, Steven Johnson has given us a mnemonics lesson using word association. Click here to watch the video he made.

The Merriam-Webster dictionary defines “mnemonic” as (noun) “assisting or intended to assist memory.” As an example, they give, “To distinguish “principal” from “principle” use the mnemonic aid “the principal is your pal.”’

I used it just the other day. I wanted to order some paper for my new Festool RO-90 that switches from delta sander to 90mm round random orbit sander, and Rubin2 was the first example that popped up in the 120 grit I wanted. I thought about Steve’s video for a minute, and said, “No, what I want is ‘general, gray,’” which helped me remember it was Granat that I needed, not Rubin2. A couple more clicks on HighlandWoodworking.com and I was on the right paper.

With that in mind, I asked Steve if I could publish a written form of his memory tool that you and I could print out and nail to our shop walls, or laminate and store with our sandpaper supplies. He said OK, so here it is.

Granat: “General-gray-blue color.” Steve says if you can buy only one Festool abrasive, Granat may be your go-to general sandpaper. It’s good on bare wood and finished wood and is supplied in extra-coarse to extremely fine (40 to 1500).

Rubin2: “Raw wood, russet potato red.” It has a special coating that sheds raw wood fibers. It is available from coarse to extra fine (40-220).

Brilliant2: “Between finish coats, beige.” Anti-static coating that works well sanding paints, fillers, varnishes, lacquers, shellac even water-based finishes. Its surface won’t load up or “corn” as some papers do with finish materials. Coarse to fine (40-180).

Vlies (pronounced like “fleece”): “Clean, scour, scuff and polish.” Steve says it’s thick, like a pot-scrubbing pad. Good for applying paste wax on equipment. Clean, scour, scuff, sand, polish, smooth out irregular surfaces. It doesn’t have dust extractor holes, but dust goes right through it. Grits are A100 to A800, polishing green and fine polishing white.

Saphir: “Shaping or stripping.” Aggressive, super-coarse to coarse grits. Removes a lot of material quickly. Grits 24-80.

Platin2: “Premium polishing pad.” Foam-backed for high gloss finishes, pumice and rottenstone. Used extensively in the auto industry, but Steve has used it on an ebony project. Grits range from S400 to S4000.

Titan2: “Tucks in” to curves and contours. Solid surfaces, couple with super-flexible latex backer. Steve says use it t polish your Bentley.

Find out more and purchase Festool Abrasives at Highland Woodworking!


Jim Randolph is a veterinarian in Long Beach, Mississippi. His earlier careers as lawn mower, dairy farmer, automobile mechanic, microwave communications electronics instructor and journeyman carpenter all influence his approach to woodworking. His favorite projects are furniture built for his wife, Brenda, and for their children and grandchildren. His and Brenda’s home, nicknamed Sticks-In-The-Mud, is built on pilings (sticks) near the wetlands (mud) on a bayou off Jourdan River. His shop is in the lower level of their home.Questions and comments on woodworking may be written below in the comments section. Questions about pet care should be directed to his blog on pet care, www.MyPetsDoctor.com. We regret that, because of high volume, not all inquiries can be answered personally.