Highland Staff

Aug 032018
 

No Southern-fried Southern boy wants to be called a Yankee, but we share the characteristics of shrewdness and thrift. Thus, each month we include a money-saving tip. It’s OK if you call me “cheap.

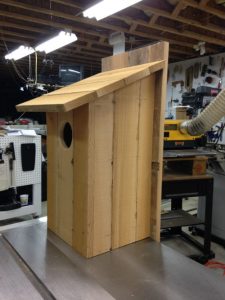
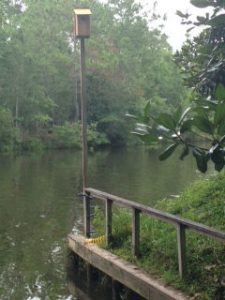
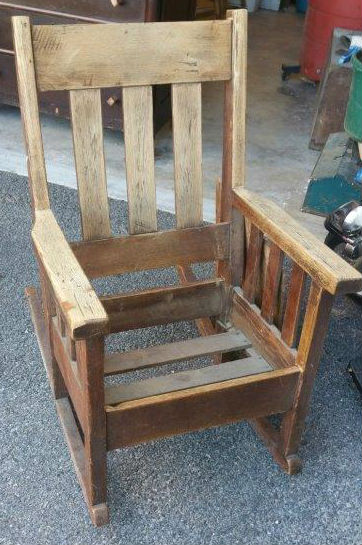
It’s all well and good to make nest boxes for cavity-nesting birds to raise young in, but, we frugal woodworkers don’t want to break the bank doing it.

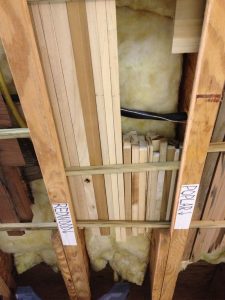
“Used” treated lumber is plentiful, fences fall down every day. But experts recommend that chemicals and paint be avoided in nest boxes. You won’t find much used cedar and redwood lying around. However, if you’re willing to work a little, you can make usable wood out of what you have, or what you find. The key is being able to remove the metal and rot.

Because the cedar I was working with had been construction lumber, it was chock full of staples and nails.

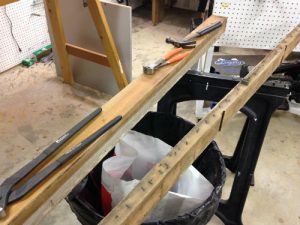
Step One was to set up some horses and an assembly line of disassembly.

First, I took out the obvious metal. A tiny screwdriver is good for getting under the staples with minimal marring of the wood. Tip: lift one side of the staple, then use pliers to remove the other side; it will be more likely to come out in one piece. The good news about staples is they don’t do much damage to power tool blades if you miss one.

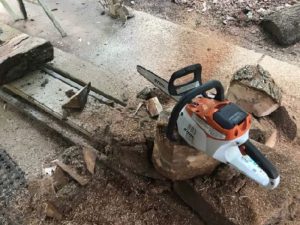
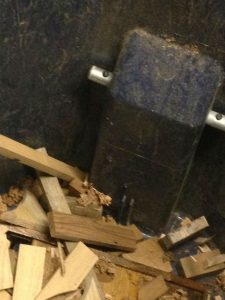
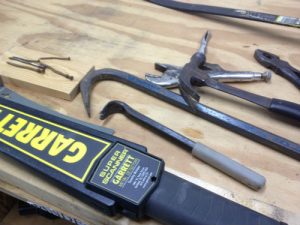
Step Two is to find the major metal. I don’t think you can do this part without a metal detector. Well, you could, but you’d have a big pile of cedar sawdust when you finished.

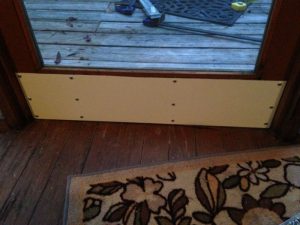
Fortunately, all I had to remove was toenails in the two ends and nails for the framing member that helped to support the screen, but the nails seemed to go in every direction. Once they were localized with the scanner, I made my best guess about where they ended and carefully made a square cut. I didn’t want to lose any material by unnecessary squaring later. But! I didn’t use the miter saw for that step. Rather, I marked lines all the way around the board and used a metal-cutting blade in the sabre saw. It’s a good thing, too, because I was off by about 1/2″, and an expensive blade could have been wasted.

I cut this where I hoped the nails ended, trying to save as much cedar as I could. Oops!

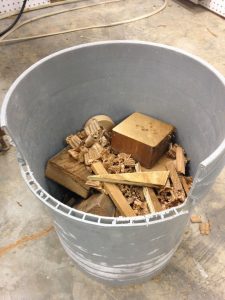
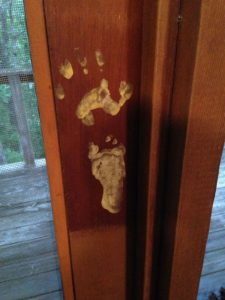
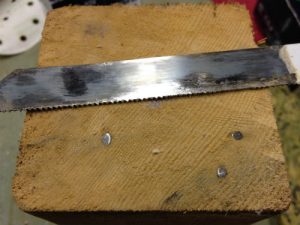
Now I had these little pieces to dig out. First, you need access. Remove some wood all around each nail. Over time, I’ve done that with a Dremel bur, an old, beat-up chisel, a pocket knife and even diagonal-cutting pliers (dikes). Access allows you to get a grip on the nail. In this case, I knew the fragments were short and wouldn’t provide much resistance to being pulled. They came out easily.

Dikes allowed me to nibble away a little wood around each nail fragment, then pull the piece easily.

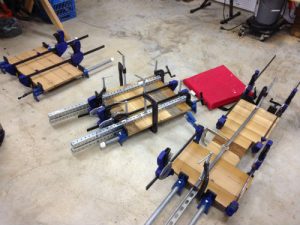
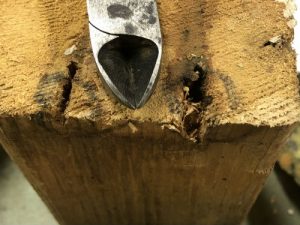
The long fragments weren’t too hard, either, as I was able to use a punch to make them back up enough that the heads protruded from the surface of the 4 x 4. You can see the two pairs of end cutters I use in the first photo. The finesse goal with end “cutters” is not to cut, but to grip firmly enough that they don’t slip, and pull the nail out with a rocking, lever motion.


Jim Randolph is a veterinarian in Long Beach, Mississippi. His earlier careers as lawn mower, dairy farmer, automobile mechanic, microwave communications electronics instructor and journeyman carpenter all influence his approach to woodworking. His favorite projects are furniture built for his wife, Brenda, and for their children and grandchildren. His and Brenda’s home, nicknamed Sticks-In-The-Mud, is built on pilings (sticks) near the wetlands (mud) on a bayou off Jourdan River. His shop is in the lower level of their home.Questions and comments on woodworking may be written below in the comments section. Questions about pet care should be directed to his blog on pet care, www.MyPetsDoctor.com. We regret that, because of high volume, not all inquiries can be answered personally.

Aug 022018
 

Welcome to “Tips From Sticks-In-The-Mud Woodshop.” I am a hobbyist who loves woodworking and writing for those who also love the craft. I have found some ways to accomplish tasks in the workshop that might be helpful to you, and I enjoy hearing your own problem-solving ideasPlease share them in the COMMENTS section of each tip.  If, in the process, I can also make you laugh, I have achieved 100% of my goals.

Regular readers know that cedar is my favorite wood to work. Redwood is a very close second.

A while back one of my birding friends posted photos of a screech owl who had occupied the nest box he’d just put up in his backyard. It was the cutest thing you ever saw, the adult owl’s round face perfectly fitting the round opening. Brenda immediately said, “I want one.”

I did, too. However, there is a complicating factor in our yard, which is that the yard is full of trees, and our trees are full of squirrels.

If you have squirrels, or you know anything about squirrels, you know that they are incredibly destructive. Put a nest box anywhere a squirrel can get to it, and it’s probably toast.

Oh, they will nest in it. all right. But, like the rats they are, they will trash the very place they live. The first thing they will do is chew the 3″ opening larger. Not that they need it larger; they can fit through a hole 1″ in diameter. No, they just do it because they’re rats.

Experts recommend that there be no trees within 20 feet of the box. Our yard looks like a tree farm.

For a couple of years, I told Brenda that it was just out of the question for us to raise baby birds in a box, until, one day, I saw the place where I thought it might work. If I mounted a box on top of a 20 foot 2 x 4, then attached it to the handrail at the end of the boat ramp, we might have a shot. I’d still have to put a metal predator guard on the post, but it just might work.

No time was wasted, because I’d already scoped out plans at the Cornell and Audubon web sites. Now, I just needed some wood.

A while back we had to replace some rotted cedar on a screened area we call our cedar deck. It’s framed in cedar and I made a cedar picnic table for it. As you might imagine, I didn’t throw any of it away, just in case.

To make the most of it, I planned ahead. I wanted 3/4″ material and the plans specify the dimensions of each panel. You’d never do this in furniture building, but I cut my materials to length before I resawed. I had 4 x 4s that would yield three pieces each with a sliver left over, and 2 x 4s that would make two boards when sawn in half. If you’re thinking I saved the sliver, you’re getting ahead of me.

It can be a challenge to glue up a panel and get all of the edges square right off the bat (which is why you don’t normally cut your pieces to length in advance). But, when you commit to a length, you have to make it happen. If your edges are already square, it’s not too hard if you’re gluing on a flat surface. I’m addicted to crutches, so I used some old biscuits I had left over before I bought the Festool Domino 500, and no one wants to buy my DeWalt biscuit jointer, so I figured this was a good opportunity to cut into my supply. After the glue is applied, squeeze the panels together and place the edges onto the flat worktop. If everything lines up, your panel’s edges will be aligned in the final project. You might sacrifice perfection because you gave up the opportunity to trim to final length, but you saved a limited resource in the process.

Knowing the exact dimensions you need in advance, and being tolerant of slight imperfections means the wastefulness of “cut long and trim later” is avoided. This technique might not work in fine furniture, but a screech owl occupant won’t complain.

I’m keeping the budget as tight as possible. I had some Titebond III that coagulated, but I skimmed the cured layer off the top and went right on. The triangular cutoffs from the sides that gave the roof its slope included glue joints. I abused the cutoffs, and the wood broke; the glue joints didn’t.

I thought the final box turned out pretty nice. A drainage dado that had been in a floor plate shows in an edge board. I filled the defect with epoxy dough.

Winter, 2019, we’re hoping for a screech owl pair to take up residence and raise babies. Sorry, there won’t be a web cam.


Jim Randolph is a veterinarian in Long Beach, Mississippi. His earlier careers as lawn mower, dairy farmer, automobile mechanic, microwave communications electronics instructor and journeyman carpenter all influence his approach to woodworking. His favorite projects are furniture built for his wife, Brenda, and for their children and grandchildren. His and Brenda’s home, nicknamed Sticks-In-The-Mud, is built on pilings (sticks) near the wetlands (mud) on a bayou off Jourdan River. His shop is in the lower level of their home.Questions and comments on woodworking may be written below in the comments section. Questions about pet care should be directed to his blog on pet care, www.MyPetsDoctor.com. We regret that, because of high volume, not all inquiries can be answered personally.

Jul 242018
 

In the July issue of The Highland Woodturner, Justin Moon takes a tour of the OneWay Wolverine Grinding Jig and demonstrates setup and use of this useful tool. Sharpen your turning tools accurately and repeatably with the OneWay Wolverine Grinding Jig.

Jul 192018
 

Well, I suppose it had to happen sooner or later. We all get older if we are lucky, so a couple of months ago, I went to the local Lawn Supply and bought a battery powered chain saw.

I had begun to find myself putting things off because I didn’t want to have to try to start the gas powered saw and I was starting to get really irritated with the whole thing.

When I went to buy the battery operated saw, they asked me for my “Man” card. I had to turn in the card before they would let me buy the saw. Nonetheless I persevered and went ahead with the purchase and I am here to tell you my new saw works like a champ. I make a lot of bowls from found wood and a chain saw comes in very handy for that sort of work. I use the saw to score the end grain of a round log and then take my iron wedges and the “sludge” hammer and bust the round into two halves. It is quick and easy and gives a good flat split. After that I mark out a bowl shape on one of the halves with a circle template and a carpenter’s pencil. I use the saw to trim the corners and then nudge it towards roundness by smoothing off the edges until it will fit on the lathe, and I am off to the races.

People ask how long a battery powered saw will last and if it will do the job. The answer is if you cut pulpwood for a living, you don’t need or want one of these. If you make bowls and trim a few limbs around the house, then it works just fine. You can even use it inside the shop since there is no exhaust to suffocate you. As to how long it will run, with a full charge it will run longer than I usually feel like driving it. Isn’t that what it is about?

The real joy is being able to pick it up and simply pull the trigger and go to work. The noise is less, it cuts everything I need to cut and it runs as long as I do. Then it will recharge completely in about 30 minutes. With the blade kept sharp, it cuts beautifully as long as you are not trying to cut a six foot redwood. Like any other chainsaw, you must provide oil for the blade.

Wonder if I can shape enough bowls to get my “Man” card back?

Jul 172018
 

In the latest issue of Wood News Online, Marshall Knox shares his method for restoring a rocking chair for a client whose Grandfather had built the chair. Marshall discusses his process for fixing the joints in the chair and applying a new finish.

Click here to read more!

Jul 112018
 

Shop time is precious. However, so is Mother Earth. We have only one, and we have only one lifetime to treat her right, both for our own good and those who will occupy her in the future.

Think “children” and “grandchildren.” Therefore, it’s worth the time to make a few extra steps across the shop each day to recycle.

These recycling bins are but a short walk across the garage from where most of my work is done. We also keep a bin in the laundry room, upstairs, and a big bin at work. Those who inherit the earth from us will appreciate that they don’t have to live in landfills.

Aluminum is the most valued recyclable, with more than two-thirds of all of the aluminum ever made still in use. If you’re sipping on a Coca Cola right now, rinse that can and drop it into the bin when you’re finished. Other scraps of aluminum you might produce in your work can also be recycled curbside, so keep your mind open to cutoffs and other sources.

Paper is a big recyclable item, and woodworking shops produce a good bit of it. Think packaging, plans, notebooks and mail. When I have scrap paper I may take a momentary break to walk across the room to recycle, or I may conserve my energy by making a pile until it gets in my way.

Steel is one of the most-recycled items in America, but more of it is recycled industrially than personally. That’s too bad, because we use and discard a lot of it. However, as easy as it is to recycle a steel English pea can curbside, other steel items might have to be stockpiled and delivered to a metal recycling center. I am fortunate to have one nearby, and I can store steel and large-format aluminum in my garage at work until I have a load to deliver.

If you prefer to be paid for your aluminum cans, you can save them and sell them at the metal recycling center, too. However, keep in mind that such high-profit items help your local government keep curbside recycling available to everyone.

I’ve never understood the attraction of bottled water, especially little 4- and 8-ounce bottles that are so inefficient. I prefer tap water, which is nearly free. However, America loves them, as evidenced by the “bottle mountains” I see in recycling bins every Friday. Sadly, when I pick up litter on my early-morning walk, I often see them in garbage cans I drop that trash into along the way. Plastic recycling is quite efficient, and the bigger your municipality, the more likely you are to be able to recycle even unusually-symboled plastic beyond common polyethylene terephthalate (PET).

Wood scraps recycle, too. We have friends who use woodburning stoves and heaters, so I keep a 5-gallon bucket handy to drop in all sizes of cutoffs. When the bucket is full …

After one of many waste-company changes in our city, we ended up with a never-used rolling garbage cart. The company didn’t want it back, so I use it to store wood scraps until someone needs them for their woodburning stove.

The “3Rs” are reduce, reuse and recycle. They are listed in order of value. First, buy less and use less. Second, reuse what doesn’t have to be thrown away. Third, recycle where you can. Recycling can also include using cutoffs and “waste” in another project. Think of this as a ceiling recycle bin.

May I encourage you to find a corner of your shop where you can reduce landfill waste by saving your recyclables for the weekly pickup?

Jul 102018
 

No Southern-fried Southern boy wants to be called a Yankee, but we share the characteristics of shrewdness and thrift. Thus, each month we include a money-saving tip. It’s OK if you call me “cheap.

“Cheap” doesn’t have to mean inferior materials. I found some discarded sign material, aluminum with a rubber sandwich filling, and I knew it would be valuable someday. I just had to hang on to it long enough. And store it long enough. It was thin, flat and lightweight, so it lay under my boat, and has been waiting for it’s moment to be used.

Meanwhile, I’ve been watching the wood on the bottom of the door of our cedar deck deteriorate for a few years. The door is irreplaceable because of an imprint.

Our first granddaughter was only a month old when her mother, Regina, got the idea to make a terrific Father’s Day present for me: a tie with her hand and footprints on it.

As some of you know, my favorite saying in the world is, “Timing Is Everything.” This process started with timing.

Controlling where an infant puts her hands and feet is considerably easier when that infant is asleep, or nearly so.

Regina and Brenda conspired to have everything ready so that they could pounce when the baby was well into her nap.

What better present for a grandfather than a tie made from his only grandchild’s feet and hands?

Making the tie went so well that Brenda decided, on the way to the bathinette, the excess paint could be put to good use by planting toes and fingers on the door stile.

Now, I’m a grandpa, and, even though our first granddaughter hadn’t been on the ground quite a month yet, I was thoroughly head-over-heels in love with her.

However, when I saw those pastels on that perfect cedar door, Brenda said my eyes flashed for a moment. Soon, however, I was OK again and I’ve cherished those little manos and pies ever since.

When Brenda first got the idea to “paint” on this door, I was a little upset. But, what grandparent hasn’t said, “What the grandbaby wants, the grandbaby gets?” I will always treasure these foot and handprints.

Now that the door needs to be replaced, I’m torn. I can save that part of the door easily enough, but I’m undecided about what materials to make a new door from.

As I struggled with the decision, it occurred to me that a kickplate made from the aforementioned discarded aluminum might be just the thing as a temporary fix.

No fancy brass like the White House, as this will be temporary (famous last words).

Good as new! Well, almost. This aluminum won’t rust and the heavy-duty sign paint will resist scratches. The Festool Carvex glided through the aluminum just like wood. There is an identical panel on the outside (thus, the offset screw positions), which has given the decaying cedar enough support while I decide about making a new door.


Jim Randolph is a veterinarian in Long Beach, Mississippi. His earlier careers as lawn mower, dairy farmer, automobile mechanic, microwave communications electronics instructor and journeyman carpenter all influence his approach to woodworking. His favorite projects are furniture built for his wife, Brenda, and for their children and grandchildren. His and Brenda’s home, nicknamed Sticks-In-The-Mud, is built on pilings (sticks) near the wetlands (mud) on a bayou off Jourdan River. His shop is in the lower level of their home.Questions and comments on woodworking may be written below in the comments section. Questions about pet care should be directed to his blog on pet care, www.MyPetsDoctor.com. We regret that, because of high volume, not all inquiries can be answered personally.