Highland Staff

Mar 032014
 

This month I’ll talk about both sizes of the Lie-Nielsen Froes. Now, some tools are extremely commonplace, as in it seems like many of us came out of the womb knowing what they are, like a hammer, a chisel, or a screwdriver. On the other side of the coin are tools that seem to have had a bit more limited exposure, like a froe. When I was first getting interested in woodworking (24 years +/-), I happened across a book that was a compilation of old woodworking articles, and in one article, they mentioned using a froe. Since I’d never seen a froe personally, at that point in time, I found it both unique and interesting.  After reading the article (wish I could recall the author), occasionally I’d see an old froe at a garage sale, an estate sale, or even at an antique store. Many of the old froes I’d see were in such bad repair they were really no longer worthy of work, even though they ran the quality spectrum, from nicely crafted blacksmith units to those cobbled together by a user snatching an old leaf spring from a truck, and bolting on a piece of wood for a handle.

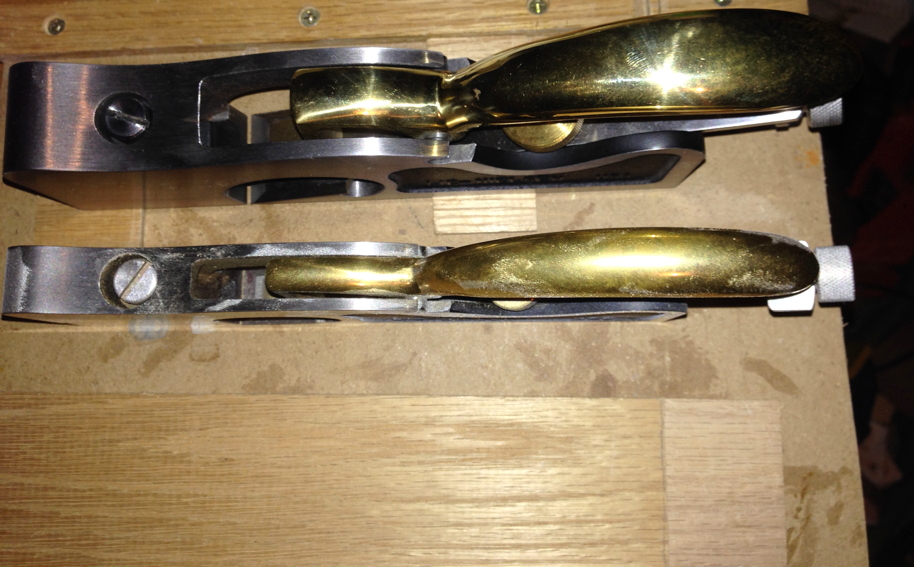
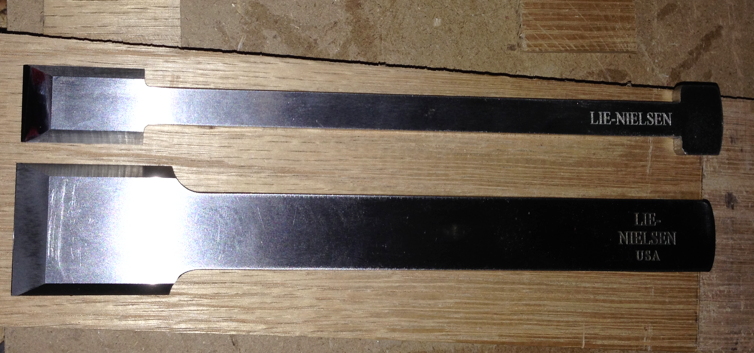
Enter the Lie-Nielsen Froe, designed in cooperation with Drew Langsner. Drew is an expert with regard to riving or splitting green wood with decades of experience, translating this knowledge into newly designed familiar tools. He redesigned the traditional froe with several key improvements. The large version of his froe has a blade 3/8” thick x 1 1/2” wide x 12” long, and a 17 1/2” long handle of hard maple. The smaller version has a blade 1/4” thick x 1 1/4” wide x 8” long, and it’s handle (also hard maple) is 13 1/4” long. The large froe’s longer handle (think levering action) and thicker blade (more rigid to adequately apply the extra levering forces) make it the obvious choice for working larger pieces of wood, but it can also easily finesse smaller pieces. If you will never even think about splitting a larger piece of wood, and you prefer a nimble and lighter tool, the smaller froe is for you. Those of you familiar with froes will immediately notice a few unique aspects of these Lie-Nielsen froes, such as the manner in which the attachment point is created and the handle attached, as well as the thickness of the blade. Rather than taking a single piece of metal for the blade and creating an eye for the handle by wrapping one end of the metal back around to itself, the blade is welded to a cylindrical ferule. This ferule is sturdy, having no weak areas like many of the older froes. The old froes also usually had a tapered eye, so the blade couldn’t accidentally slide off of the wooden handle in the working direction. Where the old style was basically a wedge/friction fit, the new Lie-Nielsen froe’s ferule is held onto the end of the handle with a stepped washer and a large lag screw. The working edge of the blade that contacts the project wood is beveled at 30 degrees. This beveling facilitates easier entry into the wood, which can decrease the amount of force required from your mallet or maul, potentially increasing the life expectancy of that accessory, too. The 30-degree bevel is suitable for use in either hard or soft woods.

For those of you who have never before tried a froe, or may not have ever even seen one, let me describe some basics. A froe is an “L” shaped tool, with a straight piece of metal connected at a 90-degree angle to a wooden handle. The froe is used primarily on green wood (wood that hasn’t yet dried). The froe’s metal blade is placed on the end-grain of the wood you wish to split, and a large wooden mallet is swung down onto the back of the blade, driving the blade into the wood. Depending on the wood (or your strength this morning), it may take a couple of good heavy whacks to move the blade deep enough to either initiate the splitting action, or position the froe so you can force the wood to split. Some wood will just easily give up, and split as though you were the master of the universe. Others will mock you, and do everything but call you names, while refusing to split. After the froe is down into the end-grain about a full blade’s depth, you can either pull the handle towards yourself, or push it away to utilize what might best be called the levering action. This is where the thin blade of the froe is rotated in the wood, so the opening that started about 1/4”-3/8” (the blade’s thickness) or so, is forced open gradually. As the blade rotates, not only does the opening become wider, but the split also runs further down the piece. Now move the blade further down, into the new area of the split, and rotate the blade again. Depending on different factors, you may need to place wedges in the gap behind the froe to help keep the initial split open while working down the wood. This process is repeated until the split is open the full length of the wood, and you end up with two separate pieces. Since the wood from this process follows the grain, you end up with blanks/boards retaining all of the wood’s original strength. This grain continuity is exceptionally useful and especially sought after for a multitude of uses, including green furniture making and more.

I hope you enjoyed the article and please let me know if you have any questions or comments.

Click to take a closer look at the Lie-Nielsen Froes.

Click to see Highland Woodworking’s entire selection of Lie-Nielsen hand tools.


Lee Laird has enjoyed woodworking for over 20 years. He is retired from the U.S.P.S. and works for Lie-Nielsen Toolworks as a show staff member, demonstrating tools and training customers. You can email him at lee@lie-nielsen.com or follow him on Twitter at twitter.com/is9582

Jan 072014
 

smallchiselplaneThe Lie-Nielsen Small Chisel Plane (97 ½) is something that never fails to catch attention. This is likely in some part due to a unique design with the cutting edge of the iron at the very front of the plane. That’s right, there is absolutely no toe section out in front of the iron, as is common for most types of planes. While this might seem like a deficiency, and could cause definite problems for a multitude of operations on most planes, the function of the 97 ½ is anything but ordinary.

The length of the plane is 6 ½”, width is 1 ¾” , and the A2 tool steel iron is a hefty 3/16” thick by 1 ¾” wide. The iron is bedded at 12-degrees, so it falls into the category of low-angled planes. The cap and body of the 97 ½ are Bronze, increasing the plane’s heft, as well as eliminating the issue of rust (bronze can still oxidize, so light oil protection is useful) on the plane. Add on the rich hues from the Cherry knob and it is one beautiful plane. The plane weighs in at 2.35 lbs, which feels as if it’s dialed in perfectly; not too heavy nor too light.

The iron comes from the Toolworks with a 25-degree bevel and I hone it  with a 10-degree micro-bevel, raising the overall angle on the iron to 35-degrees. The honing process I use is exactly the same as for almost every other plane iron, and since I’ve covered this in previous articles which are on this blog, I won’t repeat it here. If you would rather watch a video on sharpening, check out Lie-Nielsen’s Youtube channel for a great video.

After the iron is honed and on the plane’s body, rotate the cap’s screw until you feel resistance, and then add ½ turn to snug it up. To set the plane’s iron to the proper cutting depth, back off on the cap screw ¼ turn, and while moving the plane forward slowly across a flat piece of wood, rotate the blade adjuster clockwise slowly until the blade just starts to grab the wood. If the iron is hitting on only one corner, gently tap the blade until it is square to the plane body. While applying a slight forward pressure on the plane, start rotating the blade adjuster counter-clockwise slowly, just until the plane moves forward without the iron grabbing the wood. Now re-tighten the cap the ¼ turn removed earlier, and then take up the backlash of the blade adjuster until you just feel tension. The plane is now set to remove material flush with the wood on which it is riding. Remember, since this plane has no toe section in front of the iron, you don’t want to set it so the iron is below the plane’s sole, like is normal for other planes.

The design of the 97 ½ essentially creates a paring chisel with superior depth control, and no handle that hangs down to limit it’s reach. In this vein, it is very useful when working to clean up a dried glue line between boards or panels, resulting in a level surface. Similarly, the 97 ½ can easily trim protruding thin wood banding, dowels, screw plugs, through tenons, proud dovetails, …ending with each type flush to the surface.

Rabbets are occasionally a bit rough  straight from the machine or plane, and with this plane you can quickly make them perfect.

Another technique in this plane’s wheelhouse is cleaning up the surface of a board, up against a mating board. For example, like cleaning up the interior horizontal surface of a box, where it intersects with the sides of the box. This is assuming the corners of the box are 90-degrees. Remember, this plane, like most paring chisels, works most effectively as well as leaves the best surface, when used while moving the cutter in a slight arc. This shearing cut can greatly reduce the chance of some operations to cause some blowout.

I hope you’ll give this plane a try, as I believe you’ll find yourself reaching for it on a regular basis, once its in your toolbox. I’m sure you will likely come up with even more uses for this plane in your work, as I just shared some obvious uses.

I hope you enjoyed the article and please let me know if you have any questions or comments.

You can find out more information and purchase the Lie-Nielsen Small Chisel Plane from Highland Woodworking HERE.


Lee Laird has enjoyed woodworking for over 20 years. He is retired from the U.S.P.S. You can email him at lee@lie-nielsen.com or follow him on Twitter at twitter.com/is9582

Jan 012014
 

We try to do a Christmas Wish List every year along with a New Year’s Resolution List. A time for reflection on the old year and plans for the new, I always find it a bittersweet time. I have never been one for changes, but this year brought some big ones and the next will bring even more. I’m that guy who just wants to get it all fixed right and then freeze it in place and never have to worry about it again. But alas, that is not always a good thing as the wallpaper in the master bath at my house will attest.

From last year’s resolutions, I did learn to carve last year. I went to the class with Mary May at Roy Underhill’s School and enjoyed it thoroughly. The woman is good! I also went to the John Campbell Folk School and carved a Carousel Horse Head. I learned how to do it fairly well, but I think I have filled my quota for carving for the next few years.

I went back to New Hampshire in the spring and made another Windsor Chair with Mike Dunbar. One of my favorite “Chair”-rities benefited from that one and they were able to sell it at a silent auction for the benefit of some kids.

In August, I went on a two week construction trip (not on the resolution list) back to Vietnam after 45 years. About 40 Vietnam Vets and family went with Habitat for Humanity to build homes for families in the Mekong Delta of what used to be South Vietnam. I recommend it highly — it was a great trip.

Some of the old resolutions from a couple of years ago are still hanging fire. Do they ever expire or do I have to agonize over them from now on? How do you kill them off? So for this New Year, I will make a few new resolutions and try to finish up some of those old ones which are still valid. Here goes:

I will pick out at least two more classes this year. I really like the classes so I can spend a week out of town, learn something new, and be forced into completing a project. I don’t take vacations, I take classes. Highland has many classes scheduled this year and they are easy to get to, whether or not you live in Atlanta. For instance, Peter Galbert is coming back to Atlanta in March for another one of his wonderful classes on chair building. Check the web site for a complete list.

I will try to read all the woodworking books lying around the house. I have a beautiful handmade Windsor Chair (backdoor brag!) full of woodworking books and I need to get through them. Hate to buy books and not read them, but even worst is to buy a new magazine and then come home and realize I bought it before.

I want to continue to volunteer in the New Year and I would urge you to do so. Lots of the people reading this will have skills useful to many volunteer organizations. You know I build with my local Habitat affiliate, but there are over 1600 affiliates in the U.S. There is an affiliate close to you run by good people that you would enjoy being around. Call them up and offer your services.

My Habitat Affiliate We also build houses out of gingerbread.

My Habitat Affiliate
We also build houses out of gingerbread.

And one more left over from last year — Remember the newlywed wife on the flight home to Atlanta on Christmas night 2012? Her six month husband had left just two weeks before Christmas for deployment to Afghanistan. She was headed back to their house on a naval base in the Carolinas, by herself, late on Christmas night, to a dark, cold and very lonely place. He was due home this Christmas 2013. His name is Wade and he’s a Navy Corpsman. I’ve thought about him often this year and I hope and pray and wish I knew that he made it home safely to that lovely young woman. I resolve to honor and remember our military at every opportunity.

Happy New Year!!

Dec 312013
 

resolutions2012As the New Year quickly approaches (i.e. tomorrow), a few of our blog contributors have come up with their 2014 New Years Resolutions with regards to their woodworking (and some personal ones as well). 

First up, we’ve got Lee Laird:

While I’m sure most of you don’t know, I had major back surgery in March, 2012. Luckily I’m making decent progress, even though I’m not 100% yet. As one personal gloat, I have to tell that I did finally complete my Les Paul guitar and even sprayed a decent surface, both were #1 and #2 on my list for last year!

1.      I’m planning to build a hanging tool cabinet, so I can both be more efficient in having my most-used tools close at hand, and also getting my hand planes and other tools away from some dust. I plan to build this before the Lie-Nielsen Open House in July.

2.      I plan to build an upgraded workbench. I’m finding the short length of the current bench is very limiting when trying to plane longer pieces, such as back legs for chairs, or even a potential neck-through Bass guitar.

3.      I want to test my hands at making a chair, as it is one of the core techniques I’ve yet to tackle. I don’t have a set plan, as of yet, but
intend to see what I can do.

4.      This one is just barely on the fringe of woodworking. I will continue my physical training, to strength my body and to primarily regain my old walking gait. I’m finally back to the point where I am spending multi-hours in my shop at a time, hand-planing, sharpening, building…you get the idea. With the continued treadmill and BowFlex work, it won’t be long until people won’t be able to tell I even had surgery. Prior to my back surgery, I loved getting outside and playing golf. I am continuing to swing the clubs, as this movement assists in the progress of my balance, in conjuction with the aforementioned exercises. I am to the point where I believe I can try playing a round (or at least 9 holes, if the body isn’t quite up to it yet), so I have to just keep pushing and testing the body! I’ll continue this resolution point until I am healed 100%!

5.      I will continue to strive for progress in my writings (Blog articles, both Highland and personal), and hopefully provide valuable information and entertainment.

Feel free to contribute your own Woodworking New Year’s Resolutions under “Comments” below.


Lee Laird has enjoyed woodworking for over 20 years. He is retired from the U.S.P.S. You can email him at lee@lie-nielsen.com or follow him on Twitter at twitter.com/is9582

Dec 132013
 

For the past few weeks, our bloggers have been hard at work in their woodworking shops. Not only are they working on their gifts for friends and family this holiday season, but they have also been working on their 2013 Holiday Woodworking Tool Wish Lists. In case you are still working on yours (or haven’t even started), here are a few of our own wish lists. And don’t forget to make your own woodworking wish list on our website by CLICKING HERE.

Today we’ve got our regular blog contributor, Lee Laird’s wish list:

1.      Lie-Nielsen #6 Fore Plane – Another replacement for a cool old Stanley plane. Working with both types, it’s just so easy to justify the new plane, with it’s fit and finish out of the box, and the accuracy that comes with no struggles.

fore plane

2.      Lie-Nielsen 7″ Drawknife -Curved Blade  w/ leather case – While I already own two older used versions, its amazing just how sharp these knives are when new. Its also somewhat frustrating just how poorly some of the old used ones are sharpened. There is a great deal of metal that is necessary to remove in order to actually get the correct geometry and a truly sharp edge on the old knives that I own. Also, you can choose between a Curved Blade or a Straight Blade for this Drawknife.

DRAWKNIFE

3.      Electric Branding Iron  – Basic Arc  — I’ve wanted one of these for quite a while, and would love to have a consistent branding on the items I make.

4.      Lie-Nielsen Screw Driver Set w/ Case – This set of screw drivers has the perfect tip sizes (width and thickness) to fit the screws on Lie-Nielsen’s hand plane line. It is somewhat of a lost art to have a screwdriver that properly fits each screw. Sure, a different screwdriver can be made to work, but it’s so easy to cam out and bugger the screw head if the driver and screw don’t match.

5.      Lie-Nielsen Improved Workbench – The new design (as of 2011) is such a rocking (it’s truly solid, but just using a colloquialism) bench. With the change to a 4” thick top from side-to-side and end-to-end, it’s so much easier to clamp to the top, and increase the weight of the top. Just find it a home on a level floor, and you’re set. Oh yeah, I need a right-handed version, just to mention since both left and right are available.


Lee Laird has enjoyed woodworking for over 20 years. He is retired from the U.S.P.S. You can email him at lee@lie-nielsen.com or follow him on Twitter at twitter.com/is9582

Dec 062013
 

This month we’ll take a look at Lie-Nielsen’s Large Shoulder Plane (073). This is the largest of their shoulder planes and weighs in at 4 lbs. The body of the 073 is made from durable Ductile Iron and measures 8-¼” long by 1-¼” wide. The body is ground very precisely so that each of the two reference sides is exactly square to the sole, as is necessary to create the standard shoulder to tenon relationship. The A2 Tool Steel blade is cryogenically treated, double tempered and is .140” thick and .005” wider than the body, so you can set the plane up with the blade slightly proud on both sides. This allows you to make lateral adjustments without the blade becoming inset on one side. If it is necessary for a specific cut, you can always register the blade flush on one side, but in general it is best to be proud on both. The blade comes with a 25 degree bevel and its bedding angle is 18 degrees. The lever cap is Bronze and along with providing both a good grip and additional mass, it is absolute eye candy. Even though there is significant difference in size between the three planes in this series, the operation and features are the same for each.

As a quick note, since I wrote about the sharpening and setup aspect of shoulder planes in another article earlier this year, I won’t bother including it in this article, too. There is one aspect of the sharpening portion that I’d like to update. While I still use my Kell sharpening guide presently, I plan to upgrade to Lie-Nielsen’s forthcoming sharpening guide. It is solidly and accurately made and can handle a wider range of blades than any I currently own.

The size and mass of the 073 are significant and beneficial. Years ago I purchased a Lie-Nielsen Medium Shoulder Plane, at that time thinking it would give me the best of both world’s (small and large). I would now opt for the Large Shoulder Plane if I were obtaining only one for my shop, as I find the mass helps the plane continue through the cut, once started. It also acts as if it wants to stay connected to the reference surface, but even if it does shift slightly, I think the feedback it provides is more obvious.

The Large (in the back) vs the Medium shoulder planes.

The Large (in the back) vs the Medium shoulder planes.

Irons for the Medium (in the back) vs the Large shoulder planes.

Irons for the Medium (in the back) vs the Large shoulder planes.

The shoulder plane can obviously address shoulders on tenons, create or increase the depth of rabbets, and both remove and clean up additional material from a dado, just to name a few operations. Depending on the operation, you may wish to have a nice tight mouth while taking a very fine shaving, or more readily remove a fair amount of wood and open the mouth for the thicker shaving.

Shoulder on tenon, after using the Large Shoulder Plane. **Note, the score line I made was so light that the pencil wouldn’t stay within, so don’t misread that portion of the photo.

Shoulder on tenon, after using the Large Shoulder Plane. **Note, the score line I made was so light that the pencil wouldn’t stay within, so don’t misread that portion of the photo.

It is extremely easy to adjust the “shoe” of the plane, which controls the mouth opening. The first step is to loosen the screw on top of the front section of the plane by turning it counter-clockwise by about half of a turn.

Red arrow indicates the screw to unlock the shoe.

Red arrow indicates the screw to unlock the shoe.

Lrg shoe adj

Red arrow indicates the adjustment screw location.

After loosening the shoe locking screw, turn the shoe adjustment screw on the toe of the plane to move the shoe. Turning this screw clockwise will bring the shoe towards the blade, closing the mouth opening. Turning the screw counter-clockwise will open the mouth. When closing the mouth, pay close attention to the blade, so you don’t accidentally hit it with the shoe. You don’t want to dull or damage the blade.

Red arrow points to the mouth set to a somewhat neutral position, but large enough for most shavings.

Red arrow points to the mouth set to a somewhat neutral position, but large enough for most shavings.

Mouth is set much more tight than the photo above when working with a very fine shaving.

Mouth is set much more tight than the photo above when working with a very fine shaving.

After setting the mouth to the desired opening, make sure to re-lock the shoe by turning the screw on top of the plane clockwise until snug. To limit any damage to the locking screw head, either use a Lie-Nielsen #4 screwdriver that fits the head precisely, or any other screwdriver with correct tip width and length so there is no slop.

For optimum results, make sure you keep the plane iron shaving sharp. I also like to apply a little paraffin to the bearing surface(s) (sole and potentially the side, too) to reduce the friction, which I find allows for better accuracy since less force is required through the cut.

Even if you already have one of the smaller versions of this shoulder plane (or others), I believe you’ll find this plane a welcome addition,
and you may just find it superseding its predecessor. There is just no way around it; this is one sweet plane!

I hope you enjoyed the article and please let me know if you have any questions or comments.

Lee

CLICK HERE to find out more information or to purchase the Lie-Nielsen Large Shoulder Plane (073).


Lee Laird has enjoyed woodworking for over 20 years. He is retired from the U.S.P.S. You can email him at lee@lie-nielsen.com or follow him on Twitter at twitter.com/is9582


Dec 042013
 

For the past few weeks, our bloggers have been hard at work in their woodworking shops. Not only are they working on their gifts for friends and family this holiday season, but they have also been working on their 2013 Holiday Woodworking Tool Wish Lists. In case you are still working on yours (or haven’t even started), here are a few of our own wish lists. And don’t forget to make your own woodworking wish list on our website by CLICKING HERE.

First up we’ve got Terry Chapman:

It’s that time again. I went by Highlan this week to look around at what is new and to see what might catch my eye for Christmas. My son lives way up north in Connecticut and is not the least bit interested in woodworking nor does he have a lot of money to spend on Christmas gifts for me. I feel an obligation to make a list of some of the things I would like to have which do not cost an arm and a leg. I pretty much have all the woodworking tools you can get which cost less than $300 and that narrows the choices down pretty good for a kid trying to survive the heating season way up north on a preacher’s salary.

Flex Arm Work Light

Flex Arm Work Light

Here you go, Jon. I like the Magnetic LED Work Light for my lathe. This light is excellent on many counts. It has a long flexible neck, a magnetic base which goes vertical and horizontal and actually has a switch which turns the magnet off and on (how does that work?). It uses an 8 watt LED bulb which puts out a lot of light and is rated at 50,000 hours. The thing I like best is it puts focused beams of white light about four feet away and will light up the bottom of a turning bowl when I set it on the lathe bed. The only one I have seen which is better is the one my dentist has on a track above the chair to light up your mouth. The dental light probably costs $3000 used. The one at Highland is my choice.

When I was in the store last week, there is a whole wall of what I would call Viking axes. These are beautiful pieces of work signed by the smith who forged it. The one I like best is the Gransfors Bruks Double Bit Axe. If I were a lot younger, I could bring down a redwood tree with this thing. You know those old pictures where the lumberjack is standing on a spring board about forty feet in the air notching out for a saw cut on a 1500 year old tree about 60 feet in diameter, that would be me.

Viking Axes

Viking Axes

Actually, this one is designed for throwing competitions. It even comes with competition axe-throwing rules and the address of the Swedish Axe Throwing Society. How cool is that!!?? They better ship a trauma wound kit with it if I am going to throw it. My first thought when I saw the axe wall — Road Rage!! How cool would it be when some guy cuts you off on the freeway and starts toward you with a baseball bat and you pull out a Viking Axe? Plus think about Show and Tell at your grandkid’s school. Good one.

Double Bit Throwing Axe

Double Bit Throwing Axe

I always like books and there are some wonderful woodworking books out there. Here are a some new ones available at Highland this Christmas:

To Make as Perfectly as Possible by Roubo. This is a new translation of a French classic on an 18th century cabinet shop. Now it sounds like it would be terrible stuff what with no power tools and modern conveniences. What is does have is the back to basics stuff we all need on sharpening tools, selecting wood, staining and finishing, and all the other things you need to dig up from time to time. Nothing but good reviews on this one.

The Practical Woodworker A Four Volume Set by Bernard E. Jones. Originally published in 1916 and recently reissued, this is another back to basics volume. I was flipping through one volume and there is a whole chapter on joinery in “Aeroplanes.” Been a long time since I saw an article about that, but you know it has a lot of good stuff if it has a section on aeroplanes in it. If you are in the middle of a WWI Sopwith Camel and are stuck on how to attach the wings to the body, this may do it for you. Highly recommended.

With the Grain – A Craftsman’s Guide to Understanding Wood by Christian Becksvoort. I am a big fan of Christian Becksvoort. He is so down to earth that he has a blog where he averages one blog entry every three months if he thinks about it. He makes the most beautiful Shaker furniture and I would buy all he makes if I could afford it. He donated a lovely Shaker Candle Stand to the Sabbathday Lake Shaker Village for a raffle. I bought tickets for the drawing on December 7th and I would really treasure that thing. Please do not buy tickets and decrease my chances to win: http://chbecksvoort.wordpress.com/2013/07/23/shaker-roundstand-raffle/. We would all be better woodworkers if we understood our material as well as this guy does. Read this book.

And one last tool is the Galbert Drawsharp by Benchcrafted. This one is high on my list. I struggle with sharpening and I am afraid to sharpen my drawknife for fear I will mess it up completely and make a chisel driven tool out of it. That would be sad because I like what it can do and I am getting better using it. Peter has designed a tool to sharpen the thing and it runs off the rear of the blade for reference.

Galbert Drawsharp

Galbert Drawsharp

Looks like it works like a champ and you can ask Pete about it in March when once again he comes to Highland to teach a chairmaking class.

There you go, Jono.