Highland Staff

Sep 212015
 

There is something awfully liberating about learning to do a tiny little bit of leather work.

I have wanted a leather sheath for my drawknife for years but I was never quite willing to pay the price. Whenever I go to a class I pack my drawknife in my bug-out bag and endanger the hard won sharp edge. Not to mention endangering me with the sharp edge.

When I was at the leather store a couple of weeks ago,  I bought a small piece of lightweight leather, 3 to 4 oz weight, I think.

Leather Sheath

Leather Sheath

I cut a pattern out of poster board and fitted it around the blade until I liked it. I laid the pattern down on the leather and cut around it with my carving knife and then wrapped the cut out around the blade. After snipping two holes for rivets right at the corners of the blade and setting the rivets it looked good.  I tried it on the blade and the corners of the sheath were in the way, so I snipped them off. I set two snaps in the flap and pulled the leather tight around the blade so I could mark the other side of the snaps on the body. After completing the snaps, the sheath fit well except for being a little puffy on the bottom edge. I took it off and crimped the bottom with a wood scrap and it held a nice crease making it look a lot better.

I put on a coat of British Tan for looks and a coat of Neatsfoot Oil for feeding the leather and called it good. Been wanting a nice cover for a long time. I ‘m so proud!

Finished Product

Finished Product

Sep 162015
 

septemberhwtOur most recent issue of The Highland Woodturner is now available for reading!

This month’s issue includes:

Marking and Measuring– The majority of Curtis’s current Windsor Tool project consists of turning several different matching parts that require accurate measurements in order to fit together. In this article, Curtis discusses different measuring tools he uses in order to get these accurate measurements.

Turning a Small Classic Child’s Bench– Temple Blackwood has been making small child benches for most of his turning career and in this project article he discusses how he makes them.

Show Us Your Woodturning– This month we’re sharing the woodturning projects of Scott Fruchter and his grandson, Cameron, who learned how to turn from his grandfather.

Phil’s Turning Tip– Phil has a turning tip on rounding the outside of the rim on your turning projects, which will help prevent cracking.

All of this and more in our September 2015 issue of The Highland Woodturner.

Sep 142015
 

I bought half a cow (hide) last week.

Many years ago we went to visit my Mother and she was proud to tell us she had bought half a cow. Of course, that was too much for my brother and me. We immediately started to quiz her on which half of the cow she bought. She could have bought the front half, the rear half, the top half, the bottom half, the left half, the right half;  I could go on and on. (I guess you had to be there.) What she had done of course, was to go in halves with someone in town and have a cow butchered and wrapped for the freezer.

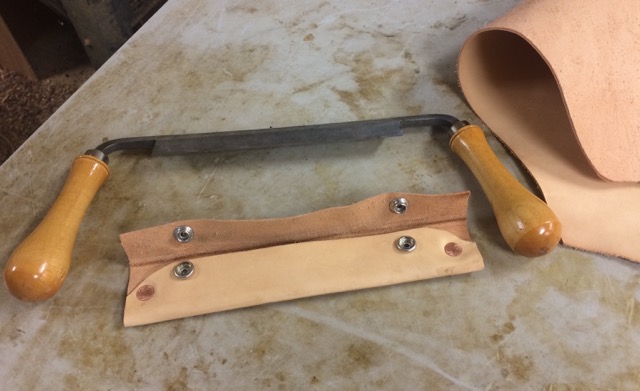
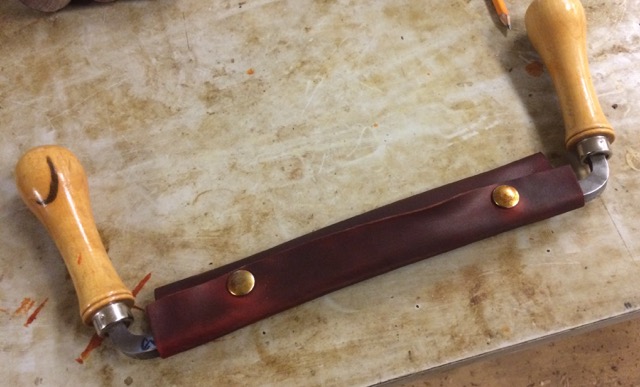
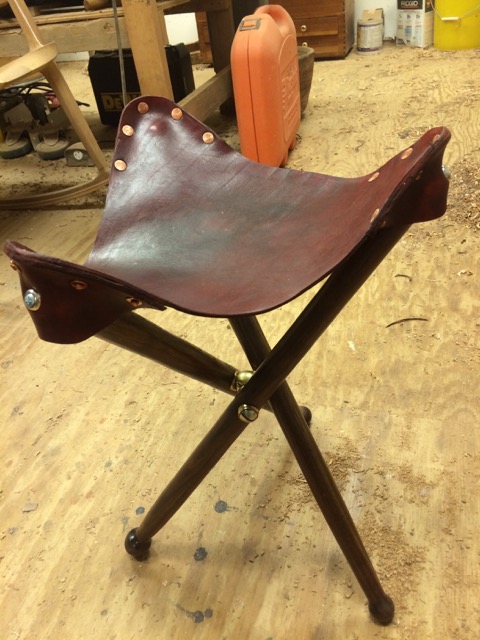
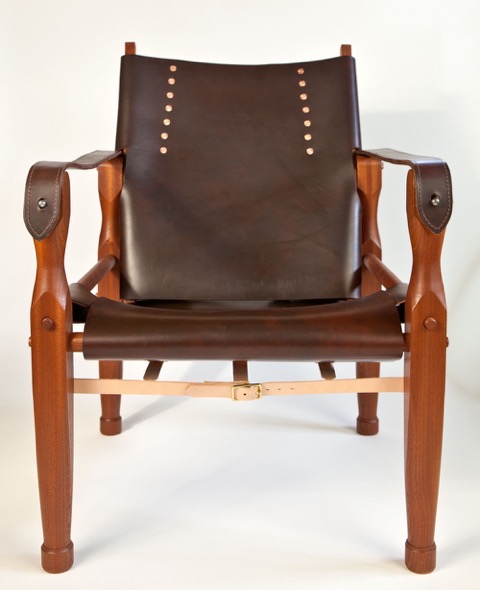
What brings up this nerd review is the Roorkee Chair from Chris Schwarz’ s “Campaign Furniture” which I have begun to build as part of my back-to-the-shop fall season. I needed a couple of fairly large pieces of leather to make the back and the seat of the chair, so I went to my local Tandy Leather Company to buy what I needed.

I’m still learning this leather business, so the very helpful people at the store jumped all over it when I took the book with me and opened it on the counter. It seems that leather comes in different thicknesses and is labeled by weight, as in “3 to 4 oz” or “7 to 8 oz”. One ounce equals 1/64” of thickness so 7 oz equals 7/64” of thickness. The thickness of the hide varies, so the weights are given in a range. Being a natural product, leather will stretch with use, so particularly for a chair seat, 7 to 8 oz is required.

Based on recommendations in the book, I needed a side of leather which should give me enough for two chairs. I like the “veg-tan” finish which is a lovely light natural color. The store offers all kinds of dye to make it any color you like, but I thought it only right to make mine British Tan.

The clerk showed me a side of leather which was beautiful and on sale, so I bought a half a cow. It was a big cow. It was a real big cow (actually, a steer, I suppose) so I rolled it out and tacked it up on the side of the shop to get a feel for it. It must weigh 20 to 30 pounds. You can actually see the rear leg on the left, the front leg and the neck. Hard to see in the picture, but the ownership brand is visible on the top left at the hip. I was a little creeped out by the whole thing truth be told. I mean this was a living creature not that long ago and obviously a magnificent one. I have the tiniest bit of appreciation for the pre-history tradition of apologizing for taking the animal.
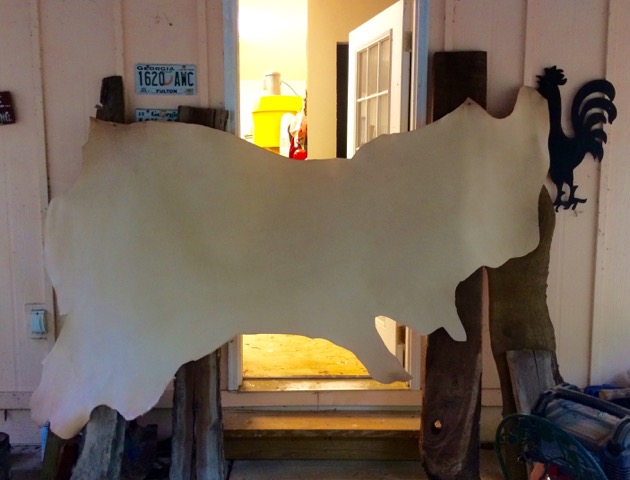
Half of a cow.

Half of a cow.

Woodworkers ask how do you cut the stuff? A utility razor knife works very well  – it is just skin. Chris recommends making a hardboard pattern and using it for a guide. The biggest thing is to keep the cuts vertical. Once it is put together, you can still trim the edges to square them up.

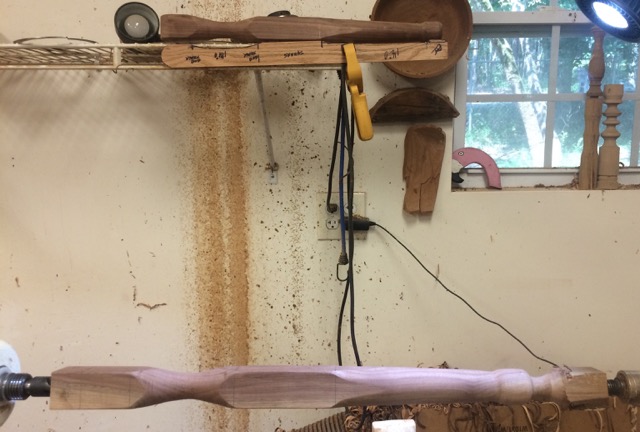
I have two of the four wooden legs turned to final shape. Next I plan to make the patterns out of some thin plywood to cut out the leather portions and then keep working on the Roorkee. Who knows, they might need me soon on a campaign in India.

Patterns above, leg on the lathe.

Patterns above, leg on the lathe.

Sep 112015
 
I love cleaning my garage.  Our garage encompasses the place where our cars and boat park, my wife’s clay studio and my woodworking shop.
The area we call “garage” includes automobile parking in the foreground, boat parking and wood storage to the right, Brenda’s ceramic studio to the left and my woodshop straight ahead.

The area we call “garage” includes automobile parking in the foreground, boat parking and wood storage to the right, Brenda’s ceramic studio to the left and my woodshop straight ahead.

Steve Johnson and I were talking one day and I mentioned I can walk in the garage in my stocking feet.  Steve was shocked!  I really like it to be that clean.  The “garage” is a multipurpose room, that not only does all the things above, but includes a spare freezer/refrigerator for overflow from the house, canned goods storage, a recycle bin for overflow from the house, and the path to the outdoor garbage can.  So, it’s not unusual for us to be in our stocking feet when we need some spare food, a screw to fix a hinge, you get the idea.
The area closest to the stairs is where the cars, fridge and recycling are located, foreground and left in the earlier photo.  Unfortunately, it’s also the area the cars track in leaves and dirt. Living adjacent to a wetland, we are surrounded by trees, so there is a constant influx of leaf debris, and leaves are my biggest cleaning challenge.
I’m an all-or-nothing kind of guy.  If I’m going to clean the garage, I don’t just clean the woodshop area, I clean it all.  If Brenda hasn’t used her studio area, I clean it anyway.
For both neatness and safety reasons, big cutoffs and chunks are tossed into a burn container or trash bin as they are created.  If chips fall to the floor that are too big for the shop vacuum, I’ll start with a broom and dust pan.  The broom is good for leaves, too, and if there are a lot of them I’ll hit the parking area with the broom.  I have a super-flexible 2½” hose that keeps my Dust Deputy cyclone separator tight to the vac as we stroll around.
“They” don’t make ‘em like this any more. Modern shop vacuum hoses are stiff, and would tend to topple the Dust Deputy over. This soft hose tucks the Dust Deputy in. The homemade cart is bottom-weighted to add stability.

“They” don’t make ‘em like this any more. Modern shop vacuum hoses are stiff, and would tend to topple the Dust Deputy over. This soft hose tucks the Dust Deputy in. The homemade cart is bottom-weighted to add stability.

An extra section of wand from the pickup hose to the floor attachment saves the back of the tall person from the stooping pain he/she would otherwise experience.
Buy enough vacuums over the years and you’ll accumulate sufficient wands to clean while still upstairs! For tall guys like me, three wands are just the right height.

Buy enough vacuums over the years and you’ll accumulate sufficient wands to clean while still upstairs! For tall guys like me, three wands are just the right height.

The Dust Deputy prevents almost all of the floor debris from reaching the vacuum.  I haven’t changed a filter, or even blown one clean, in years.
The pièce de résistance, however, is something you may or may not want to invest in.  How much do you like your socks?  Our veterinary hospital was once a testing center for Oreck upright vacuums.  They would give us their latest unit and challenge us to tear it up.  Not a difficult assignment for a place where dogs track in dirt and sand on their paws all day; where hair deposits are measured in buckets, not gallons; and clipped toenail remnants do their best to shatter Oreck turbines.  Sometimes we would get a new test model before we wore out the previous one.  The used units would go home to the garage, where I learned to be spoiled to an impeccably-clean floor.
This Oreck upright is tough! It survived its torture test at our veterinary hospital and its torture continues in our garage. Sometimes I use the whole-house vacuum in the shop, but I worry about getting shop debris caught in the piping, so I usually limit it to picking up dust.

This Oreck upright is tough! It survived its torture test at our veterinary hospital and its torture continues in our garage. Sometimes I use the whole-house vacuum in the shop, but I worry about getting shop debris caught in the piping, so I usually limit it to picking up dust.

I generally clean before starting a new project, do a little spot-cleaning along the way and clean thoroughly again when the project is finished.
This Hang Up is connected to a Dust Deputy recessed into the ceiling and is activated by pulling fishing line connected to a switch. Notice the Dust Deputy is mounted on a swimming-pool-tablet bucket. The lid seals tightly and unscrews easily for easy emptying.

This Hang Up is connected to a Dust Deputy recessed into the ceiling and is activated by pulling fishing line connected to a switch. Notice the Dust Deputy is mounted on a swimming-pool-tablet bucket. The lid seals tightly and unscrews easily for easy emptying.

A closeup of the Hang Up/Dust Deputy system.

A closeup of the Hang Up/Dust Deputy system.

The Hang-Up/Dust Deputy system in action. I can reach nearly the entire woodworking area with the standard hose that came with the Hang Up. Thanks to the Dust Deputy I never have to clean the Hang Up’s filter. The low-profile bucket preserves headroom in the shop.

The Hang-Up/Dust Deputy system in action. I can reach nearly the entire woodworking area with the standard hose that came with the Hang Up. Thanks to the Dust Deputy I never have to clean the Hang Up’s filter. The low-profile bucket preserves headroom in the shop.

Work, my “day job,” (and the bugaboo that made Maynard G. Krebs cringe at its mention), sets the pace for how many projects I get to do in a year, so it’s not unusual that the after-project cleaning is no longer evident by the time the next project begins.
Sep 092015
 

wn121Welcome back to woodworking season! Our September issue of Wood News Online is full of projects, new tools, and woodworking tips to help motivate your return to the shop!

This month’s issue includes:

Where Are All The Girls in the Shop– This month Anne spends a day in the shop with Kim McIntyre, who grew up in her father’s workshop and has been doing some kind of woodwork all throughout her life. In the article, Kim discusses how to make handmade cutting boards, her favorite beginner’s project.

Show Us Your Shop– Richard Lahr has traveled around a lot during his life and so has his workshop. Currently, his shop resides in Gulf Cove, FL where he makes custom furniture and works on yachts.

Show Us Your Woodworking– Steve Lyde’s favorite style of woodworking is Greene & Greene. This month he shows off  a variety of custom furniture pieces he has made for his home.

Show Us Your Carving– Mark Levin has studied under several master carvers who have inspired him to develop multiple table series including his Leaf Series and his Fruit Series.

The Down to Earth Woodworker– This month Steve focuses on sharpening, including how to achieve the elusive “perfect edge,” a comparison between the Tormek T-4 and the Tormek T-7 Sharpening Systems, and answers More Frequently Asked Questions.

Tips from Sticks in the Mud– Jim figures out how to use his tablesaw fence rail as a backstop for biscuit slot and domino cutting, and shares a money saving tip on repurposing speaker magnets.

This month we’ve got in-depth reviews of the Hamilton Marking Gauge and Christopher Purney’s, The Furniture Bible.

We’re also looking forward to some great woodworking events including Woodworking in America at the end of the month in Kansas City, MO, and a visit from Roy Underhill to Highland Woodworking for our Fall Open House in October.

This month’s deals include a 33% discount on several different Fox Chapel woodworking books, a great deal on the Rikon 10″ Bandsaw, and if you’ve been needing a new workbench for woodworking season, check out the deal on the Sjobergs Hobby-Plus Workbench.

We’ve also got some great new tools including Blue Spruce Toolworks Hand Tools, Sterling Tool Works Roubo Curves, Bad Axe Hand Saws, and a new Woodpeckers One Time Tool.

All of this and more in our September issue of Wood News Online!

Sep 042015
 

Time to start back in the shop for the fall and winter season and make something nice. Summer has been pretty busy, school is back in and all the vacations and trips are done, so time to get back to it.

I decided a few months ago to make the three legged folding stool in Chis Schwarz’s “Campaign Furniture”. I like the campaign style and the idea of making stuff that fits on the back of an elephant or a camel on the way to the campaign in India. On the other hand, most mornings when I roll out of bed I am glad my campaigning days are over. I like teak wood chests with the brass corners and recessed handles and chairs that fold down into a packable bundle. The three legged stool in “Campaign Furniture” seemed a perfect introduction.

Three Legged Stool

Three Legged Stool

I have wanted to try some leather work for a while. I like the look and smell of leather and I sensed it could not be too difficult. I checked with a couple of friends and they recommended a local branch of a national chain of leather suppliers. I took off one Saturday afternoon and found the store and bought enough leather to make two stools. The people at the store were very helpful and between the clerks and the book, I got what I needed. I cut some leg stock, ordered the three way nut for the center joint and in a few days had a beautiful little stool. I am real proud of it and actually found one like it in a hunting catalog the other day for $250.

All this to say that my work for the fall will come from “Campaign Furniture”.  The Roorkee Chair is particularly fascinating to me. I love the legs and the leather and the straps and the buckles and the shape. I sat down today and ordered all the buckles and the brass screws and the knobs it takes to build two chairs. Next week I will head back over to the leather company and get a shoulder or a half hide so I will have all the leather I need for a couple of chairs or at least one chair and some screw-ups.  Here’s a picture from Chris’s Blog about making the chair.  Buy his book, check his blog at blog.lostartrpress.com, and bow down to someone who is bringing back a beautiful chair.

roorkee_ele_img_7673After the Roorkee, there is a folding table, a strong trunk, a traveling secretary, and a folding bookcase. After that, it will be time to call the travel agent and book the camel caravan to Sudan and Egypt.

What are you making this fall and winter?

Sep 012015
 

No Southern-fried Southern boy wants to be called a Yankee, but we share the characteristics of shrewdness and thrift.  Thus, each month we include a money-saving tip.  It’s OK if you call me “cheap.”

If you are not fumble-fingered, you may want to skip this tip. Always unplug your table saw when working in or on it. I understand that some table saw manufacturers have figured out a way to make it harder to lose the nut and washer from a table saw’s blade arbor, but my 2005 Delta doesn’t have that feature. Thus, every once in a while those items land in the bottom of the cabinet. Few people have arms skinny enough or long enough to reach the bottom of where sawdust falls when the unit is operating. It’s a short reach from the dust port to the fallen item, but a big deal to disconnect and reconnect the dust hose.

I don’t fish as much as I used to since I got so deep into woodworking. For long stretches, fishing for the arbor nut or washer is as close as I get. Rather than dismantle the dust port to retrieve the elusive part, I try to capture it with this old Radio Shack speaker magnet.

I don’t fish as much as I used to since I got so deep into woodworking. For long stretches, fishing for the arbor nut or washer is as close as I get. Rather than dismantle the dust port to retrieve the elusive part, I try to capture it with this old Radio Shack speaker magnet.

Every time an audio speaker dies, there is a treasure hiding inside:  a powerful magnet. Whether it’s a car or home speaker, save that magnet and store it on any handy steel surface. The best ones have a hole in the middle. Tie a string, or, better yet, fishing line to a big speaker magnet and you can retrieve anything ferrous from any hidden crevasse.

This particular magnet is stored right next to the table saw. Are you thinking it gets a lot of use? Like I said, if you’re not fumble-fingered, you might not need this tip!

This particular magnet is stored right next to the table saw. Are you thinking it gets a lot of use? Like I said, if you’re not fumble-fingered, you might not need this tip!

I can’t seem to throw a magnet away. All sizes and shapes get stored on this rolling tool cabinet.

I can’t seem to throw a magnet away. All sizes and shapes get stored on this rolling tool cabinet.

—-

Jim Randolph is a veterinarian in Long Beach, Mississippi. His earlier careers as lawn mower, dairy farmer, automobile mechanic, microwave communications electronics instructor and journeyman carpenter all influence his approach to woodworking. His favorite projects are furniture built for his wife, Brenda, and for their children and grandchildren. His and Brenda’s home, nicknamed Sticks-In-The-Mud, is built on pilings (sticks) near the wetlands (mud) on a bayou off Jourdan River. His shop is in the lower level of their home. Questions and comments on woodworking may be written below in the comments section. Questions about pet care should be directed to his blog on pet care, www.MyPetsDoctor.com. We regret that, because of high volume, not all inquiries can be answered personally.