Highland Staff

Apr 042018


Measure twice, cut once.

Such sayings are legendary, sage advice.

We all know that accuracy is one of the most important factors in a good woodworking outcome. Usually, it’s a matter of “taking the time.” Taking time to mark accurately, line up a cut accurately, and execute the cut accurately.

Whether a butt joint or miter, few aspects of your work can make it look uglier than an ill-fitting intersection.

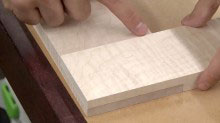
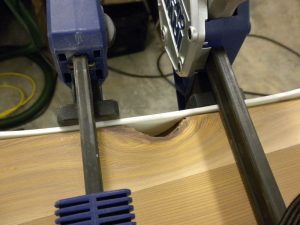
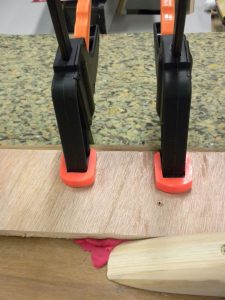
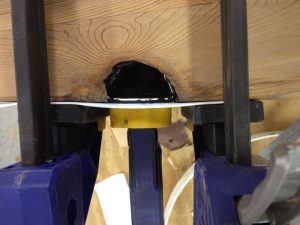
A perfectly-executed half-lap joint by Marc Spagnuolo.

There are plenty of ways you can enhance accuracy. Marking your cutlines with a knife instead of a pencil, for example.

Many woodworkers intentionally cut their pieces long and fine-tune after.

Picture framers often “shave” their miter cuts for accuracy to the thousandth.

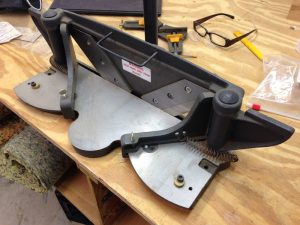
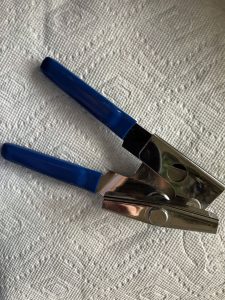
When nothing less than perfection will do, nothing beats making one’s cuts a tad long and improving them with this miter trimmer. Highland provides a handy product tour.

The same principle is provided by a hand plane and shooting board. In both cases, the blades must be extremely sharp to prevent tearout.

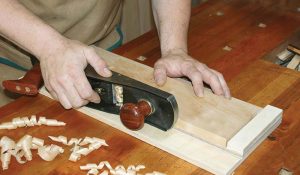
Shooting boards. I suppose they’ve been around almost as long as hand planes.

A modern invention intended to enhance accuracy is the laser. You can find them on your power miter box, your drill press, your band saw, and even some handheld drills have them.

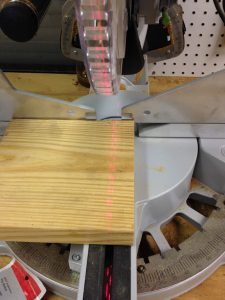
The laser guide on this Kapex is quite good, although I usually still cut and test.

Some would argue that accuracy isn’t improved, even though most people would say speed is. This month’s poll asks about your preferences regarding lasers.


Jim Randolph is a veterinarian in Long Beach, Mississippi. His earlier careers as lawn mower, dairy farmer, automobile mechanic, microwave communications electronics instructor and journeyman carpenter all influence his approach to woodworking. His favorite projects are furniture built for his wife, Brenda, and for their children and grandchildren. His and Brenda’s home, nicknamed Sticks-In-The-Mud, is built on pilings (sticks) near the wetlands (mud) on a bayou off Jourdan River. His shop is in the lower level of their home.Questions and comments on woodworking may be written below in the comments section. Questions about pet care should be directed to his blog on pet care, www.MyPetsDoctor.com. We regret that, because of high volume, not all inquiries can be answered personally.

Apr 032018
 

No Southern-fried Southern boy wants to be called a Yankee, but we share the characteristics of shrewdness and thrift. Thus, each month we include a money-saving tip. It’s OK if you call me “cheap.

Back in the day, can openers created a sharp-edged disk of metal that was at least as dangerous as a Ninja star.

Old School can opener.

There is no telling how many people have been stitched up from handling those. Today, modern can openers cut the lids in such a way that there are no sharp edges.

New School can opener.

But, there is yet another benefit. The flat, safe surface is perfect for mixing epoxy. It is dished just enough to make a little depression to contain the epoxy, and you can mix it with a little stick. Just be sure to wash and dry it well before using it.

I store epoxy and clean can lids together, along with some old credit cards to cut up for disposable, recyclable stirring sticks and cups for mixing liquid epoxy. Tin snips cut the cards cleanly, and you can make wide or narrow stirrers, according to your needs. In addition to TransTint, I have used concrete coloring powder to color epoxy. Solids accelerate curing.


Jim Randolph is a veterinarian in Long Beach, Mississippi. His earlier careers as lawn mower, dairy farmer, automobile mechanic, microwave communications electronics instructor and journeyman carpenter all influence his approach to woodworking. His favorite projects are furniture built for his wife, Brenda, and for their children and grandchildren. His and Brenda’s home, nicknamed Sticks-In-The-Mud, is built on pilings (sticks) near the wetlands (mud) on a bayou off Jourdan River. His shop is in the lower level of their home.Questions and comments on woodworking may be written below in the comments section. Questions about pet care should be directed to his blog on pet care, www.MyPetsDoctor.com. We regret that, because of high volume, not all inquiries can be answered personally.

Apr 022018
 

Welcome to “Tips From Sticks-In-The-Mud Woodshop.” I am a hobbyist who loves woodworking and writing for those who also love the craft. I have found some ways to accomplish tasks in the workshop that might be helpful to you, and I enjoy hearing your own problem-solving ideasPlease share them in the COMMENTS section of each tip.  If, in the process, I can also make you laugh, I have achieved 100% of my goals.

When working with cedar, you must be prepared to deal with the defects. Of course, there are knots on every surface.

One look at a cedar tree and you see why there are so many knots: limbs everywhere.

You can celebrate the defects by leaving them au naturel, or you can celebrate them in the way you fix them, or you can disguise them with, say, a Dutchman.

I didn’t want any rough or sharp edges that might catch tender little grandbaby skin, so I made sure to fill each one. A Dutchman would have been fine, but this project had run long already.

As something of a trademark, I incorporate black-tinted epoxy into many of my projects. Here are the steps I used:

First, you need epoxy, and you have options. If you buy large containers of epoxy you might spend a good bit up front, but, stored properly, it will keep for years and years. The resin and hardener are separate and very stable.

If you’re only wanting to dabble in a little epoxy, good ol’ two-part syringe epoxy is perfectly fine. Don’t purchase the fast-curing kind if you’re adding amendments because the additions speed curing further and even one drop of dye or small amounts of sawdust will harden it faster.

Have your surfaces prepared in advance: clean, dry, no grease and no paint. No epoxies have a long “open” time.

Always work in small aliquots. If your defect is deep, fill it in layers no thicker than 1/8″ each.

To fill the knothole in the edge of this bench I cut a dam from a 5-gallon plastic bucket and clamped the dam with squeeze clamps.

To ensure no epoxy ran out from the bottom, I made an additional dam out of PlayDoh and clamped a plywood scrap on for reinforcement. Now, patiently fill the defect in 1/8″ layers. It’s not necessary for each lamination to cure completely between applications but each should be allowed to cool thoroughly.

Make your last layer thinner, which will allow bubbles to escape more easily.

One drop of Transtint Dye will darkly color a large quantity of epoxy. I suspect this bottle might last me a lifetime. I store it in a used zipper-locking bag in case of spills.


Jim Randolph is a veterinarian in Long Beach, Mississippi. His earlier careers as lawn mower, dairy farmer, automobile mechanic, microwave communications electronics instructor and journeyman carpenter all influence his approach to woodworking. His favorite projects are furniture built for his wife, Brenda, and for their children and grandchildren. His and Brenda’s home, nicknamed Sticks-In-The-Mud, is built on pilings (sticks) near the wetlands (mud) on a bayou off Jourdan River. His shop is in the lower level of their home.Questions and comments on woodworking may be written below in the comments section. Questions about pet care should be directed to his blog on pet care, www.MyPetsDoctor.com. We regret that, because of high volume, not all inquiries can be answered personally.

Mar 222018
 

In the latest issue of Festool Heaven, we featured Gary Wegner’s woodworking shop. When Gary Wegner left his farm and moved into town in Spokane, WA, he decided to reinvent his wood shop by eliminating his tablesaw and replacing it with a Festool TS 55 Tracksaw and MFT Workbench. Take a look at the pictures of his shop below to see how it worked for him, or click to learn more about Gary’s shop.

To read about even more shops, click to check out our Shops Gallery.

If you would like to submit your shop, just SEND US PHOTOS of your woodworking shop along with captions and a brief history and description of your woodworking. (Email photos at 800 x 600 resolution.) Receive a store credit redeemable towards merchandise if we show your shop in a future issue of Wood News or Festool Heaven.

Mar 202018
 

Having trouble with your dovetails? Try using the David Barron Magnetic Dovetail Saw Guide for awhile and see if it helps straighten out your cuts.

In the video above, Jay Bates uses his Barron Magnetic Dovetail Saw Guide to hand cut dovetails for a hand tool tote. Follow along to see how you can use the Barron Guide in your own projects.

Click here to watch the video

Mar 152018
 

Leigh’s B975 Box Joint and Beehive Jig offers a simple way to quickly make perfect half-inch and 3/4-inch box joints using either a handheld router or a router mounted in a router table.

To find out more about this exciting new tool, watch the playlist below:

Mar 132018
 

Reviewed by J. Norman Reid

In the March issue of Wood News, Norm Reid takes a closer look at a classic, Roy Underhill’s The Woodwright’s Shop.

This book is more than a guide to working timber into useful things; it’s an essential guide for anyone desiring to live close to nature, as well as a spellbinding adventure into the craft of woodmanship for us all.

Click here to read more or order your own copy.