Did you know Temple Blackwood has a monthly woodturning column in Wood News? For the July issue of Wood News Online, Temple explains how he uses story sticks to reproduce a project multiple times:
My goal with this project will be to occasionally replicate this little chair without needing to have the original back and without needing a drawing – because by using a story-stick, I do not need to stop the lathe to measure and mark transitions and features.
For the July issue of Wood News Online, Jeff Fleisher writes about the distinction between a defect or a feature, and how to change your attitude about it when doing custom woodworking projects:
I recently overheard one of the students in my class say, “geez, I hope I don’t have to use this board because it is all messed up and looks a little crappy.” At the end of the class the same student looked at me and said, “you know, I didn’t like that piece of wood before the class but it looks amazing on that box.”
Shall we call them happy accidents, or just plain mistakes?
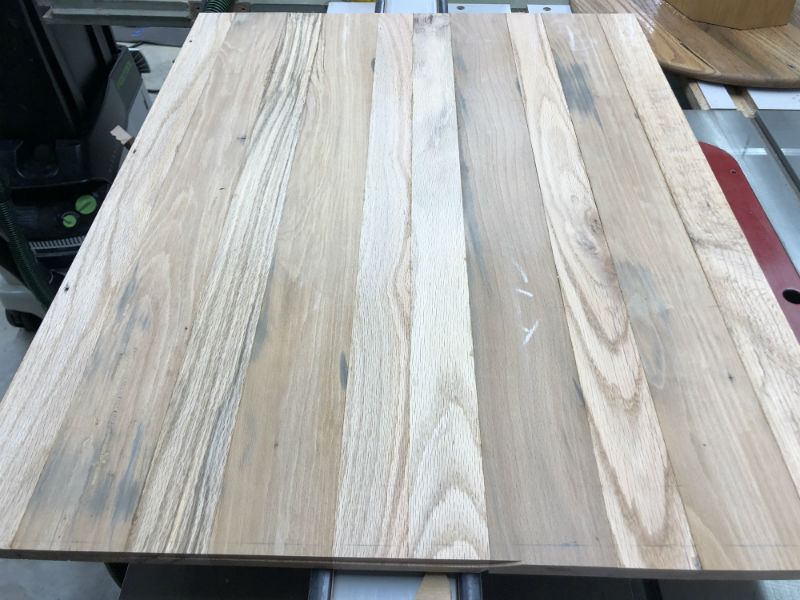
In a recent tip, we discussed preparing extra boards for a project that utilized used oak flooring. The rejection rate is pretty high, as many boards are warped, stained, bowed and bent. And that doesn’t even count the ones that the floor nails blew out the entire underside of the board.
Although I followed my own advice, there were so many bad boards that I had to go back to the pile and select some more.
I took about twice as many boards as I thought I’d need to replace the rejects, cleaned, ripped and planed them, then began to arrange them among the original selections for a pleasing look.
That’s when it hit me.
These boards were different. Still oak, but about half the width of the first set.
I’d picked them out, done all that work on them, and I’m just now noticing?
Hmmm. These boards aren’t exactly the same width. Well, no, they’re not even close to the same width. After all that work, it’s a good thing I was able to come up with a way to make them work!
As Popeye says, “All’s well that ends in the well.” As I tried various arrangements, it became obvious that alternating widths gave the panel an interest it lacked with uniform board width.
I’m not sure what the final product will end up being, but I’m calling this a happy accident for now.
Jim Randolph is a veterinarian in Long Beach, Mississippi. His earlier careers as lawn mower, dairy farmer, automobile mechanic, microwave communications electronics instructor and journeyman carpenter all influence his approach to woodworking. His favorite projects are furniture built for his wife, Brenda, and for their children and grandchildren. His and Brenda’s home, nicknamed Sticks-In-The-Mud, is built on pilings (sticks) near the wetlands (mud) on a bayou off Jourdan River. His shop is in the lower level of their home.Questions and comments on woodworking may be written below in the comments section. Questions about pet care should be directed to his blog on pet care, www.MyPetsDoctor.com. We regret that, because of high volume, not all inquiries can be answered personally.
No Southern-fried Southern boy wants to be called a Yankee, but we share the characteristics of shrewdness and thrift. Thus, each month we include a money-saving tip from Sticks in the Mud woodworker, Jim Randolph. It’s OK if you call him “cheap.”
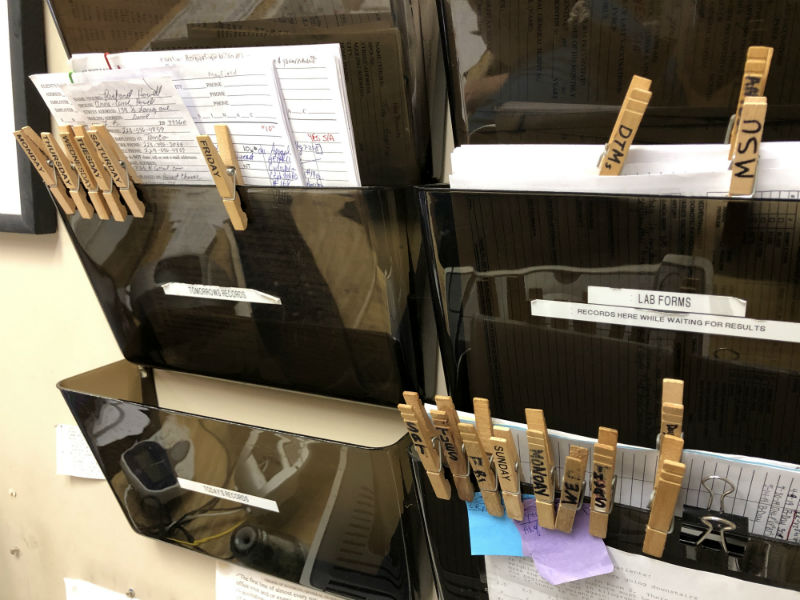
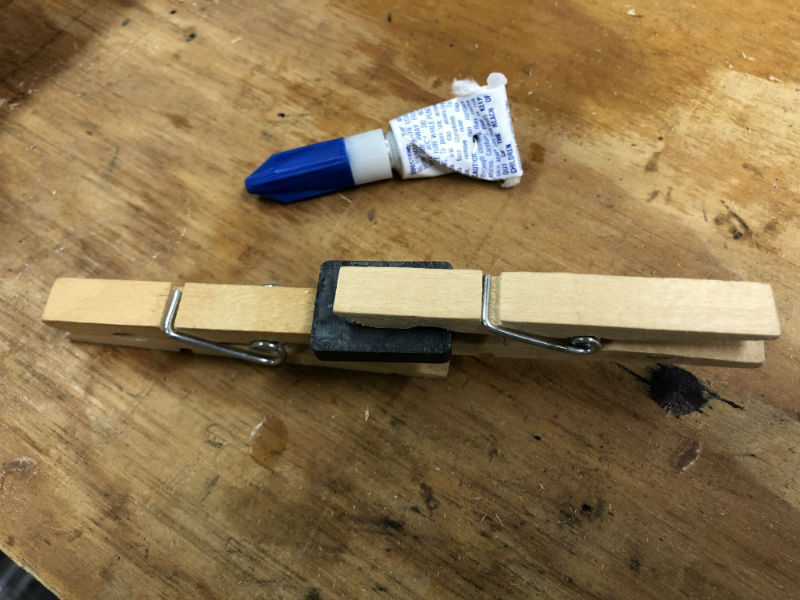
I sent an email to Steve Johnson, and the background of an included photograph showed off a bunch of papers held together by a clothespin. Steve responded, “Clothespins instead of paper clips … I love it! I think there might be a ‘Tips’ column in that. Glue a Rare Earth Magnet to the back of one leg of the clothespin and you have a great way to hang up notes, too!”
“Gee,” I thought, “doesn’t everyone use their clothespins that way?”
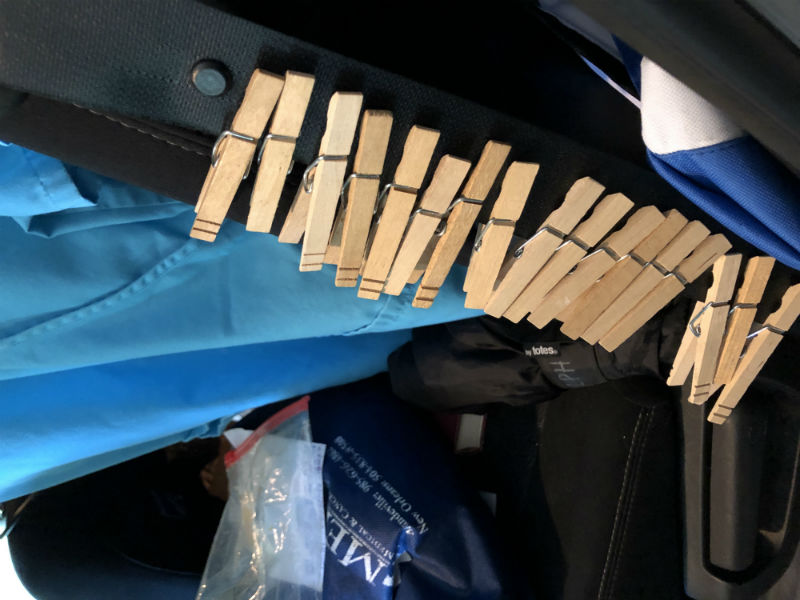
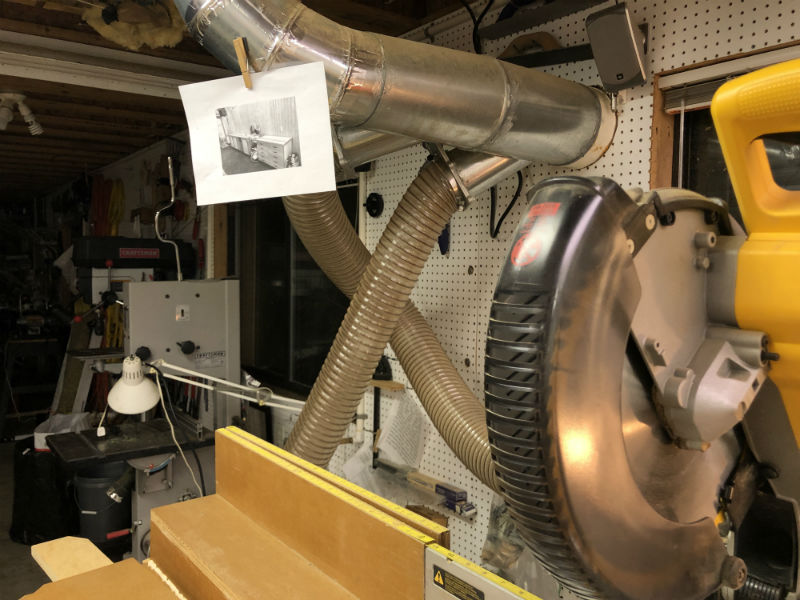
I can’t remember when I didn’t use clothespins to hold papers, but I’m going to say it started at Animal General Hospital. As you can see, labeled with Magic Marker, each one has its own special job.In my vehicle, I’m never far from a clothespin. Because it’s essentially a one-man transport, I rarely have to worry about anyone wanting to use this seat belt.In the shop I keep a supply by the sink and several on pegboard hooks in various locations around the shop.In a pinch, you can even use them as a lightweight clamp. Here, I’m gluing a magnet to a clothespin, and having another clothespin hold things together while the super glue cures.Here’s the clothespin holding the plans on the metal dust collector duct while I work.
Jim Randolph is a veterinarian in Long Beach, Mississippi. His earlier careers as lawn mower, dairy farmer, automobile mechanic, microwave communications electronics instructor and journeyman carpenter all influence his approach to woodworking. His favorite projects are furniture built for his wife, Brenda, and for their children and grandchildren. His and Brenda’s home, nicknamed Sticks-In-The-Mud, is built on pilings (sticks) near the wetlands (mud) on a bayou off Jourdan River. His shop is in the lower level of their home.Questions and comments on woodworking may be written below in the comments section. Questions about pet care should be directed to his blog on pet care, www.MyPetsDoctor.com. We regret that, because of high volume, not all inquiries can be answered personally.
Welcome to “Tips From Sticks-In-The-Mud Woodshop.” I am a hobbyist who loves woodworking and writing for those who also love the craft. I have found some ways to accomplish tasks in the workshop that might be helpful to you, and I enjoy hearing your own problem-solving ideas. Please share them in the COMMENTS section of each tip. If, in the process, I can also make you laugh, I have achieved 100% of my goals.
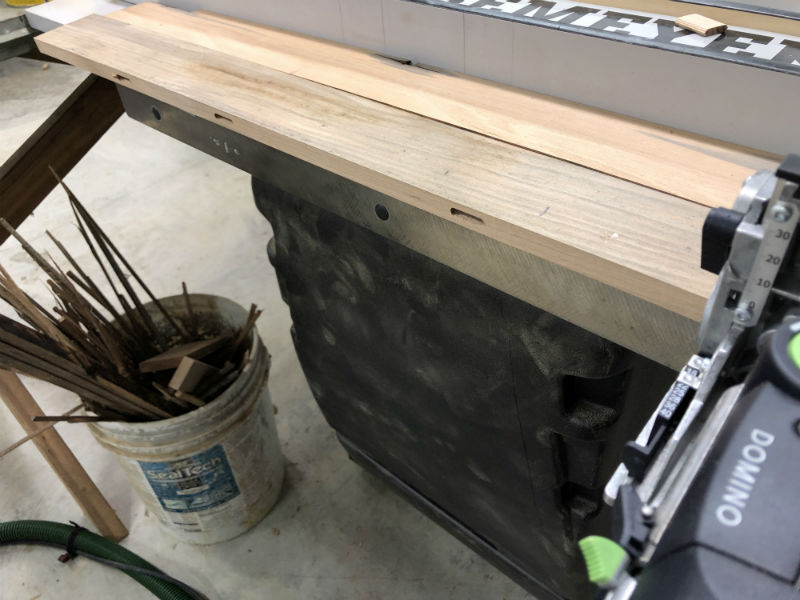
I’m continuing my panel making project, which I’ve discussed in the last two month’s of Tips from Sticks in the Mud (Part 1 and Part 2), and we’re now down to the wire. I hope. I had to go through a lot of boards before I got enough to make the panel lie reasonably flat. Some were twisted, some were bent, warping was rampant. Some junctions required extra Dominos to pull the edges into alignment with each other.
I know most “experts” say that biscuits and Dominos don’t add any strength to an edge joint. I’m no engineer, so I’m not going to argue the point. Nor am I going to test joints with and without additions. However, they certainly give me the feeling that the joint is stronger, and I’ve glued up enough crooked, used wood to know that alignment is far superior when a loose tenon inside is pulling crookedness in the direction of straight. And, the better the initial alignment is, the less sanding, scraping and planing you will have to do to give the smooth surface you desire.
This panel started out about 25″ by 28″. In the 28″ direction, each joint got 4-5mm Dominos, and two joints got two extras. The lowest height setting put the Domino in the middle of the thickness, which I kept thin because Brenda wants it as light as possible.
Before Dominos, each edge was treated to a pass with the Forrest Woodworker II, as the coarse-toothed blade combined with all that crookedness left some burning on the edges. A few edges required a light pass on the jointer to true them up.
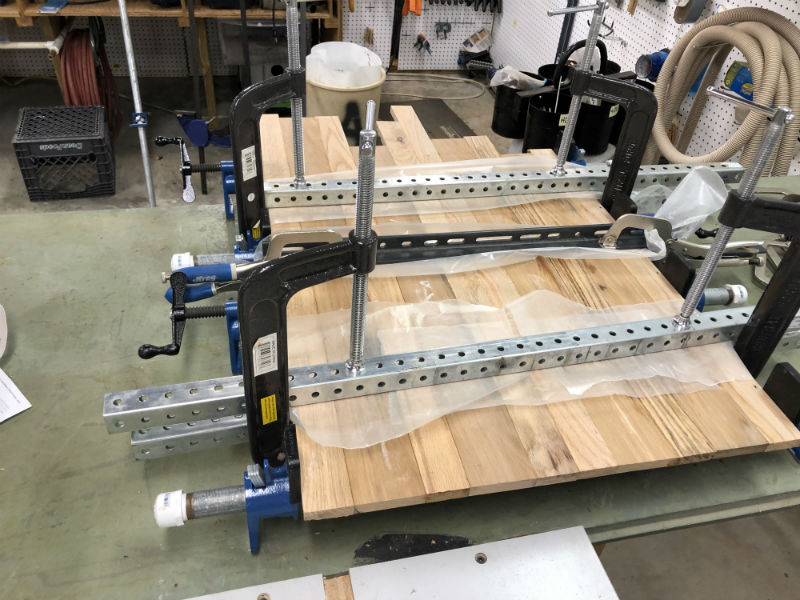
Using the table saw fence as a backstop, I put enough Dominos in each edge to help flatten the panel.
After gluing, I used some cauls to keep the panels as flat as possible.
A bit of waxed paper keeps the metal cauls from reacting with the tannic acid in the oak, causing a stain you’d never get out.
While I had one end of the boards mostly square and even with each other’s ends, I let the other end run wild. There is no reason to sand all of that unused part, and nothing is reliably square yet, so I used the TS 55 REQ Track Saw to cut off the excess.
It’s nothing short of amazing how smooth the cut is from Festool’s track saws when used with a guide rail and a properly-fitting splinter guard. Had this been a final cut, it would be ready for sanding.
And, that’s where I got stuck. I came home early from work one day specifically to finish this task. Then, I got a text from a dear friend from church, “How are you coming along with the bench you were modifying for me?”
I’d already warned him that I had two jobs ahead of the bench. This was one of them, the other was putting new springs under our boat trailer because it was immobilized in its spot in the garage, and nothing could get through that area.
Then, I thought, “He’s been such a good friend.” I finished his bench modification, used the drill press to make 56 screw holes in the brackets he was using on them, and got everything delivered.
He was ecstatic.
I was able to cut off those boards with the TS 55, and begin sanding when I returned, then it was off to supper, kiss my beautiful bride, and bedtime. After irrigating, of course.
With any luck, I can be finished by next month and have a final product for you to look at. Meanwhile, there’s work, and, this week, Brenda and I are making a trip to the Seventh Annual American Eagle Foundation Chatters’ Reunion. While there, I hope to climb Mt. LeConte again. I’m up for it, but there is an 80% chance of rain on the one and only day I can hike. I’ll update you on that next month, too. And, by the way, yes, the boat trailer repair is finished. It has new springs, new wheel bearings and even new Bearing Buddies.
Now, if only I had time to go fishing.
Jim Randolph is a veterinarian in Long Beach, Mississippi. His earlier careers as lawn mower, dairy farmer, automobile mechanic, microwave communications electronics instructor and journeyman carpenter all influence his approach to woodworking. His favorite projects are furniture built for his wife, Brenda, and for their children and grandchildren. His and Brenda’s home, nicknamed Sticks-In-The-Mud, is built on pilings (sticks) near the wetlands (mud) on a bayou off Jourdan River. His shop is in the lower level of their home.Questions and comments on woodworking may be written below in the comments section. Questions about pet care should be directed to his blog on pet care, www.MyPetsDoctor.com. We regret that, because of high volume, not all inquiries can be answered personally.
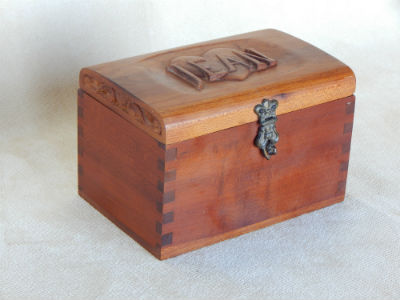
For the June issue of Wood News Online, Bob Rummer writes about what you need to know about making boxes that they don’t teach you in shop class:
I have made a LOT of boxes in nearly 50 years of woodworking — toolboxes, jewelry boxes, tissue boxes, cabinet-sized boxes, bandsawn boxes, carved boxes, recipe boxes, inlaid boxes, ring boxes, veneered boxes, and nesting boxes. You probably made a box yourself as one of the first projects in woodshop or an introduction to woodworking. After all, the saying is, “If you know how to make a box you can make anything.” The starting point in every box project is, “What are you going to put inside it?” After all, most of the design decisions hinge on fitting something inside the box.
And to read about even more shops, click to check out our Workshop Gallery.
If you would like to submit your own shop, just SEND US PHOTOS of your woodworking shop along with captions and a brief history and description of your woodworking. (Email photos at 800 x 600 resolution.) Receive a $50 store credit redeemable towards merchandise at Highland Woodworking if we show your shop in a future issue.