
I am a wood turning snob. I admit it. It took me ten years to get reasonably good at turning and I still am disheartened when I see someone who turns better than I can (think Mike Mahoney, Peter Galbert). I took all the classes. I worked at it long and hard. I bought all the books. I still buy the books, and I am still hoping to get better at my craft. Anyone who wants to call themselves a wood turner should have to go through what I went through – there are no shortcuts and there should not be.
All that said, I resent it when someone calls their tools “easy”. It is not easy – let everybody else pay the price as I did. Buy the books, take the classes, practice for hours and hours. It is not supposed to be easy – if it were easy, than everybody could do it.
With all that in mind, you can imagine my thoughts when I came across the Easy Wood Tool turning tools at the High a few weeks ago. These are new turning tools sold as easy to learn and easy to use. Yeah, right!! Snobbery kicked in.
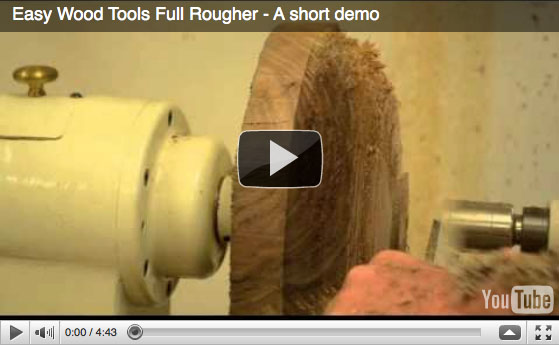
Nonetheless, I got my hands on four of them to try out for a few days. Skeptical and snobby as ever, I set up a big round piece of tough walnut crotch on the Oneway. I pulled the large roughing tool out of its case and very carefully and delicately eased it up to the walnut. Every tool says right on the label to use the tool level and parallel to the floor and stick it straight into the wood. That is exactly what I did. I put it up there and stuck it right in the wood fully expecting some catch or kickback. Nothing happened. At least nothing bad happened. Small cuts at first and then as I gained confidence more and deeper cuts and pretty soon there were chips everywhere. I’m convinced. I must say that was the “easiest” bit of turning I have ever done.

Large Rougher
There is a whole group of Easy Wood Tools. The one I used for this review was the large roughing tool. It comes from the factory with a solid steel shaft and a substantial beautifully shaped and finished wooden handle. The cutting edge on the large rougher is a square piece of carbide sharpened on all four edges and mounted to the end of the shaft with a set screw. When one edge dulls, simply rotate the cutter to a new sharp side and continue working. When all four sides of the cutter are dull, the cutter is replaced.

Note Replacable Tip
I am impressed with these tools so far. Take a look at the video below and also go to the Easy Wood Tools website to see how to use the tools. If you are a beginning wood turner and don’t want to spend a large amount of time learning the other traditional methods, then these are the tools for you. If you are a traditional turner with many hours of experience, you will still like these tools for their extremely easy (there, I said it) use. You can throw some chips fast and easy with these tools. Give them a try. And be sure to take a look at the video below if you still aren’t convinced.

 Most people know whether or not they live in an area where rust forms quickly. Many times the areas with elevated rust are near a body of water (ocean, lake, pond…), but high humidity alone will facilitate the formation of Mr. Rust. Obviously (or not so obviously), the bodies of planes made from bronze do not rust, even though the blade is still a potential target for rust. This is because rust is iron oxide. The metals used in most non-bronze planes, however, are subject to rust. This includes the blade, which is made from steel. Woodworkers will try a multitude of procedures to ward off rust. In our show kits, we will put Jojoba oil onto a rag (Ed. note:
  When we finally closed our gaping mouths, we got out our ultra-flat granite plate and a couple of


 Now it’s time to cut your plane into your desired shape. Remember, it’s a good idea to have the back of the plane iron at least slightly above the top edge, so it’s easier to set or adjust the iron. After cutting to shape, you can use rasps, files, chisels, sandpaper, and anything else you desire to finish your plane’s surface the way you like. Some prefer a very smooth outer surface, where others like it to have texture so it’s easier to hold onto. This is personal preference. I usually use a chisel to put a bevel on all edges, so they are both stronger and feel better to the hands. If you don’t feel comfortable with this, sandpaper will knock off the edges, too. Now that the shaping is completed, you’ll need to make a wedge out of the left-over triangular piece. The fitting process can take a while, but it is another skill learned. Slide the cross bar into place, put the iron onto the bed and then put the wedge between the cross bar and the iron. Tap the wedge with a little force, so the cross bar marks the wedge where it makes contact. This will show you which portion is making contact, and which area is too low. Use your preferred method to remove material from the area on the wedge where it made contact. Reinsert the wedge, and repeat until the wedge is showing signs of contact with the cross bar, all the way across, or at least on both edges. (If it is making contact on both edges, it will apply equal pressure across the iron) It’s a good idea to work the fitting until the wedge reaches down past the cross bar about an inch or an inch and a half. Remember to take the fitting process slowly, as you can always remove more, but it’s more difficult to add material to the wedge.