Highland Staff

Aug 312012
 

This month I’m writing about one of Lie-Nielsen’s smallest planes, the Convex Sole Block Plane. Don’t discount the size though, as it can be as handy as any other plane in the lineup.

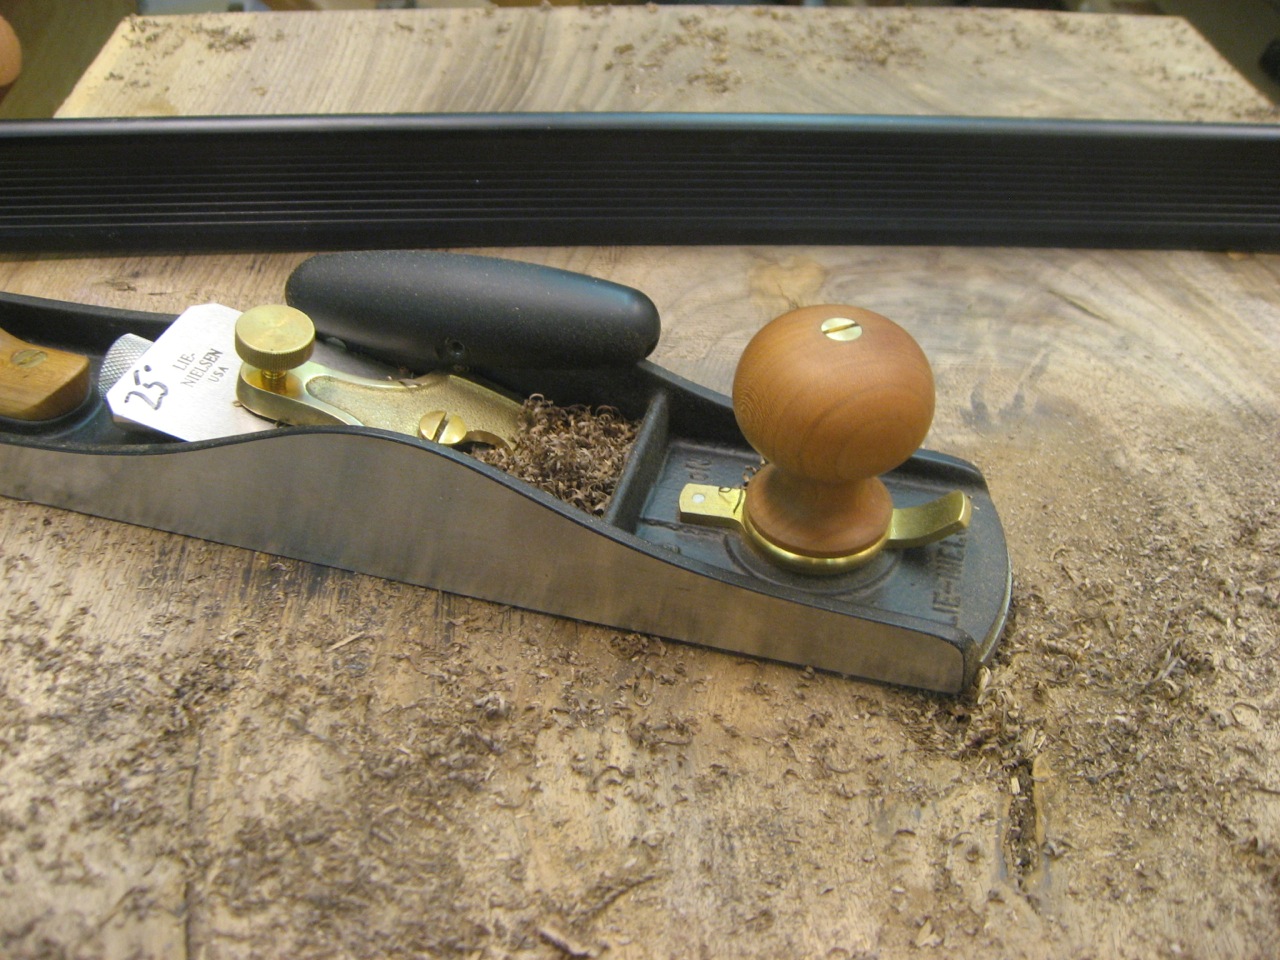
The Convex Sole Block Plane is similar to other planes, in that it has a ductile cast iron body, an A-2 steel iron and a bronze cap. The sole of the plane is 3 1/2” long, and the overall length, including the squirrel tail handle, is 5”. Not all block planes have squirrel tails, but since this plane is small, the tail really makes it much easier to hold comfortably. On most block planes, the sole is flat both side-to-side and front to back. Not on this plane. The sole on this plane is convex both side-to-side and front to back (This means if you set the plane down on one of it’s sides, the bottom bows out in width and length). This Plane is bedded at 20 degrees, with the iron bevel up. The sole radius is 3” side-to-side and 27” front to back, and the mouth has a radius of 15/16”. The radius of the cutting edge of the iron is 7/8”, which prevents the corners of the iron from engaging the wood, as long as the iron is set for a light to medium cut.

This shape of plane is very handy when working on any project that has a concave recess, like a seat for a chair, or even some of the shaping that goes into making the top for a Les Paul guitar (originated by Gibson Guitar Corp.), for instance. Some woodworkers will gravitate towards some type of gouge to work concave shapes, but there is something about the control this plane provides, and the surface it leaves, that makes this such a valuable piece for your tool kit. Even if I use a gouge for the bulk removal of a concave shape, I like to follow it up with this plane, which provides a finalized surface, and the results look and feel so much better than when I use sandpaper.

Sharpening this plane’s iron is a bit different from sharpening a typical flat-soled plane. You start by honing the back of the iron much the same way you would an iron from most other planes. Start with a 1000 grit water stone and then move up to 8000 grit. The main difference is, since the end of this iron is essentially a section of a circle, rather than straight across, you won’t use the Charlesworth ruler trick for this one. I work with the back of the iron flat on the stones, and it usually takes a little longer to fully hone the back the first time. Subsequent sharpening requires very little attention to the back, so the time spent on the first sharpening is a one-time thing. I also limit how much iron extends onto the stone, so it reaches no more than half way across, and depending on the stone size, I may not even reach the half way mark. There is no reason to work the complete back of the iron, as the only section that is cutting is the very edge. Just make sure enough iron is extended onto the stone so you can feel your reference. If you tried to hone something silly-small like a 1/16”, at the tip of the iron, it would be almost impossible to feel that the iron was actually flat on the stone.

Once you finish working the back, shift to the bevel side, for which the steps are also a bit different. To hone the plane iron’s bevel, start by creating a groove in some soft wood, and then set the plane to make a deeper cut than normal. Expect it to take multiple passes, and either focus on keeping the plane’s centerline aligned with your groove’s centerline, or tack a straight strip of wood onto the board to use as a fence. My preference is to make at least a couple of these “pattern” boards, if I plan to use multiple “grits” of honing compound. This way I can maintain each board for a specific grit, and just mark each one for the type of compound used. After creating the groove in the board, apply the compound to the groove. Now, with the iron out of the plane body, orient the iron so the bevel matches the curvature of the groove. Next, I like to mark the bevel of the iron with a black Sharpie marker. This provides feedback so I can immediately tell that I’m working the correct area of the iron. Work the bevel through the compounds, until the full bevel is polished, or at minimum, the leading edge is polished.

Once the iron is sharp, it’s time to re-assemble and put the tool to work. Once the iron is in the plane, lightly snug up the bronze cap, just so it is tight enough that the iron doesn’t move around. I like to set the plane on a flat piece of wood, so the mouth of the plane is the point where the body is resting. While holding the body, I put just a bit of pressure on the back of the iron, so the iron is making contact with the wood. Tighten the cap a bit more, and then see if the iron is engaging properly. If the iron needs further adjustment forward or laterally, make sure the cap isn’t too tight, then tap the blade lightly until the cut is to your liking. Make sure to tighten the cap once you’ve dialed in the cut.

Go give the Convex Sole Block Plane plane a try. I think you just might find it a missing piece from your kit.

I hope this helps answer any questions. Please let me know if you have any specific questions I may have missed.

Click to take a closer look at the Lie-Nielsen Convex Sole Block Plane.

Click to see Highland Woodworking’s entire selection of Lie-Nielsen hand tools.


Lee Laird has enjoyed woodworking for over 20 years. He is retired from the U.S.P.S. and works for Lie-Nielsen Toolworks as a show staff member, demonstrating tools and training customers. You can email him at lee@lie-nielsen.com.

Aug 302012
 

First I want to decide how to orient the top boards.  So I looked them over, turned them around, and flipped them until I was happy with the top side and match.  They ended up in a slip-match but one board is turned 180 degrees because they taper in width top to bottom by 4-6″ (just like a tree).  This way I get the maximum total width from just two boards.  Once decisions are made, I use chalk to mark the pieces.

English Walnut Two-Board Top

English Walnut Two-Board Top

Now it”s time to get to work: flattening the top.  My Lie-Nielsen #62 becomes the workhorse for these boards since they are too big for my jointer / planer.  A toothed blade does nice work, quickly.

Lie-Nielsen #62 Flattens the Boards

Lie-Nielsen #62 Flattens the Boards


Morton is a furniture designer builder working in Harvard, MA.  He reviews tools for Highland Woodworking on YouTube.  You can also find him on Facebook, Twitter @morton, and his own YouTube channel.

Aug 282012
 

I use my Festool TS55, paired with a rail, to rip off the wavy live edges from boards: it”s a safe, fast, easy way to get a straight edge.

Festool TS55 Ready to Rip

Festool TS55 Ready to Rip

I wet the top to look at the sapwood of my air-dried walnut – trying to decide on using it or not.  Using the white sapwood would definitely look nice as a contrasting stripe down the middle, and echoed in the legs as well – but ultimately I decide to go more “elegant” and remove the white sap.

Sapwood is White on Air-Dried Walnut

Sapwood is White on Air-Dried Walnut

Again – I use the TS55 to rip the sapwood off.  The boards are so long, I have to use Festool rail connectors to gang up my 55″ and 106″ rails in order to make a single cut!

Two Festool Rails Connected to Rip

Two Festool Rails Connected to Rip


Morton is a furniture designer builder working in Harvard, MA.  He reviews tools for Highland Woodworking on YouTube.  You can also find him on Facebook, Twitter @morton, and his own YouTube channel.

Aug 222012
 

Today I went to Artisan Lumber to look for some wood that would match my table design.  Obviously I was mainly looking for material for the top, legs and stretcher.  Brian (the owner) had three pieces of 20-24″ wide x 13′ long english walnut left from a flitch.  It has very wavy grain, lots of cracks and knots – apparently the tree was on a hill on Concord, MA and had been struck by lightning multiple times.  Very unique, making it perfect for this table – and I can get the whole top from just two boards!

English Walnut Roughsawn

English Walnut Roughsawn

Back in my shop, I poured on some alcohol and took a picture so I could see the grain and color.  Actually, we did this at the lumber yard too – make sure you know what you’re getting!

English Walnut with Finish

English Walnut with Finish

I also found some killer material for the curved legs: crotch walnut.  It’s the right size and shape for my design.  Even though I only needed two 8/4 sticks, I grabbed all 4 from the flitch set.

Crotch Walnut Roughsawn

Crotch Walnut Roughsawn

And again, I wanted to check out the right section for my legs – so I taped it off and put on a little alcohol.

Crotch Walnut with Finish

Crotch Walnut with Finish

The material is excellent – now it’s time to get to work!


Morton is a furniture designer + builder working in Harvard, MA.  He reviews tools for Highland Woodworking on YouTube.  You can also find him on Facebook, Twitter @morton, and his own YouTube channel.

Aug 172012
 

Welcome to the first post in a new series for Highland Woodworking: Morton”s Shop.  This series of blog posts will bring you photos and text of the daily work in a furniture-makers workshop.  I plan on keeping it short and sweet – just a taste of the latest.

Dining Trestle Table

Dining Trestle Table

The first project I”m working on is a very large dining table: 10.5″ x 3.5″.  It”s a trestle table with one large leaf at either end, making it collapsable to about 6″ in length.  I look forward to bringing you pictures of my progress!

Dining Trestle Table (Underside)

Dining Trestle Table (Underside)


Morton is a furniture designer builder working in Harvard, MA.  He reviews tools for Highland Woodworking on YouTube.  You can also find him on Facebook, Twitter @morton, and his own YouTube channel.

Jul 312012
 

This month I’m writing about some very unique looking planes that are extremely functional. These are the #95 Bronze Edge Planes. Lie-Nielsen makes these in both right and left hand versions, so you get optimum results no matter the grain direction of your work piece. The #95 has a sole and fence that are precision lapped so they are 90 degrees to one another. The iron is 1/8” thick to prevent chattering and is bedded at 12 degrees. The iron is A2 and comes with a 25 degree bevel straight across and is skewed 17 degrees in the plane body.

Right hand version of the #95

Since the iron’s bevel is ground straight across, like most bench and block planes, you can sharpen it using any side clamping or top clamping honing guide with good results. I treat the iron just like the majority of my other plane irons and hone a 5 degree micro bevel, raising the iron to 30 degrees. On the first honing, it only takes a couple of strokes on the 1000 grit stone to raise a burr on the back of the iron. Subsequent honing may require additional strokes on the stone to generate the burr. Raising a burr will always be the indicator that you’ve completed the work with this stone. Another couple of strokes, at the same angle, on the 8000 grit stone and the bevel side is complete. Now it’s just a matter of providing the same level of attention to the backside of the iron. As you may recall, I use David Charlesworth’s method to handle the back of the iron. Place a thin ruler on the 8000 grit stone, just far enough from the far edge that the iron’s cutting edge hangs slightly over the edge, while the non-cutting end rides on the ruler. Pull the iron’s cutting edge onto the stone, then push back off to the starting position. Repeat this a few times until the burr on the back of the iron is gone. You should see a very thin polished area, on the back of the iron, at the very cutting edge. That should get you a shaving sharp edge on your iron. With that said, be sure you handle the iron carefully. It only takes a moment of inattention to need a trip to the safety kit, or even a stitch or two. Don’t ask me how I know.

Place the iron back into position on the plane, and slip the cap over the iron. Lightly tension the cap, then while holding your thumb on the cap, move the lever under the iron to advance or retract it. Like with most planes, you sight along the sole and look for the thin black line that shows when the iron is above the sole. If the line only shows on one side, move the blade until it is consistent across the full width. I usually retract the iron to the point where I just lose sight of the black line, and then I tension the cap. This gets me very close on cutting depth and angle, and I take the plane to a test piece of wood to finalize the setting. If the resulting test is not exactly 90 degrees, you can adjust the iron to get it perfect. Moving the iron so there is more opening near the fence will lower the angle, while additional opening near the edge will increase the angle.

Notice the small lever behind the non-cutting end of the iron.

If I want to use the #95 to make the edge of a board square to the face, I start by first flattening a reference face. Once complete, I make a mark so I know my reference face, as I always want the fence on my #95 to be up against that side. This will provide my best results, and is why Lie-Nielsen makes both right and left hand versions of the #95. If you always put the fence against your reference side, you’ve got a 50/50 chance that the grain will be your friend. With both versions of the #95, it’s just a matter of choosing the plane that takes advantage of the grain on any given board.

While the primary use is for squaring the edges of stock, you can easily add wooden shoes to the fence, to establish for instance, a specific angled bevel that might be outside the range of adjustment of the iron alone. These planes can also function to widen dados and adjust the depth on rabbets. If the bronze is leaving a mark on light colored wood, you can add a thin strip of wood or tape to the sole/fence to prevent contact, or polish the same contact areas on the plane.

Now go make some shavings! Let me know if you have any questions or suggestions for future articles.

Click to take a closer look at the Lie-Nielsen left hand and right hand edge planes.

Click to see Highland Woodworking’s entire selection of Lie-Nielsen hand tools.


Lee Laird has enjoyed woodworking for over 20 years. He is retired from the U.S.P.S. and works for Lie-Nielsen Toolworks as a show staff member, demonstrating tools and training customers. You can email him at lee@lie-nielsen.com.


Jul 062012
 

The Progressive Pitch version of Lie-Nielsen’s dovetail saw has some features that make it unique and also a fan favorite. Most production made handsaws have saw teeth that are the same pitch all across the saw plate. For example, if a saw has a pitch of 15ppi, then each inch will have 15 points. In this Progressive Pitch dovetail saw, the pitch gradually changes from the toe to the heel of the plate. At the toe, the pitch starts at 16ppi and progressively decreases to 9ppi at the heel. The picture below displays the range of teeth sizes used on this saw.

With handsaws, most woodworkers will find that a smaller pitch makes it easier to start a cut, while a larger pitch cuts more quickly once you get started. That’s the concept behind the Progressive Pitch in this saw and what seems to make it a fan favorite. It’s easy to start using the small-pitched teeth at the toe, and then once you get started, the larger pitched teeth cut quickly. Just remember that when you are starting a cut to hold the saw so most of the saw’s weight is off the wood. Just let the teeth lightly graze the wood, while moving the saw back and forth on your cut line. After a couple of strokes, gradually let the full weight of the saw do the work. Don’t try to add extra pressure, or you’ll likely cut off line.

Since cutting dovetails is a Rip operation, the saw plate is filed Rip, is .020” thick, and has .003” of set on each side. The saw plate is made of Swedish Steel, and is hardened to 50-52Rc, which will stay sharp for a long time, but allow re-sharpening with a small triangular file. The back of the saw is a beautiful piece of solid milled brass. This saw is now 10” long, growing an inch compared to the previous iteration, allowing a longer stroke. The saw has an open style handle, which fits hands of many sizes. The handle is made from beautiful curly maple and is held on with screws using split nuts. Below is a picture, with the split nut driver highlighted, to show what tool you will need to adjust the split nuts.

I personally find the open style handle preferable on a dovetail saw, compared either to a closed style handle or a gents style handle (which is a straight handle in line with the spine of the saw). If the saw had a closed style handle, it is likely that the balance of the saw would be upset, as the closed handle is heavier since it requires more wood. On the gents handled saws, it is easy to accidentally grab the handle, with the blade not quite straight up and down, and to lose your point of reference. I hold my saw handle with my lower three fingers and thumb, while my index finger points out and down the saw plate. The open handle, in and of itself, provides some indexing with my hand and provides feedback as to how I am holding my saw. While this is true, the pointed index finger helps me know the saw plate is in line with my forearm, as long as my wrist isn’t flexed to one side or the other. Why is this important? Let’s compare this to shooting a pistol. I know the index finger is actually on the trigger, with a pistol, but we’ll focus on the alignment issue of the tool to the forearm. When I aim a pistol, I point my forearm and hand towards my target, and of course my pistol. If I flexed my wrist either to the left or right, even though my forearm is still pointed in the target’s direction, I wouldn’t hit dead center. When using a saw, my arm works like a piston, along the line leading to my target (which is the line I want to cut). If I flex my wrist, again I’m going to miss my target, and beyond that, the saw won’t work well. The most efficient usage of a handsaw is when the saw is in line with your arm and target (cut line) and you move the saw back and forth like a piston. Once you get used to using a saw in this way, many inaccuracies go away.

I’ve always loved the look of hand-cut dovetails, and when I first started woodworking, I found they seemed very difficult to cut accurately. So much so, that I thought I just didn’t have enough skill. For a number of years, I’d repeat the process of trying some more dovetails, getting frustrated, and putting my previous dovetail saw away. When Lie-Nielsen came out with their dovetail saws, I was lucky enough to have a friend that owned one that I could try. I was amazed at just how much difference a saw could make. Now, I won’t try to tell you that my first attempt with the Lie-Nielsen dovetail saw was completely flawless, but it looked so much better than anything I had done before and I could see all that I needed was practice. (Oh, and a Lie-Nielsen dovetail saw!) I immediately recognized just how important it is to have the right amount of set on a saw. My old saw had so much set that it made a kerf that looked wide enough to drive my car through. It really felt sloppy and because of that, required a great deal of focus in the attempt to follow a line. Since Lie-Nielsen’s dovetail saws have just .003” of set on each side of the saw plate, it just takes a little practice lining up the initial cut. Once you get to where you can start the saw on your line, it will track very nicely and all you have to do is provide the power. Just back and forth.

I believe you’ll enjoy using the Progressive Pitch Dovetail saw. It can make a huge difference.

Now go make some sawdust! Let me know if you have any questions or suggestions for future articles you would like to see.

Click to take a closer look at the Progressive Pitch Dovetail Saw.

Click to see Highland Woodworking’s entire selection of Lie-Nielsen hand tools.


Lee Laird has enjoyed woodworking for over 20 years. He is retired from the U.S.P.S. and works for Lie-Nielsen Toolworks as a show staff member, demonstrating tools and training customers. You can email him at lee@lie-nielsen.com.