George T. (Terry) Chapman

Terry Chapman is a Professional Engineer (Civil) and Land Surveyor who lives south of Atlanta. He has done woodworking for many years and particularly enjoys bowl turning and making Windsor Chairs. He currently works as Site Development Manager for a local affiliate of Habitat for Humanity and has one son who pastors a Church in Connecticut. You can email him at cdeinc@mindspring.com.

Nov 162010
 

All the Pieces

Original Packing Box

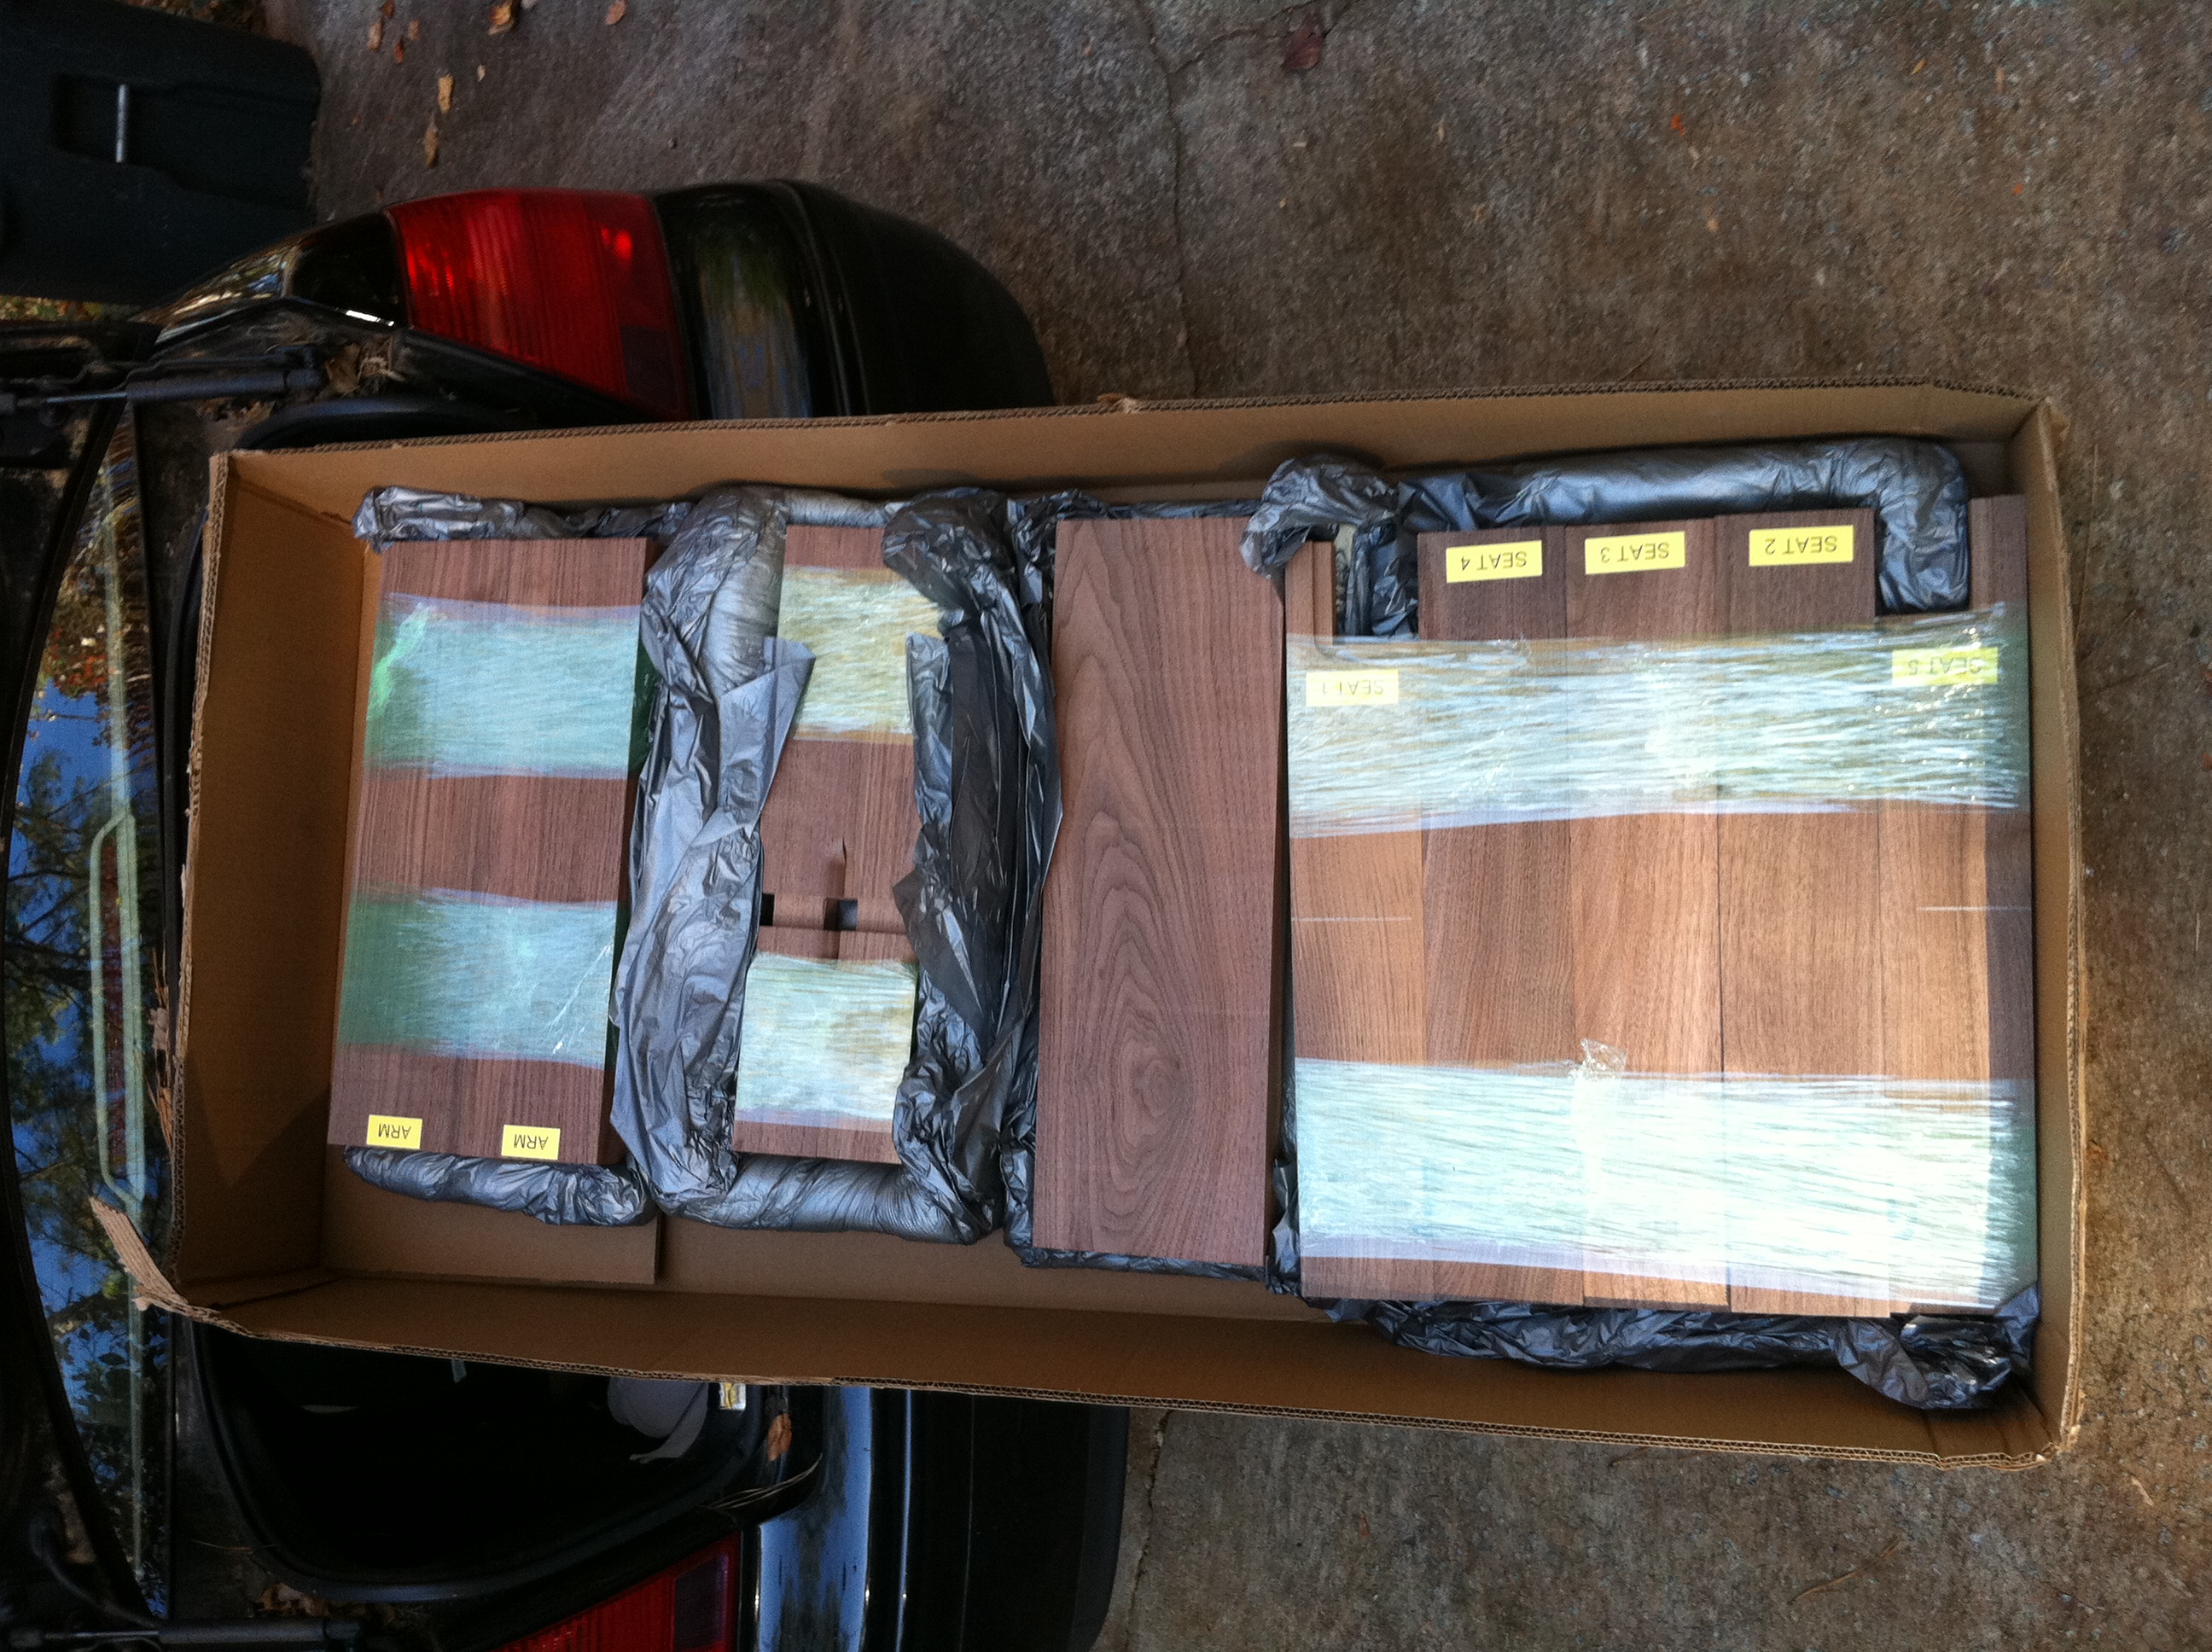
Working on Charles Brock’s Maloof-inspired walnut rocking chair kit from Highland Woodworking. Since I picked it up from the store last week, I got it home and started pulling the pieces out of the package. We had to stuff it into my small car and when I got home, it was too heavy (shipping weight is about 70 pounds) and awkward to get out by myself. I opened it up and took it out one piece at a time. It took me a while because I spent a lot of time admiring the wood. Seldom do most woodworkers get a chance to see walnut this thick and pretty. It is beautiful!

The kit comes in a box with fitted foam sections to protect the wood. The wood is packed in two layers and some groups are shrink-wrapped together and labeled to match the instructions. I picked up a set of instructions including a book and the DVD Charles Brock has put together. Over the weekend, I read the book and watched the video a couple of times to get a feel for the whole process. There is also a smaller set of instructions packaged with the wood that is specific to the kit –sort of a subset of the DVD instructions. I found after I watched the video and got ready to start on the kit that the things, which initially looked the most difficult in the video, were already done. The tenons on the seat rear and shaping of the legs, front and rear, for example, are completed.

Patterns on Plywood

I started with the seat as instructed. I first cut out the patterns from the plan sheets, glued them to some eighth inch ply, and used them to mark the seat. I could not help being a little apprehensive when I started sawing that beautiful walnut.

I followed the video instructions to saw the pieces of the seat and my next step is to glue the seat together and start shaping it. I had to buy a right angle grinder and some 30-grit sandpaper. (When’s the last time you used 30-grit for anything?)

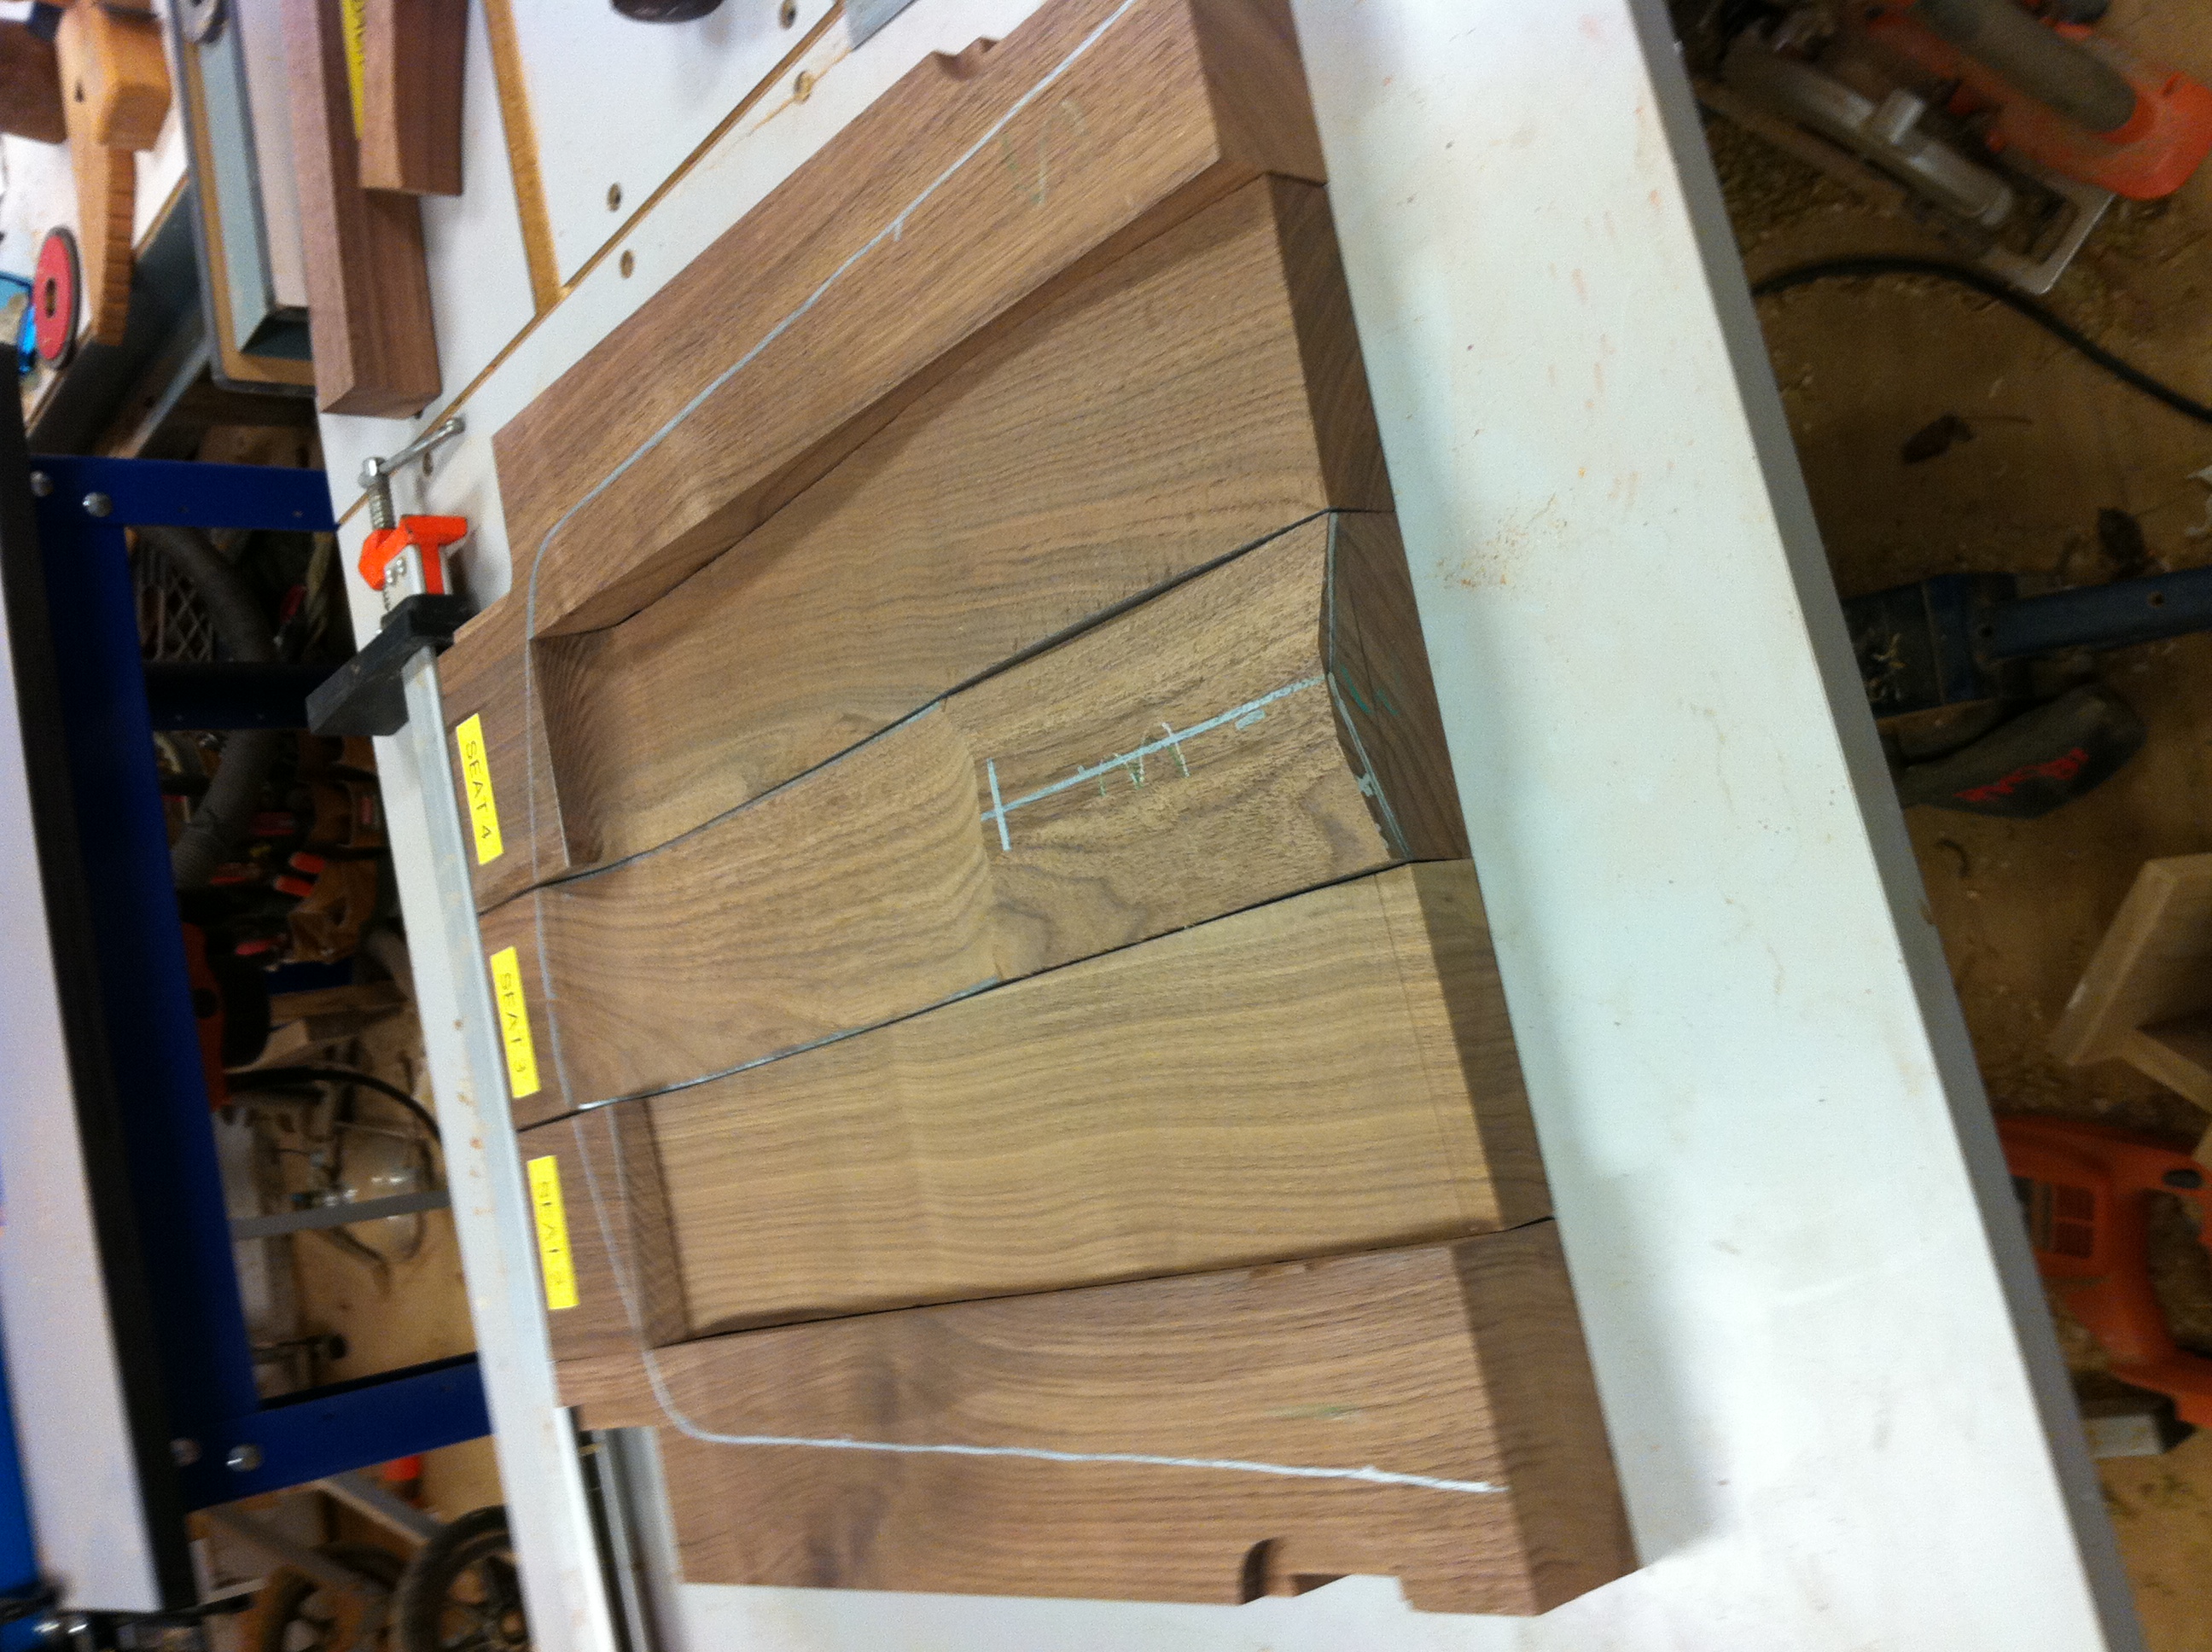
Seat Ready to Glue and Shape

Here’s what I have learned so far:

  1. This kit has absolutely beautiful wood.
  2. Watch the video carefully all the way through and then when you start working, you will have to sort out the parts of the video you need.
  3. Before you start any step, go watch the video, read the book, and the instructions again, and then do the next piece.
  4. I never saw anybody mark up wood this way. He draws all over everything and since none of it is a finished surface until the very end, it doesn’t matter. I’m doing it too.
  5. This is better done listening to Mozart than the Beach Boys. Sets a more appropriate mood.

Time and materials so far:

  1. 6 hours including watching video.
  2. $50 for right angle grinder and sandpaper and white pens.

Check out how to get one of these kits

Click here to read about Terry’s next step in building the Maloof Inspired Rocker.

Nov 132010
 

You can call me the “Chair” man. Maybe we can go with “Chair Man of the Walnut Board”; or we could shorten it to Chairman of the Board. We already discussed my Windsor Chair with Mike Dunbar last summer, and then last month I did the Chair class with Peter Galbert at Highland. Now I get to do a Charles Brock Maloof style rocker. You can call me “Mr.” Chairman.

You may have seen that Highland is offering a Maloof style Rocker in a kit form and the first kits came to the store today. I am going by tomorrow (if you really want to be the first to get one, you better be there before me) and pick one up so I can get started . Charles Brock is teaching a class these days on building this beautiful rocker from scratch. He has set up to sell kits with all the wood you need, some pieces already shaped to fit, and the High has them on hand.

Chair and the Kit

I am going to pick up my kit tomorrow and start to work on it. I will write about it as I move through the process and you can follow me at the Highland Blog. I will keep a log of my time and tell you all the snags and all the good stuff. This is going to be fun!!

Click here to read about Terry’s next step in building the Maloof Inspired Rocker.

Nov 022010
 

I once heard Norm Abram say that nothing upsets him more than someone suggesting that the only reason he can build all those things is all the tools he has.

Well, having a well-equipped shop is indeed a wonderful thing, but Norm is right. How much woodworking you can do is not solely dependent on how many tools you have.

Listen to me Goober when I tell you, it ain’t how many tools you have. Now go make something.

Oct 302010
 

Piedmont Hospital in Atlanta is one of the biggest and best in the city and they have a wonderful tradition.  There in the middle of all the living and dying that goes on in a big city hospital, they play Brahms’ Lullaby over the intercom throughout the hospital whenever a baby is born.  Everyone who knows of the tradition stops and smiles and listens to the whole thing in celebration and thanksgiving.

I tell you all this in celebration of the birth of six new Child’s Windsor Chairs.

Bow on the Seat

I told Peter this afternoon that we should stop and sing something or do a little dance or stop and shout “Chair” with our hands in the air so everyone would stop and smile and celebrate with us.

This morning we started out by cleaning up the seats and scraping them smooth.

Ready to Drill the Bow

We trimmed off the leg tops and made ‘em look real pretty.  After we pulled our bows out of the heated closet we had left them in all week, we cleaned them up and got them ready to install in the seat.  We trimmed the ends to fit and then got the back spindles ready to plug into the seats.  After a long lesson on how to drill the holes in the bow so the spindles will fit correctly, we drilled the holes and fitted the spindles and finally glued and wedged the bow back into the seat.  A new chair entered the world.  Each of us took particular pride and joy in sitting down on our chair for the first time.

A Chair is Born — Everybody Shout “Chair”

It is done and all the guys have left town.  It will certainly be different going to my shop by myself next week.  This was a great class and Peter Galbert is a fine chair maker, wood turner and woodworking teacher.  My new Windsor chair is beautiful, if I do say so myself.

Want to see our graduation picture?  From left to right there is Daniel, Corey, Terry, Dana, Rich, Peter and Andy.

Peter Galbert’s Chair Class–Highland Woodworking — October 2010

Photos for the last two days are by Ed Scent, a staffer at Highland Woodworking.

Want to read the rest of this series? Start at the beginning with Day 1 of Peter Galbert’s Windsor Chair class.

Oct 282010
 

We are almost there. It is the end of Day Six at the Galbert Windsor Chair Class and today we legged ‘em up. All of us have been looking forward to this day all week.

“R” ing the Spindles

The way these chairs are made is with a “box” configuration in the stretchers and if you get an angle wrong or drill a hole wrong, then it will not fit into the bottom of the chair. I was a little worried once I put the four connected legs on the floor for the first time. The set was holding one leg up off the floor at a funny angle, kinda like a dog with a hurt foot. We rescued it and plugged it into the seat and it went right where it was supposed to fit.

Getting There

One thing that is striking is the stretchers are never test fitted into the legs. They fit so tightly that you will never get them out.

They are driven home with substantial blows from a steel hammer and then a dead blow hammer from the other side and with a thin coating of hide glue; they are good for the next two hundred years. It really makes you want to do it right and then put your name on it.

Another thing we did this morning was shape the front foot rest for our chairs. That is the first time this week that Peter turned us loose to do our own thing. It was great! You see we have not even been able to say the “r” word all week much less change the shape of our spindles from octagonal to “r” . Being able to shape that footrest however we wanted was terrifically liberating.

Tomorrow we will add the back bow and spindles to finish our chairs and then go our separate ways. I am afraid it will be sad. Look how lonely the legged up seats looked after we all left today.

Click here to read about Day 7 of Peter Galbert’s Build a Windsor Chair class.

Or, start at the beginning with Day 1 of Peter Galbert’s Windsor Chair class.

Oct 272010
 

Drawknife on Three Days of Work

Why would we talk about “Fortune Favors the Bold” in a chairmaking class? Next time you spend three days working on a piece of soft pine trying to make a Windsor chair seat out of it and the instructor tells you to take a drawknife and make big honking cuts on the edge of the seat with it, you will know what I mean. It took a lot of guts to cut that seat.

Scorping It Out

We spent the morning of the fifth day carving out the seat to our chairs. We started with the scorp and carved a round portion near the back of the seat. Peter did one as a demo in about 45 seconds and then we spent about 45 minutes trying to make ours look like his. After that, we worked on another part of the seat and then tried to look at the whole thing to make it symmetrical and even and not have something people will not sit on. It is harder than you think. The travisher came next to smooth it out some more. Next we moved to the bottom edge and cut a bevel which runs up to the top edge and if you mess that up everyone will come along and run their fingers along the edge and say, what fool did this? That’s the part that needed boldness.

We spent the rest of the day smoothing the seat, shaping the spindles for the back and getting ready to attach the legs tomorrow. I surely do hope this chair comes together since we only have two days left to finish it. Wouldn’t want the one-eyed guy on the horse to laugh at me.

Needs Some More Smoothing and Scraping

Click here to read about Day 6 of Peter Galbert’s Build a Windsor Chair class.

Or, start at the beginning with Day 1 of Peter Galbert’s Windsor Chair class

Oct 262010
 

Day Four is done.  I think we may have figured out who is Grumpy and who is Sleepy today.  I don’t believe you have met our crew.  There is Corey from Kentucky, Dana from Virginia, Daniel from Israel (that’s right, all the way from Israel), and Jim and I are from Atlanta.  Peter and his assistant, Andy complete the crew.  We are already good friends.

Drilling Seat Holes

We spent the morning doing nothing but drilling holes in the seat.  That may not sound like much, but there are eleven holes drilled at precise compound angles at very particular locations.   If you want a good chair, you have to be very careful making these holes.

After a lunch break, we started working on getting the legs into the seats.  The legs are fitted in tapered holes for strength and they must be set at the correct angles so that when you look at the chair from the front or from the side, the legs line up.  It is a fact of making things like Windsor chairs that the eye goes directly to things which are out of line or uneven.  If the legs are not lined up, a one-eyed man on a fast horse would ride by and see it and chuckle a little at your ineptitude.  You certainly don’t want that so you need to be careful.

When we had the legs fitted, we started measuring for the side and front stretchers – a delicate operation.  Since this is a “box” stretcher configuration, there is little room for error.  If you mess it up, then your work on the legs and stretchers will have been in vain and you might as well give the whole works to the man on the horse.  We got all the stretchers cut to size and we will be ready to start drilling holes in the legs in the morning.  We will also start carving the seats and shaping them to that beautiful delicate shape you can see in all the pictures.

Seat with holes drilled

Seat with Legs

We made another full day today and expect to do so again tomorrow.  Don’t you wish you had signed up?  Go look at the schedule of classes on the Highland Woodworking web site and see what you would like to learn.  We look forward to seeing you in Atlanta. Maybe I will see you there and put you on the Blog too.

Click here to read about Day 5 of Peter Galbert’s Build a Windsor Chair class.

Or, start at the beginning with Day 1 of Peter Galbert’s Windsor Chair class.