George T. (Terry) Chapman

Terry Chapman is a Professional Engineer (Civil) and Land Surveyor who lives south of Atlanta. He has done woodworking for many years and particularly enjoys bowl turning and making Windsor Chairs. He currently works as Site Development Manager for a local affiliate of Habitat for Humanity and has one son who pastors a Church in Connecticut. You can email him at cdeinc@mindspring.com.

Dec 302020
 

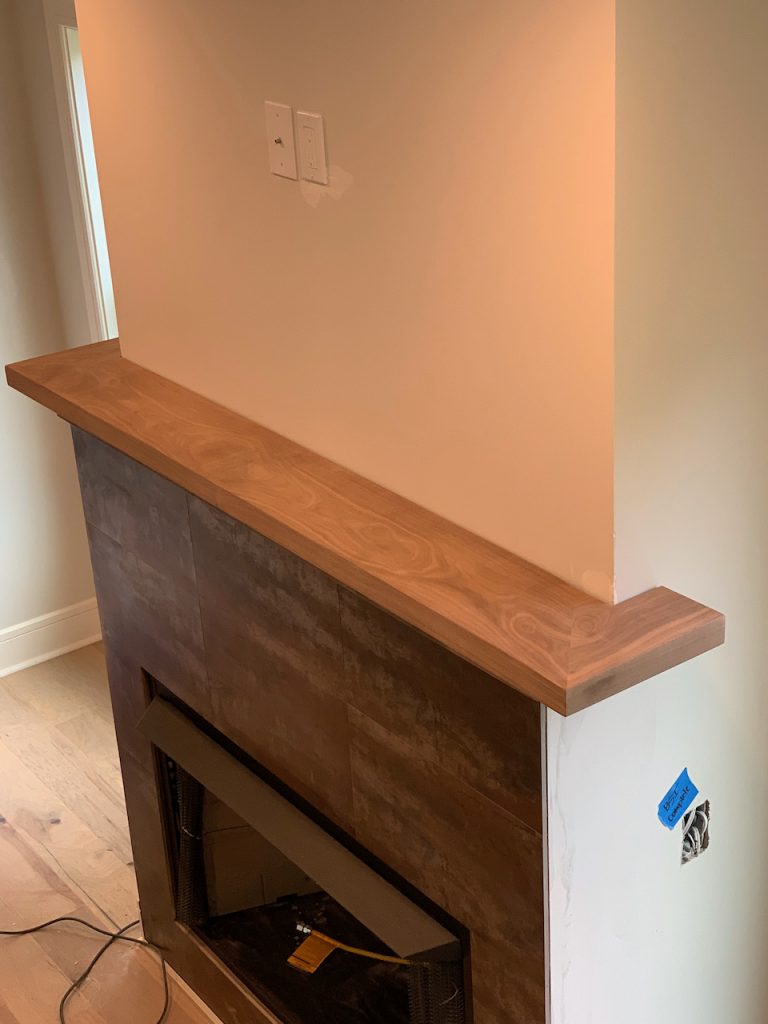
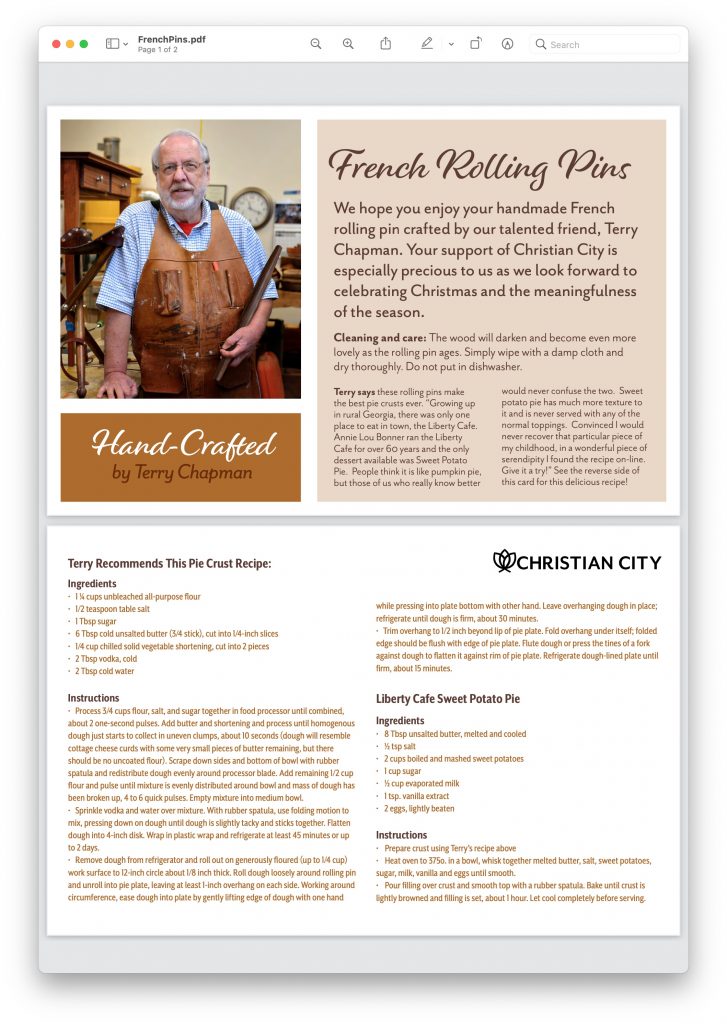
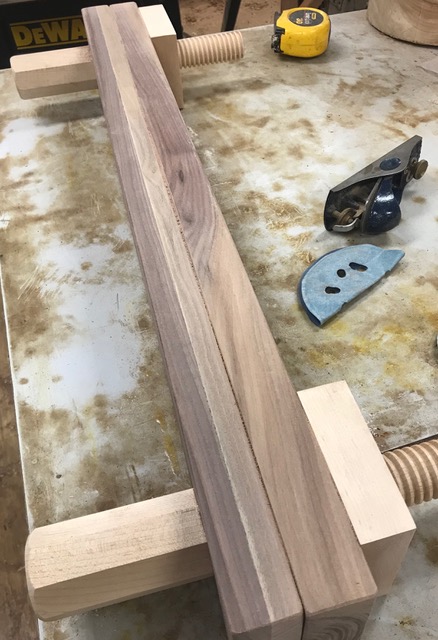
I have volunteered many years for a local Retirement Community/Children’s Home in my professional capacity as a Civil Engineer/Land Surveyor. I am also a Residential Contractor and a while back we needed a mantle piece over the fireplace. I bought a piece of 8/4 black walnut and when it turned out to be too wide for the mantle, I cut off a two inch strip and saved it in my shop. One day I was clicking around online and found a French style rolling pin. It occurred to me that my piece of walnut would work very nicely so I made a couple of rolling pins for gifts and they were well received. As it got closer to Christmas I realized there may be a sales opportunity to benefit the Children’s Village at the Retirement Community. I typed up a quick prospectus for the fundraising folks and sent it over with a clear offer to decline if they needed to. Well they jumped on it and it has been a rousing success.  

The Walnut Mantle.

I didn’t know how many I thought we might sell, but after an email blast and a Facebook post, we had orders for 8 in the first hour. By noon, we sold 41 and were thinking of cutting off Christmas orders. We ended up continuing, and as of December 24th, 2020 we are up to over 100 sold for a $28 minimum donation. There have been donations of $500 and with a matching grant in place the funds have turned into a significant amount for the children. It has been most gratifying. The marketing people came up with a card to include with the pins which has a picture of me in the shop, a sweet potato pie recipe from my teens in rural Georgia, and a pie crust recipe.  

During the annual review with my financial manager, I mentioned the campaign and she ordered 3. And then her company, (think big mega-bank), decided to offer them as gifts for some of their clients and ordered 20 more. To say I was thrilled is an understatement.  

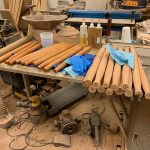
If you are not a baker, the pins are 22 inches long with the major diameter at 1.5 inches and a 4 inch taper to one inch at the ends. These pins are wonderful for making pie crusts and other baked goods. It is like driving a sports car rolling a pie crust with one of these dudes. 

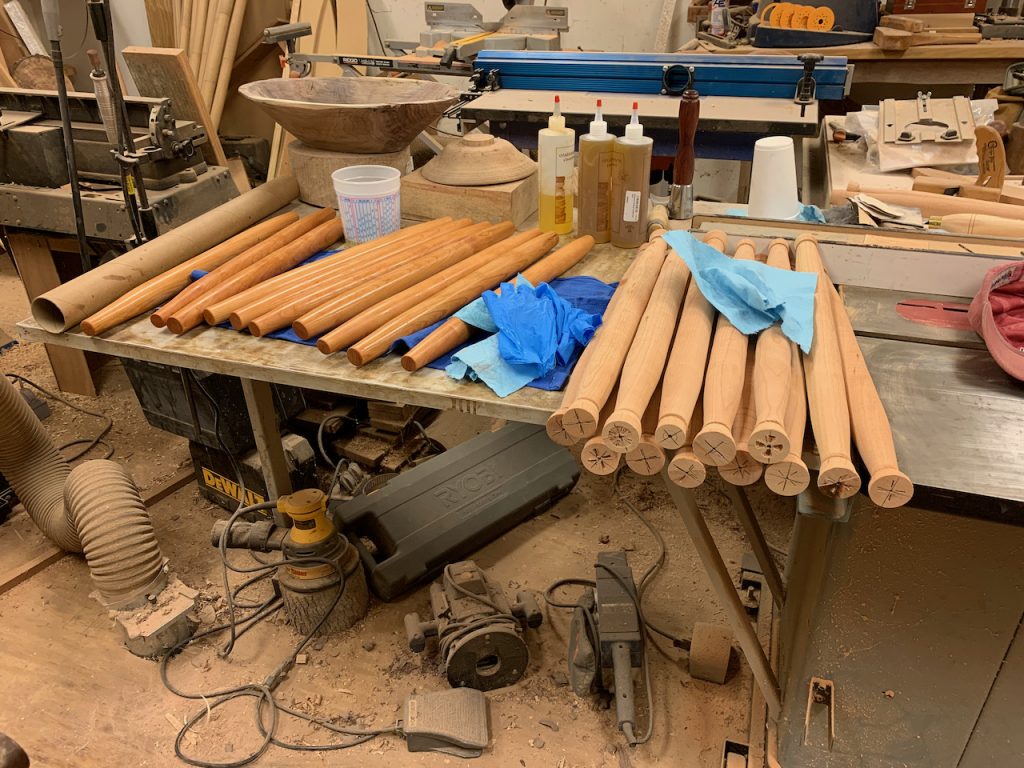
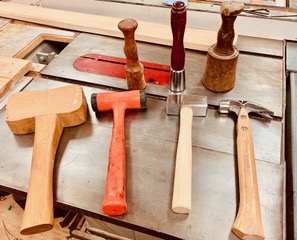
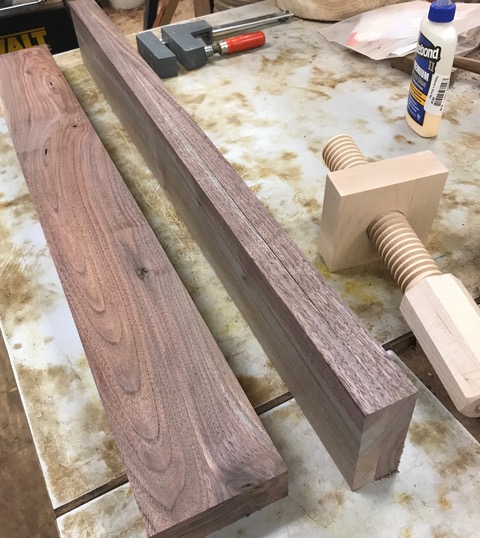
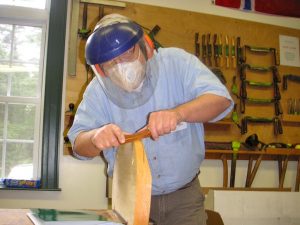
I make them from walnut and cherry, but I suppose you could make them from any hardwood. I buy 8/4 material and rip them to a square blank I can round on my lathe. I bought a new roughing gouge and it has been an absolute joy to use. I round them with the gouge, set some depth grooves with a parting tool and calipers and then run them out quickly with the roughing gouge. After I get a batch shaped, I hook up the dust collector pipe at the lathe and set to work sanding. I shape with 80 grit, then step up to 150, 220 and then some nonwoven cloths and #0000 steel wool. I trim the ends and round them with my wood rasps then a coat or two of Walnut Oil on them for a finish. I bought 24 inch cardboard mailing tubes and they are on the way.

I was surprised how much better I have gotten at spindle turning after knocking out nearly 100 of these things. The first few I did, I used an old light weight roughing gouge and had the lathe turning too slow. I was getting vibration in the center of the piece and it made a series of small divots all around the piece. I pulled out my new skew chisel but I need more practice with a skew. Now I use the roughing gouge, the parting tool and the sandpapers and I can produce a rolling pin from start to finish in about 20 minutes.

What happiness to be able to do something I enjoy to support an institution that does as much good as this one does.  Might want to give it a try.  

Apr 162020
 

I subscribe to the New York Times (All the News That’s Fit to Print) Sunday only. It comes to my driveway and it is my habit to sit in the truck and read for about three hours. In the winter time, the seat is heated and in the summer it is cooled and I can listen to the radio if I want to. It’s actually the best seat in my house. About five weeks ago they published in the magazine section a recipe for making marshmallows at home.

New York Times Magazine

It seems homemade marshmallows are a thing — who knew?? You can flavor them up differently and some shops sell them at a premium along with custom cupcakes. I made up a batch, don’t ask me why, and they are delicious. Tender and much better than the bought kind, and well worth the trouble. If you never knew, they are made of sugar, corn syrup and gelatin. At the end you coat them with cornstarch and powdered sugar and they look just like the bought kind except they are bigger and square and overly tender. Highly recommended.

While I have been sitting out the virus at home with very little to do for the last week, I have been listening to W. Patrick Edwards on his blog. He is an expert furniture conservator and has made his living for many years in the field.  His work is impressive to say the least. He manufactures and sells Old Brown Glue, sold at Highland. For the last week or so, he has been reviewing videos he posted for Fine Woodworking Magazine on hide glue and its proper use.

Now, I have a Glue Pot and some Hide Glue granules I bought a few years ago, but I really did not know how to use the stuff. I knew the theory of being able to release a hide glue joint with hot water because of my reading on violin making, a youthful dream. I bought a bottle of Edwards’ Old Brown Glue, a ready made hide glue for those without a glue pot. I finally broke it out the other week and actually heated the bottle in my glue pot. I used it to glue a piece of leather (irony?) onto my new shaving horse (more irony?!?). But here’s the connection to the marshmallows above. I began to get the same odor from the glue pot that I got from the marshmallow recipe. It’s the same stuff.

I started to do a little more research and it turns out that gelatin, (Jello, hey??) and hide glue are related. They are both animal proteins, one more purified than the other, of course, but still animal proteins. Edwards says that animal proteins have been used as glue for a documented 8,000 years. No clamps needed, rubbed joints, remove and clean up with a hot wet cloth, never let go, how can you beat it. Turns out there is one company left in the U.S. that still makes hide glue and if you want to buy 200 pounds of hide glue granules, they are the one to call. The company is Milligan and Higgins in Johnstown, NY and thankfully there appear to be two different departments — one which sells Hide Glues/Bone Glues/Industrial Gelatins, and another to sell Edible/Technical Gelatins.

Glue Pot

Give a try to Hide Glues if you’ve never used them. They are very easy to use and easy to remove if you need to redo a joint. Cleanup is a snap with a hot wet cloth. Edwards has a series of videos linked to his site and goes over the whole process and preparation for using hide glue. You can buy Old Brown Glue prepared by Edwards at Highland, and you will find it extremely easy to use. No glue pot required.

And if you want to try the marshmallows, then search marshmallow recipes online. They are very easy to make and delicious. Do not tell your spouse about the connection between hide glue and gelatin.

Mar 112020
 

You might have heard of National Dog Day, National Margarita Day, National Pizza Day, but did you know there is also a National Worship of Tools Day? And it just happens to be today, March 11th. The ‘National Day Calendar’ describes this holiday as “a day to go out into the garage, the tool shed, the storage closet or wherever it is you keep your tools. You can clean them, reorganize them, make something new with them or maybe go to the store and buy a new one.”

Terry Chapman took the time to tell us what he thinks of this national holiday, and how he thinks it would be best spent.

Read his article here

Sep 122019
 

I had some visitors in my shop this week and one of them noted all the mallets and hammers. I explained that sometimes you want things to move and most of the time you want them to move quickly. I spread some of the movers out on the table saw to take a photo and I was a little surprised myself to see the range and number of them. There was a whole family of Movers!

At the bottom mid-right is my new Papa Mover, the two pound baby “sludge” hammer from Christopher Schwarz and Crucible Tools. Beautifully made, it is a Prime Mover and gives a good solid blow to anything that needs to get out of the way fast. Mama Mover is the slim rounded mallet in the top center that I bought from Highland a couple of years ago. You can buy a one pound or a one and a half pound size in the metal head. It is beautiful, well made and a joy to use as well as surprisingly effective for moving a carving chisel. You may not think it is easily controlled with the round shape, but that shape has been around for centuries and works like a champ. In fact I was watching a video on stone carving the other day and even with stone the guy choked way up on his round mallet and using a little tap-tap motion that I thought was too delicate for stone, he was able to cut the rock very effectively. This mallet by Shenandoah Tool Works has turned into my favorite and the one I pick up first for any kind of chisel work.

Two younger daughters at the top are ones I made just for the fun of it. The top right is a mallet made from a dogwood tree root. You can see it split to the pith cause I didn’t know any better at the time, but dogwood is one of the tougher woods and the root is the toughest part of all. The baby sister on the top left is a whim from the lathe too light to be useful. Lesson learned.

Cousins Ralphi and Vin down on the bottom left are the ones I use when I want to move a board without leaving a mark and where a round head like Mama will not work. Vin is a dead blow hammer with lead shot inside the non-marring head and serves very well for tightening up a furniture joint. I made Ralphi out of maple a few years back and the handle is too big for my hand — wait!! I know how to fix that, but you can bring a blow with it. Not bad on leaving a mark, but you can set a wood scrap between if you need to.

Course down on the bottom right is a brother to Papa Mover, the ever faithful trim/claw hammer, Carl. Uncle Carl is that middle weight trim hammer with the smooth head that is fairly difficult to find these days. There seem to be a lot fewer hammer manufacturers around than there used to be. I looked a long time to find Carl with his wooded replaceable handle. It is a beautiful hammer and my favorite on any carpentry project. I have a smaller trim plus a much larger straight claw framer and and I am a fan of all of them.

Bottom line, it takes a family to keep things moving quickly and efficiently.

Sep 212018
 

I have been hearing about Joseph Moxon and his book Mechanick Exercises for several years now.  Christopher Schwarz of Lost Art Press writes about Moxon all the time and was able to find some details of the Moxon vise in Andre Roubo’s L’art du Menuisier, including a detailed drawing at Plate 280 of a twin screw wide clamping vise.

Over the years there have been several iterations of the Moxon vise. Benchcrafted in particular has a wonderful version of the vise which includes screws and hand wheels. Highland sells the hardware and you furnish the lumber. Lake Erie Toolworks offers another version through Highland and their version comes with the lumber included.

A new kit by Acer-Ferrous Toolworks just came on the scene at only $99.99. I got a kit from Highland to put together and give you my opinion. Included in the kit are two wooden screws and two wooden nuts made from lovely hard maple and beautifully machined with wooden threads. You will have to furnish your own wood for the jaws, recommended at 4 inches wide and 1-1/2 inches thick. The length can be whatever you want it to be depending on what kind of work you plan on doing. The instructions recommend 32 inches long which should give you about 24 inches or so of clamping room between the screws.

I have had some rough sawn walnut drying in my basement for several years, so I pulled out some of it to make the jaws. I only had enough inch and a half material for one jaw so I glued up two thinner pieces to make the other. I milled them both down to the dimensions recommended on the plans and then set out the holes for drilling on my drill press. As recommended, I used a 1-1/2 inch spade bit which moved right through the walnut jaws. It is critical to have the holes perpendicular to the face of the jaws, so the drill press is the best way to go. Once the holes were drilled, the next task was to glue the wooded nuts to the back of the rear jaw. The trick is to get them in exactly the right spot so they line up with the screw holes in the jaws and let the screws run true. The way to line the screws with the rear jaw holes is to wrap the threads with a shim to keep them centered. The instructions recommend cardboard from a cereal box, though they did not say what brand you had to use.  I only had Honey Nut Cheerios and since I wasn’t sure that would work, I found some thin cardboard in the shop.  

I wrapped the threads with the cardboard and added painter’s tape to get close to the diameter needed to slide snugly through the drilled hole in the rear jaw.  By setting the nut in place on the outside and turning the screw tight through both jaws, I was able to clamp the nut to the outside of the rear jaw while the cardboard shim centered the screw in the rear jaw hole. When I was sure it was all in the right place, I loosened the nut and spread some glue on it, carefully avoiding the threads so it was not one big piece of expensive fire wood. When the glue dried, I screwed the vise apart, saving the tape and cardboard, and then put the other nut on and glued it the same way.

After the glue was dry, I put the whole thing together and checked it out. I realized I had made the jaws slightly shorter than the nuts, so I planed and sanded all the pieces to the same height. I broke all the sharp edges on both jaws to make it pleasing to the touch and it was ready to try out.

When mounted on my bench it certainly works as advertised. Clamping pressure is strong with very little effort. The increase in working bench height due to the height of the jaws is very pleasant when you are trying to do any kind of cuts on the end of a  board. Obviously, this thing lives for making dovetails on the end of long wide boards like a blanket chest or a tool chest. Anything up to about 24 inches wide and maybe 40 inches long would work without any problem.  The whole thing is very sturdy and easy to use.

If I were to make another one of these, (and you can look for this one at the store in the next few days if you want to try it out), I would probably make two changes. While looking over the literature to write this article, I saw where some recommend dropping the bottom edge of the front jaw say half an inch below the rear jaw. That way, the rear jaw sits on top of the bench, and the front jaw is used to align the vise to the front face of the bench. As built, any board clamped into the vise aligns it to the bench, a solution which works nicely for small boards but would be awkward for larger boards.

The second change would likely be a small clamping piece attached to the rear of the back jaw. If you notice in the photo above, my bench dogs are set in from the edge of the bench just a little too far to let the bench dogs grab the vise directly.  If the vise had a clamping piece or was mounted on a flat base that extended onto the bench, then the bench dogs could grab, or two hold downs would catch. In addition, if the front jaw were made shorter than the back jaw, clamping would be easier.

Several articles I saw recommend making a beveled top on the front jaw, so if you are making blind dovetails and need to tilt your saw to the ceiling to keep from cutting the face of the finished dovetail piece, it could be more easily done.  I think it would be easier to simply raise the workpiece.

I have not put finish on the vise yet, though I think I will do so. Several articles recommended not finishing the clamping faces to make it easier to hold the workpiece.

All in all, a good piece of equipment. With a little adaptation to your particular workbench, and if you do the kind of work this vise lends itself to, then the Acer Ferrous Moxon Vise Kit is well worth the price. Stop by the store and get your hands on it and see how you like it.

Aug 312018
 

Nobody ever interviews me so sometimes I interview myself. Plus even if someone did interview me, they would never know the right questions.

I love that show called “Best Thing I Ever Ate”. What’s the best thing you ever ate?
My Mother-in-Law’s chocolate pie. She could make the fool out of a chocolate pie.

What is it you like about woodworking?
I like carrying around that fantasy of making anything I want out of a piece of wood. Like some young fellow came to the shop one time and looked around and asked “So, you just get a tree out of the woods and make something!?” Well, yeah.

What specifically do you like best?
I like that finishing touch on a piece. I like taking my little Lie-Nielsen block plane signed by the man himself with an engraving pen the day I bought it, and breaking a sharp edge on a completed piece. If, a hundred years from now, someone turns the piece over and finds my name or initials on the bottom of it, and then touches that rounded edge and realizes that the guy who signed it took the time to round the edges with a hand plane, then my life will be complete, even if I am dead and gone.

What do you not ever eat?
Boiled okra.

What part of woodworking do you not like?
I don’t think anybody likes sanding. I certainly do not. Nothing even remotely fun about sanding. That and cleaning the shop. I despise cleaning the shop.

Favorite material?
Cherry. I love the way cherry looks two hundred years old within two hours after you put finish on it. I love the way it oxidizes from light. I stacked some pieces of a chest on top of one another one time and left them for a few weeks until I got back to the project and you could see the shadow of every piece on the one beneath it. I think it is lovely.

Least favorite material?
Particle board and plywood are tied for first place. None of either in my shop. I bought some plywood imported from eastern Europe one time – I guess it was real cheap. It smelled like a wet dog when I cut it, even though it was perfectly dry. I threw it away, recycled it back to the earth. Reminds me of trying to turn a bowl out of locust wood near the beginning of my turning career. That stuff smelled so bad, I took it back to the place I got it and returned to sender, so to speak. Life is too short for stinky wood.

Most remembered lessons from woodworking?
Two things, incidentally from the same guy, Mike Dunbar. Many years ago, Mike came to Highland to teach a class on Windsor chair making. Now understand, I am an Engineer and a Land Surveyor. I measure things and make engineering drawings to solve problems, and if you build things from my plans as I drew them, it will fit together and work as it should. Inevitably, those lessons transferred to woodworking, so it was a total revelation to me when Mike made a piece of his chair and instead of going to the plans, simply made the next piece to match the first. Totally opposite to my work philosophy, it changed my woodworking.

The other lesson from Mike was twofold. I went to his classroom in New Hampshire to make a chair and the first day he showed us two things. First, he clamped a board in the bench, took a wooden hand plane and flattened the board – the first time I ever heard a properly sharpened hand plane make that wonderful snick snick noise. No earplugs, no dust collector, no electric planer, no setup, no dust, just wonderful long curls of hard maple drifting to the floor. Second, he drilled a hole in the flattened board and used a reamer to taper the hole. He drove a tapered pin into the hole and picked up the end of the whole workbench by lifting on the pin. No glue, no nails, no fasteners, nothing but friction on the pin. Amazing.

And all that changed things how?
Life works well for me when I do the chair thing like Dunbar. I start from where I am, accept what I have, and then go to the next piece. Like the GPS in my car when I make a wrong turn, I recalculate and go from there. And I don’t have to invent everything. Someone has probably had the same problem before and found a solution — all I need to do is find it. Not bad ways to operate, I’d say, based on making a chair.

Anything you want to add?
You can’t make a cobbler out of strawberries. It’s just wrong.

Jul 192018
 

Well, I suppose it had to happen sooner or later. We all get older if we are lucky, so a couple of months ago, I went to the local Lawn Supply and bought a battery powered chain saw.

I had begun to find myself putting things off because I didn’t want to have to try to start the gas powered saw and I was starting to get really irritated with the whole thing.

When I went to buy the battery operated saw, they asked me for my “Man” card. I had to turn in the card before they would let me buy the saw. Nonetheless I persevered and went ahead with the purchase and I am here to tell you my new saw works like a champ. I make a lot of bowls from found wood and a chain saw comes in very handy for that sort of work. I use the saw to score the end grain of a round log and then take my iron wedges and the “sludge” hammer and bust the round into two halves. It is quick and easy and gives a good flat split. After that I mark out a bowl shape on one of the halves with a circle template and a carpenter’s pencil. I use the saw to trim the corners and then nudge it towards roundness by smoothing off the edges until it will fit on the lathe, and I am off to the races.

People ask how long a battery powered saw will last and if it will do the job. The answer is if you cut pulpwood for a living, you don’t need or want one of these. If you make bowls and trim a few limbs around the house, then it works just fine. You can even use it inside the shop since there is no exhaust to suffocate you. As to how long it will run, with a full charge it will run longer than I usually feel like driving it. Isn’t that what it is about?

The real joy is being able to pick it up and simply pull the trigger and go to work. The noise is less, it cuts everything I need to cut and it runs as long as I do. Then it will recharge completely in about 30 minutes. With the blade kept sharp, it cuts beautifully as long as you are not trying to cut a six foot redwood. Like any other chainsaw, you must provide oil for the blade.

Wonder if I can shape enough bowls to get my “Man” card back?