Lee Laird

Lee Laird has enjoyed woodworking for over30 years. He is retired from the U.S.P.S. and works for Lie-Nielsen Toolworks as a show staff member, demonstrating tools and training customers. You can email him at lee@lie-nielsen.com or follow him on Twitter at twitter.com/is9582

Dec 172012
 

I’ve been in the process of building an electric guitar (a Les Paul copy), for, well, do I have to really tell you how long?? Ok, something like two years! Ok, ok, I said it. All right, let me see if I can get myself back on topic.

Currently, I’ve been working to create the cavities where the two pickups sit into the body of the guitar. Most of it is fairly straightforward, as in marking out where I want each pickup to live. Also, I initially drilled out the majority of the waste wood, and followed it up with my router and a pattern maker’s bit.

Unfortunately, there was one more piece to the puzzle with this build, relating to making the cavities complete. There are basically two different styles of Les Paul designs. The first has a short tenon on the end of the neck that is glued into the body, and doesn’t interfere with anything else in the build. The second design has a longer tenon, and it actually crosses paths with the neck pickup cavity. So, even though I’d completely routed the body for the neck pickup, I still had to remove the wood from the neck tenon that would otherwise block a good majority of that same space.

I’m not yet to the point where I want to glue in my neck, so I went about removing the excess wood from the neck tenon, using hand tools rather than just routing it at the same time as the body. I started out by marking a basic area I wanted to remove. I didn’t want to try to hit the perfect mark on the first try. So, I sawed out the material that got me to a much closer fit, but still had to finalize to a perfect fit.

Paring to the knife line on the neck pickup

Paring the other side - first cut

Paring the other side against the line

Paring to the knife line on the other side

End from the top - both angled corners

After placing the neck tenon back into the body, I used a metal ruler across the neck, lining up exactly where I wanted the tenon to end. Using a sharp knife, I lightly scored across the grain, for about three or four light passes. After this, I marked up both sides of the neck’s tenon, using the previously routed walls as guides. Rather than pulling out a saw, I thought I’d use one of my paring chisels to fit this section. I start out by taking some material off of both corners, taking multiple passes, until I was down very close to my knife lines on the sides of the tenon. Since the lower section of the tenon remains full length, I did the same procedure from the two sides, and the front (top) of the tenon. After sneaking up on the knife lines, the raised section between these lines is pared away. I have a Japanese chisel that is extremely sharp that I used for this process. It holds an edge almost forever, and has some size to it, so it’s easy to control.

Neck in body showing excess material

Enough removed for the pickup to fit

Just remember to take it methodically. This isn’t the type of operation where you want to rush it, or you’ll likely create a problem.

Please let me know if you have any questions relating to this process.


Lee Laird has enjoyed woodworking for over 20 years. He is retired from the U.S.P.S. and works for Lie-Nielsen Toolworks as a show staff member, demonstrating tools and training customers. You can email him at lee@lie-nielsen.com or follow him on Twitter at twitter.com/is9582

Dec 142012
 

I’ve written a number of blog articles that include sections on sharpening, but in this article I’ll focus on one aspect that can make a huge difference in your results. Even though I’ll talk specifically about this technique for water stones, it is equally important on other sharpening media.

When I first started woodworking, I didn’t have a mentor to show me the ropes, and the Internet was still a glimmer in [whom ever you believe initiated the internet]’s eye. I had a small set of chisels that were so dull, it’s amazing they’d even scare the wood. I’d read an article about Japanese water stones functioning well, so I decided to invest in three stones. I soaked the two coarse stones in water and then started sharpening. I worked and worked, only to start seeing something happening to the ends of my chisels. For lack of a better description, it almost looked like the chisels were grinning at me. What I didn’t know, starting out, was the stones are made so the media breaks down with use. This continues to present fresh sharpening material, allowing the stones to continue to remove metal. I was working primarily toward the central area of the stones, since I was afraid I’d slip off an edge, and the center was the area that was breaking down. Ultimately, it made a dished area, and this made it so the next chisel would touch on the outside edges, but not the center, until enough material was removed from the chisel so it could reach the center. Hence, the nice smile-looking shape on the end of my chisels.

So what did I learn? It’s important to work as evenly as possible on the full surface of sharpening stones, and even more critically, flatten the sharpening stones regularly.

There are a number of ways to flatten water stones (Norton, Shapton, King, …), including sandpaper on a known flat surface such as plate glass, a granite plate, or even on a Table Saw or Jointer table. Another choice, which I prefer, is a diamond impregnated precision metal plate. Specifically, the DMT Dia-Flat Lapping Plate, which is certified flat to a tolerance of .0005” across its surface. This level of flatness is likely more flat than any of the previously mentioned “flat” surfaces. I’ve owned other diamond flattening plates in the past, and when used to flatten sharpening stones, they had a somewhat short life expectancy. Specifically, I have a 400 grit plate that transitioned into something closer to what I believe would be a 1200 grit, due to the diamonds losing their bond when used to flatten water stones. The new Dia-Flat plate has a new proprietary coating that will minimize this degradation, creating a longer lasting precision tool.

I’ve used one of the new Dia-Flat plates for over a year, and it’s still going strong. I can tell that it has a slightly less aggressive bite now, but I’m extremely happy with the present state, with all of the stones it has flattened. I’ve shared this plate amongst my peers, during training sessions this last year, so I’d likely equate this usage to 2 – 5 years worth of time in a one-person shop or possibly more for the hobbyist. Almost 100% of this usage was on Norton 1000/8000 grit water stones. The Dia-Flat Lapping Plate also excels at prepping tools not yet ready for water stones. The diamonds can remove the gross material much quicker and more efficiently than dropping down to a super coarse water stone like a 220 grit, and there is no need to flatten the Lapping Plate.

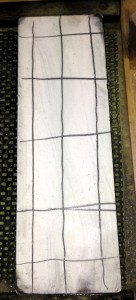
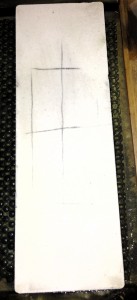
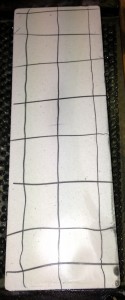
When I flatten a water stone, I take a #2 pencil, and draw a grid across the face of the stone, that has water just like I’d use it to sharpen.


After a couple of passes, I look to see if any of the grid lines are remaining.


If the outside edges of the stone are clean, but the middle area still has some of the grid lines, this indicates the stone has a hollow. Depending on the stone, the pencil lines can also degrade, from the water in the stone. Depending on how dramatic the hollow, I may re-apply the grid a couple of times.


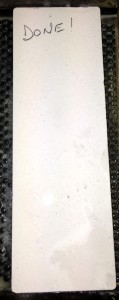
Also, pay attention to the look of the stone during this process. The stone that has made contact with the diamond plate will have a slightly different color, more dominantly in some stones than others, than the area not yet flattened. So, if the grid is all gone, but an area in the center isn’t consistent looking with the outer area, I’d re-apply the grid and just take one test swipe across the diamond plate. If the grid is gone in the center, you’re golden. If not, continue to work until the stone is truly flat. This quick visual makes it very easy to verify when the stone is flat.


You’ll end up spending much less time sharpening, and have a much better result if you flatten your sharpening stones regularly. I know this information would have helped me early on in my woodworking career. I hope it helps you as well.

Please let me know if you have any questions I may have missed.


Lee Laird has enjoyed woodworking for over 20 years. He is retired from the U.S.P.S. and works for Lie-Nielsen Toolworks as a show staff member, demonstrating tools and training customers. You can email him at lee@lie-nielsen.com or follow him on Twitter at twitter.com/is9582


Dec 112012
 

I’ve recently been working on building a copy of a Les Paul solid-body electric guitar. During the build, there were a number of holes to drill, and some required a fairly high level of precision. Specifically, the two holes for the tailpiece and the two holes for the bridge.

Both the tailpiece and the bridge directly handle the pathway of the strings for the guitar. Because of this, there are a couple of factors at play. First, the two holes need to be the correct distance apart, so the respective component (tailpiece or bridge) will fit onto the studs after they are screwed down into the installed bushings. The second, which is equally if not more important, is the exact relationship to the string path, from the nut down the fingerboard, of these pieces. If they are drilled slightly to one side or the other, the strings will be offset on the fingerboard, and the guitar will be useless.

I strung a piece of red thread from the tailpiece (outer two holes) up through the nut, to the respective tuners. This allowed me to find the correct location to drill. I marked the position from the opening on the tailpiece, where the connecting stud will reside. The back half of this is a half-circle. The bridge has a complete circle, as it sits down onto cylindrical studs.

So, how am I finding the center of these marked points? Well, I didn’t think of this trick until I’d already drilled the holes for the tailpiece, which went together, but just barely. I marked the location for the two studs, but missed dead center by about as much as would allow the parts to go together! This is actually what inspired this tip.

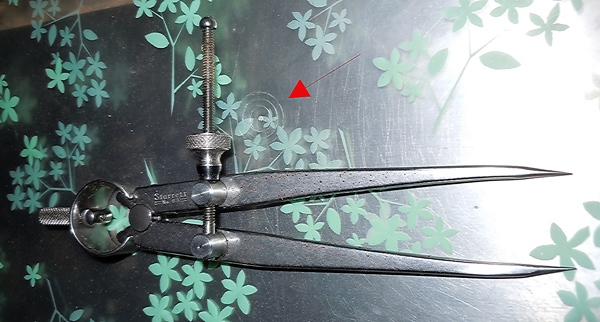
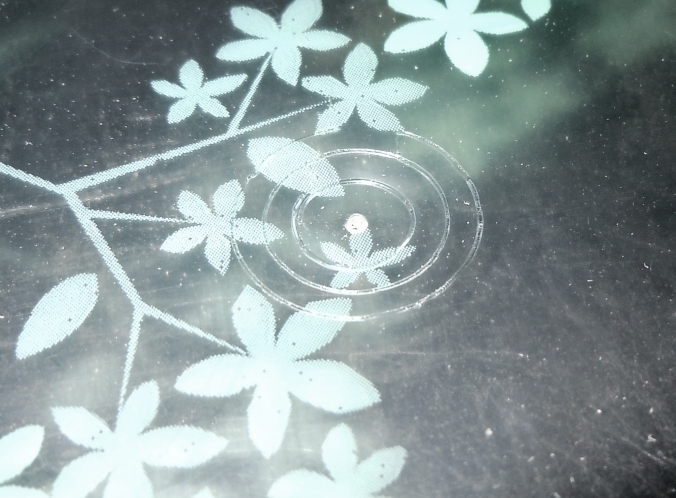
I took an approximately .008″ (or .2mm) thick sheet of somewhat transparent plastic, and a compass with very sharp pointed legs. I put the plastic onto a piece of MDF, and then pushed one compass leg through the plastic until it was contacting the substrate. This was my center-point. Next I moved the other leg to multiple positions, and at each position, rotated the compass, pressing heavy enough to leave a scoring mark all the way around, but not enough to cut through the plastic.

What I ended up with is a center-point through the plastic, with multiple circles all circumscribed around each other, with one single center.


I laid the plastic down over the circles for the bridge for which I wished to find the center, and positioned one of my scored circles so it was either slightly outside or inside the circle I’d drawn on my guitar. Once I positioned the plastic so the two circles had an equal spacing all the way around, I used one leg of the compass (I found opening the compass very wide prevents the opposite leg from getting in the way, and possibly causing the marking leg to lean away from center) to push through the existing center of the plastic. This marked the wood with a small hole, very close to dead center. I drilled the holes at my drill press, and with this technique, the bridge fit exactly as intended.

Overall, I found that this technique was very easy to use, and it provided wonderful results.


Lee Laird has enjoyed woodworking for over 20 years. He is retired from the U.S.P.S. and works for Lie-Nielsen Toolworks as a show staff member, demonstrating tools and training customers. You can email him at lee@lie-nielsen.com or follow him on Twitter at twitter.com/is9582

Nov 302012
 

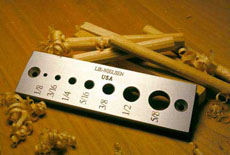
Many woodworkers have at some time needed or wanted a dowel for a project, and had to hop into their car to pick one up at the home center. Once there, you have a couple of choices of wood types, and if you are really lucky, the dowel might almost be straight. The sizing of the dowels available at a home center may not be exactly what you’d like: I’ve purchased 5 dowel sticks before, of the same size, only to find that they all were slightly different from each other when I measured them with my micrometer. So, if you have an important project, and want to use a specific wood that either contrasts with or matches your project, what the heck do you do? Well, enter the Lie-Nielsen Dowel Plate, which is exactly what it sounds like it would be: a thick (1/4”) steel plate with a range of hole sizes, optimized for many tasks. The Dowel Plate’s holes are the following sizes: 1/8”, 3/16”, 1/4”, 5/16”, 3/8”, 1/2”, and 5/8”, along with two mounting holes (one on each end). If you prefer to work in the Metric measuring system, there is also a Metric Dowel Plate that can accommodate you with the following hole sizes: 3mm, 4mm, 6mm, 8mm, 10mm, and 12mm. These will provide a nice range of sizes available to woodworkers that want to create their own dowels.


These Dowel Plates are made from A2 steel (hardened to Rc60 – 62), and each of the cutting holes are bored straight down for .025”, at which point a six degree clearance taper begins, to ease the dowel’s release after the cut. The top portion, where the holes are still straight, is made in this manner so the original sizing of the hole is retained even after subsequent sharpenings. To sharpen the dowel plate, just hone the top surface of the plate with your water stones. It is likely however that they won’t require sharpening for quite some time, unless you happen to make and sell dowels for a living.

Earlier I mentioned each plate has a mounting hole on each end. You can make a wooden box, with tight tolerances on dimensions, so the plate fits down onto a rabbet on all four sides, with adequate room to run screws through those mounting holes into the wood. And then you have a portable method for using your Dowel Plate that is ready to use, and doesn’t take much additional room to transport or store. If you might be planning to use the Dowel Plate in your shop daily, you could modify the top of your workbench (or another table), by routing out a section not too far from an edge (likely along the end of the bench), and all of the way through the top, where a basket could sit/hang to catch the dowels. You should make the through-hole large enough to allow all of the dowel sizes to easily fall through, and create a rabbet so the Dowel Plate would sit flush with the top, and have a solid base.

To use the Dowel Plate, start with a straight-grained wood, as that will provide the best results (both White Oak and Ash have flexible properties that excel when asked to snake through off-set holes). This wood can be off-cuts from the same project (to match coloring as close as possible), leftover wood you have lying around, or a wood specifically purchased for the dowels you need. I usually cut blanks myself (riven wood is the strongest, guaranteeing no cross-grain exists) so they are approximately square in cross-section, in whatever length I require. Then I use a small plane to quickly modify the square form into an octagon, by removing material from each of the four corners. I also pare down one end slightly, using a chisel or a sharp knife, depending on what feels most comfortable. I work the end until it feeds into the cutting hole a bit more easily, and then proceed to drive it through with a large wooden mallet. It doesn’t take many attempts to determine the maximum blank size for a given species of wood. If you have pre-cut some blanks that are too large, you can either trim them down, or if they are within the Dowel Plate’s range, work your way through the plate’s holes, until you arrive at the size you need.

Awhile ago, I made a small side table for my family. My wife had seen some “put together/throw away in a couple of years” types of tables, and told me she was going to purchase one. I was shocked she would even entertain the idea of owning that stuff, but I guess that was her way of telling me I was too busy with other projects, and it got my attention.

I had some nice Walnut that I used for the top, legs and stretchers. While I’m not going to go into great detail on this build, I do want to focus on the leg/frame joinery. I used mortise and tenon joints at all the corners to make this table strong, and by pinning each joint with a dowel, may have even crossed into the “last forever” category. I bought some “sticks” of a light dowel material, labeled 1/4”, that would provide good contrast, as I wanted the dowel to be noticeable. I marked and drilled all of the holes in each mortise, and then drilled the holes in each tenon slightly off-set towards the shoulders, so the dowels would help pull the joints even tighter. I went to put the first dowel into the hole, and to my shock, it was too large. Well, I was about to freak out, but luckily found a solution – I microwaved each dowel, which removed enough moisture to allow the dowels to fit in the holes.

Now, if I’d had a dowel plate, and spent just a little time to match up the size of each hole to a specific drill bit, I’d be golden each and every time. There’d be none of the hair pulling, wondering if I’d just wasted some nice wood. I would, however, still keep in mind the fact that wood moves, and if you make dowels in advance, it’s possible they may just absorb enough moisture from the air to have a similar situation to the one I described. I find it’s always a good idea to test the fit of the dowels prior to applying glue, so you have the opportunity to resolve an issue, instead of having to toss some otherwise nice glue-laden purpose-made dowels.

I hope this article was helpful – please let me know if you have any questions.

Click to take a closer look at the Lie-Nielsen Dowel Plates.

Click to see Highland Woodworking’s entire selection of Lie-Nielsen hand tools.


Lee Laird has enjoyed woodworking for over 20 years. He is retired from the U.S.P.S. and works for Lie-Nielsen Toolworks as a show staff member, demonstrating tools and training customers. You can email him at lee@lie-nielsen.com or follow him on Twitter at twitter.com/is9582

Nov 192012
 

A while back I wrote about finally finding a great bandsaw blade, the Wood Slicer from Highland Woodworking. I talked about it doing a wonderful job ripping wood, and how it cut through the wood as if it was butter. One thing I didn’t include in my article was the physical properties of the cut directly from the saw, and in this article, I will do just that. I think it’s important to have what is more empirical rather than just superlative information.

The pieces of wood I’ll present are from two corners of a rectangular piece of figured maple. This piece of maple is a fence for a home made marking gauge, and I decided to change the shape to something a bit more pleasing. I wondered just how much work I would have to do to smooth out the curves where the band saw cut the wood.  In the past, the band saw blades I’ve used would leave a surface that was extremely rough in both the visual and tactile sense.  Not the case with this Wood Slicer.  Now I’m not going to say it was as smooth as glass, but some areas did shine when light bounced off. It is yet another aspect of this blade that will keep it as my go-to for all but the most specific usages.

First corner piece

Second corner piece

When you look at the photos, be aware that I’m not a band saw expert, and as such, I believe even better results would come from a hand with better feed control. That being said, I’m still just as happy as I can possibly be that I finally tried this blade. It rocks.

Click to take a closer look at the Wood Slicer Resaw Bandsaw Blades.


Lee Laird has enjoyed woodworking for over 20 years. He is retired from the U.S.P.S. and works for Lie-Nielsen Toolworks as a show staff member, demonstrating tools and training customers. You can email him at lee@lie-nielsen.com or follow him on Twitter at twitter.com/is9582

Nov 122012
 

With the holidays on their way, everyone around here is starting to think about what new tools would really enhance our workshops if we were to receive them as gifts. Lee Laird’s wishlist clearly shows a preference for hand tools, but wouldn’t you expect just that from the guy who writes about and demonstrates hand tools in his spare time? Maybe you’ll find something on his list that you might like to add to your own!

1. DMT Dia-Flat Lapping plate – Such a good tool! And since this is my wish list, I’ll add that efficiencies can go up with a second in the shop. One can be used for sharpening (flattening a stone) while the other plate can be used to coarse flatten the back of a plane iron.

2. Magni-Focuser – Provides a range of magnification (with just a quick swap of different lenses) to either off-set for existing vision issues, or the difference between sharpening a hand saw and perhaps removing a hidden splinter.

3. Lie-Nielsen Large Router Plane with adapter for small blades – Time to put my old, tired Stanley Router Plane up as a visual piece. The Lie-Nielsen version is just so much smoother to operate, and added flexibilities abound.

4. Lie-Nielsen #6 Fore Plane – Another replacement for a cool, old Stanley plane. Working with both types, it’s just so easy to justify the new plane, with its fit and finish out of the box, and the accuracy that comes with no struggles.

5. Lie-Nielsen Screw Driver Set w/ Case – This set of screw drivers have the perfect tip sizes (width and thickness) to fit the screws on Lie-Nielsen’s hand plane line. It is somewhat of a lost art, to have a screwdriver that properly fits each screw. Sure a different driver can be made to work, but it’s so easy to cam out and bugger the screw head if the driver and screw don’t match.

6. Lie-Nielsen Improved Workbench – The new design (as of 2011) is such a rocking (it’s truly solid, but just using a colloquialism) bench. The change to a 4″ thick top increased the weight, and from side-to-side and end-to-end it is so much easier to clamp to the top. Just find it a home on a level floor, and you’re set. Oh yeah, and make sure you get me a right-handed version, since both left and right versions are available.

Did you know you can create a wishlist at Highlandwoodworking.com and send it out by email to anyone who might be searching for the perfect gift for you? CLICK HERE to get started with your own wish list.


Lee Laird has enjoyed woodworking for over 20 years. He is retired from the U.S.P.S. and works for Lie-Nielsen Toolworks as a show staff member, demonstrating tools and training customers. You can email him at lee@lie-nielsen.com or follow him on Twitter at twitter.com/is9582

Nov 022012
 

The Violin Maker’s Plane (A.K.A. the #101) is one of Lie-Nielsen’s newest planes, and the smallest to use a captive nut adjuster, which is such a bonus when dialing up the perfect shaving. This plane is based loosely on Stanley’s #101, but Lie-Nielsen has made a number of improvements to the original design. The body and cap are made from Manganese Bronze, which add some mass to the plane, bringing it in at a hefty 1/2 pound. Another added benefit of Manganese Bronze is it doesn’t rust. This plane is just less than 3 1/2″ long, and has a 7/8″ wide A2 iron that is a full 1/8″ thick, and really holds an edge a long time. The iron is bedded at 20 degrees and operates in the bevel up configuration, and as usual, the iron comes honed to 600-grit on both the bevel and the back. I recommend honing both sides up through 8000 grit, as this provides a razor-like sharpness that is ready to take on any wood you decide to try. Take a look at this sharpening video for more details on the process.

The size of the Violin Maker’s plane is small enough that you can work in very tight areas, and with such a short length, it can easily handle sections that aren’t totally flat, as long as the “waves” aren’t too close together. That being said, I want to make sure you all know this plane isn’t only for violinmakers. While the somewhat diminutive size does make it handy for instrument makers, it can be used across the board (pun intended). The depth of cut for many planes of this stature is adjusted by reducing pressure on the iron, and then tapping lightly on the back of the iron. When using this style of adjustment, you’re basically just trying your best not to end up shooting past the intended depth. While there are a large number of planes that operate on the “Tap” principle, the fine movements of a captive nut adjuster makes it so much easier for all skill levels to obtain repeatable results.

An aspect of this plane that should be emphasized is the thickness of the iron. An 1/8″ thick iron may seem like a fairly thick iron for this small of a plane, but it radically reduces the chance of any blade flexing or chatter during a cut. Definitely a great reason to go thick.

The iron comes from the factory with a 25-degree bevel, but as always, a honing to a minimum of a 30-degree micro-bevel speeds honing and strengthens the iron. Since this plane’s iron is used bevel up, honing angles above 30 degrees are usable and up to the end user’s discretion. For example, if I were using this plane on some of the extreme curly maple on one of my guitar tops, I’d consider raising the honing angle to 45 degrees or possibly even slightly higher to reduce tear-out. With the 7/8″ iron width, this plane is extremely useful at very focused operations, reducing the chances of accidental contact with unintended areas of a work piece.

This super-small plane can easily fit into the pocket of your apron, or even in a pants pocket. You would almost forget it was there, if it wasn’t so functional. Just remember to take it out of your pocket at home before flying, so you don’t have to leave it with the nice TSA agents.

I hope this helps answer any questions about this plane. Please let me know if you have any specific questions I may have missed.

Click to take a closer look at the Lie-Nielsen #101 Bronze Violin Maker’s Plane.

Click to see Highland Woodworking’s entire selection of Lie-Nielsen hand tools.


Lee Laird has enjoyed woodworking for over 20 years. He is retired from the U.S.P.S. and works for Lie-Nielsen Toolworks as a show staff member, demonstrating tools and training customers. You can email him at lee@lie-nielsen.com or follow him on Twitter at twitter.com/is9582