blair

Oct 092014
 

Do not throw rocks at this sign.

My eighth grade teacher Mr. Knox put a sign in the parking lot that said “Do Not Throw Rocks at This Sign.” He put it there to prove a point that if you tell a kid not to do something, most likely they will want to do it. He was right. By the end of the week, the sign was demolished.

Maybe it is the kid in me or I’m just the rebellious type, but when a friend told me it is not possible to steam bend kiln dried lumber, I just had to try. My plan was to create a wooden handle that had three tight bends in it. Of course, my first try splintered along the outer radius of the bends, proving my friend right.

Apparently, when wood is kiln dried, the lignin in the wood dries out and hardens, not allowing it to bend. Now, I am not a biologist, so I may not be qualified to explain exactly what lignin is. However, the same friend who told me you can’t steam bend kiln dried lumber provided me with this definition. Lignin is an organic substance binding the cells and fibers in wood together. By the way, he is not a biologist either.

Not letting his explanation stop me, I set out to do my own research. I didn’t waste any time researching things that would tell me I couldn’t do it, like studying what lignin is. I did however find an old Woodwright’s shop episode were Roy Underhill showed how to use a metal strap during the bending process to compress the outer fibers, preventing them from splintering.

Now the wood Roy used was not kiln dried, but his technique was what I was interested in and I thought it was worth a try. I headed off to the hardware store to find some flexible metal.  It turns out they don’t really sell anything that I thought would work. Feeling defeated I headed towards the door to leave when I spotted a piece of metal banding sticking out of a trashcan. Not wanting to be tackled in the parking lot for stealing their trash, I found an employee and asked if I could have it. While giving me an odd look, he said “sure”. I headed back to the shop to test it out. On a side note, after showing my friend what I was using to prevent splintering, he suggested using metal strapping that plumbers use to secure pipes and ductwork, which can be purchased at most hardware stores.

It took me a few practice runs to figure out how to keep the metal banding tight against the outside curves where the most splintering could happen. After some practice, it worked out pretty well. It didn’t stop all of the splintering, but the little parts that did splinter were easily sanded off.

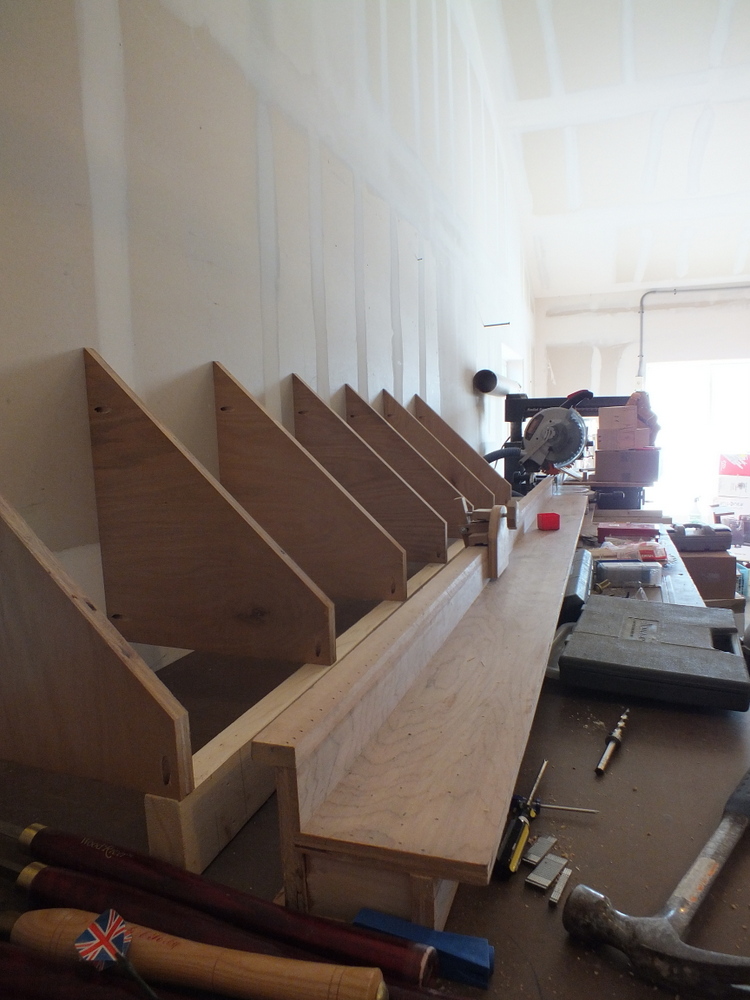
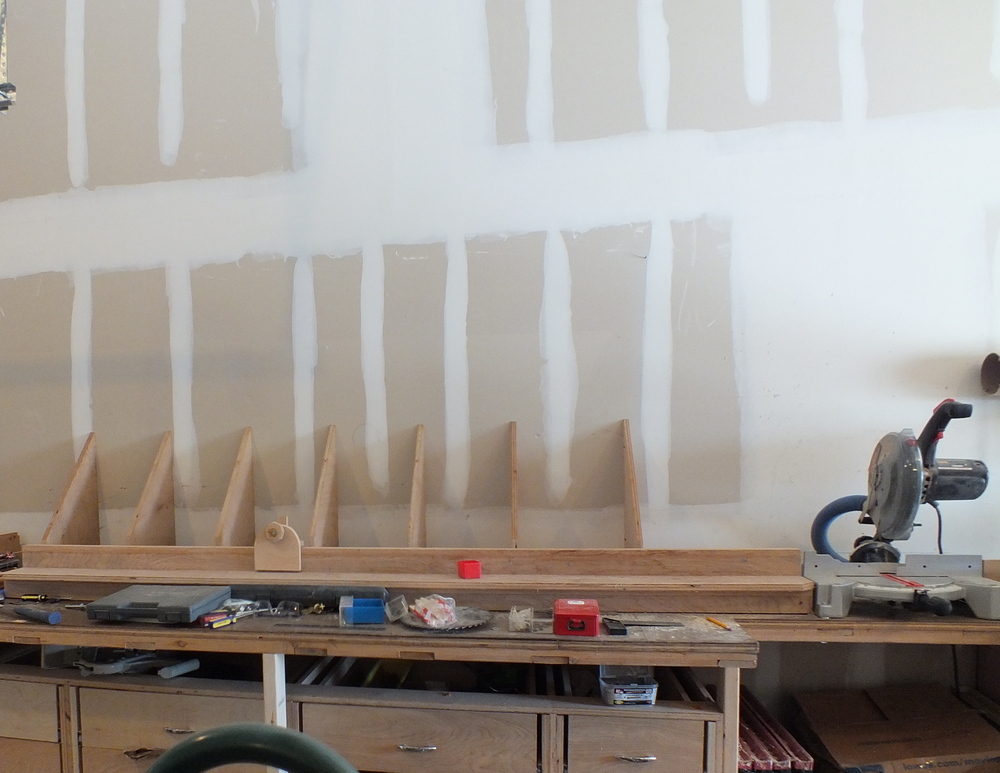
I have seen some elaborate setups for building steam boxes; however, my setup for this project was simple. Since the piece I wanted to bend was small, I just used a trash bag to contain the steam. To generate the steam, I snuck into my wife’s closet and got the little steamer she uses to steam out the wrinkles in her clothes (let’s keep that part on the down low).  I stuck the end of the nozzle in the bag, taped it shut, and let it fill with steam for 30 minutes before pulling the piece out and bending it into my form and clamping it.

Steam-bent-handle

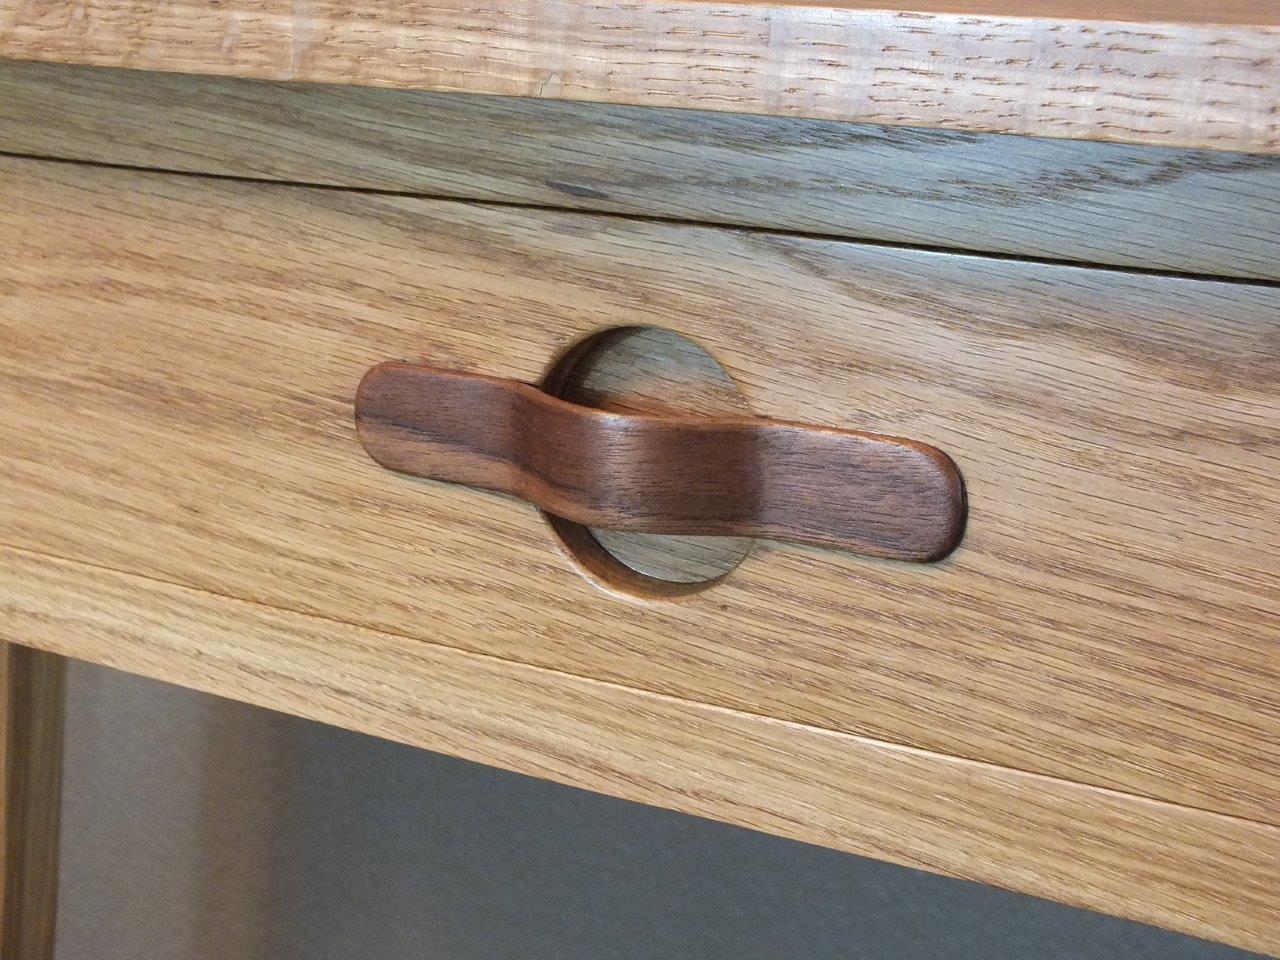
When I showed my friend my accomplishment, he didn’t readily admit to defeat. He said, “The handle is only 1/8 inch thick, it is like a bent lamination.” On the other hand, unlike a bent lamination where the gluing of the layers are what holds its shape, this is only one piece of wood and no glue. It is holding its shape all on its own. The two outer curves are almost at a 90-degree bend, which is tough to do even with a 1/8 inch thick piece of wood. In the end, whether or not I am rebellious or just determined, I ended up with a beautiful steam bent handle.


Brian Benham has made his lifelong passion for woodworking his profession. He enjoys taking his clients’ ideas and combining them with traditional woodworking techniques to create a unique piece of furniture. You can find more about his furniture at http://www.benhamdesignconcepts.com/

Sep 262014
 

If you have been woodworking for a while, there is a good chance you have seen or even built a rendition of Norm Abram’s Miter saw station. I built my version several years ago and as the years have passed, I have made several changes to it to meet my shop needs. My most recent change was to the area behind the miter saw fence. That area has become a drop zone for clutter. I seem always to be losing project pieces and small tools directly behind the fence where it is out of my sight. Even worse, the pile of scrap wood and miscellaneous supplies stack up and spill onto the fence getting in the way, preventing my miter saw’s stop block from sliding down the fence and making it unusable.

Honestly, I could probably throw half of the scrap wood away to clean up the mess, and not miss it. However, there seems to be an unspoken rule among woodworkers to never throw away scrap wood, so if I did I’m afraid I would have to turn in my woodworker’s card. To clean this mess up and take back that valuable shop space, I decided to build storage bins directly behind the fence.

DSCF2905In addition to cleaning up the mess, I found a use for some of the scrap wood in the pile and used it to build the bins. I started by screwing down a 2×4 to the workbench behind the fence. I paid special attention to be sure I left a space for the miter saw’s stop block to slide past, and a comfortable amount of room for my hand to reach back to clamp it to the fence. The 2×4 will provide a solid surface to screw my dividers to as well as a stop to prevent the wood in the bins from sliding against the fence causing the same problems as before.

To make the dividers, I cut some scrap plywood into triangles and attached them to the wall as well as to the 2×4 using pocket screws. My shop walls are made from structural panels so I can put a screw anywhere. If you are in a traditionally framed shop be sure to find studs in the wall for the screws to get a good strong bite. The studs being spaced 16 inches apart will make for a nice sized bin and help keep them evenly spaced out.

Now that the bins are complete, I sorted out my pile of scrap wood by size and species. It keeps it all visible and at my fingertips, ready to be incorporated into a project. The bins are also helping me stay organized as well. As I am cutting the lumber down to size, I can easily sort the cutoffs into the scrap bin as I go.

DSCF2904

Sep 242014
 

This is the time of year many woodturners dust off the lathe and gear up for their winter activities. While it’s not even close to fall in Texas, I recently began the process of cleaning up my shop. Fortunately, I do this sporadically throughout the year. This tends to make this job a little less daunting.

This is my process and I hope you find it helpful and maybe inspiring. I am sure you learned to start at the top and clean your way down. So, I began by vacuuming off the light fixtures. Once the lights were cleaned the shop seems a little bit brighter. I also, vacuumed off the air vents.

Highland getting back in shop (1 of 8)

Perhaps you don’t have HVAC in the garage, but consider cleaning any heating or cooling device you do have in the shop. A thin layer of dust can reduce the efficiency of any device. I am not a fireman, but I think dust build up on motors and heaters would be a fire hazard. Now that I mention it, check your fire extinguisher to ensure it is up to code. If you don’t have one buy one now!

Highland getting back in shop (2 of 8)

This is a good time to reevaluate that old bottle of finish you’ve been saving for the last decade. Most finishes, glues and stains, once open, do not have an infinite shelf life. You should properly dispose of these old products. It will free up storage space and reduce the risk of a leaky container creating a fire hazard.

Another suggestion is to completely clean off your lathe. This is something that should be done more than once a year. I vacuum off the lathe first, reaching into every nook and cranky. Then I apply Renaissance Wax on the bed and under the banjo. This helps prevent rust and ensures that the banjo and tail stock move smoothly. I also apply wax to various metal surfaces around the shop such as my bandsaw and table saw.

Highland getting back in shop (3 of 8)

Highland getting back in shop (4 of 8)

I also vacuum off other equipment such as the grinder, and even inside my bandsaw.

Highland getting back in shop (6 of 8)

Before…

Highland getting back in shop (7 of 8)

…and After!

Highland getting back in shop (5 of 8)


Okay, I think that is enough for now. I’ll save cleaning the floor for later.

Highland getting back in shop (8 of 8)


Curtis was the 2012 President of Central Texas Woodturners, a member of the American Association of Woodturners, and a member of Fine Woodworkers of Austin. Curtis teaches and demonstrates nationally for Lie-Nielsen Toolworks. He also owns a studio where he teaches and works. Curtis lives and works in Central Texas with his wife and four young children. Take a look at his website at www.curtisturnerstudio.com

Aug 262014
 

benhamtableMany times as furniture makers, we will put a finish on the underside of a tabletop to prevent it from warping or cupping. The theory being, if you put the same finish on the top as you do the bottom the moisture transfer will be equalized on all sides, helping to prevent wood movement. Regardless whether or not this theory is true, there are other reasons to finish the bottom of your tabletop.

I am often asked to match a stain color and in doing so I end up mixing different colors together in an attempt to get the color just right. The underside of the tabletop gives me a blank canvas and plenty of room to dial in the color. This also adds extra reassurance that the stain will react the same on the top as it did on the bottom because I am staining the same piece of wood. If the bottom blotched badly I know the top most likely will too. I can then adjust my application method before applying the finish to the show side.

Staining the bottom also give me an opportunity to see what the color will look like on a larger scale, to be sure I like the final color. This is especially helpful if you have a customer or spouse that has a hard time visualizing what the entire piece will look like from a little stain sample. It is much easier to strip the finish off the bottom to try a different color opposed to the whole piece.

Having the blank canvas on the bottom also allows me a risk free area to practice a new application technique. When I first started using water based gel stains, I found the application method I typically used for oil based stains left streaks and overlap marks. The water base finish dried much faster than an oil finish. Without using the right application technique, I found the water based stain would dry before I had a chance to come back and wipe up the excess, leaving overlap marks. That is something I would have never discovered on a small test board, and would have been devastating to discover when staining the show side of the tabletop.

However, practicing my application technique has saved me from many tabletop do overs; it is not the main reason for finishing the underside of a table. When I build any piece of furniture, I want people to be drawn to it. I want them to reach out and feel how smooth the finish is by running their hand across the top. I think we both would be disappointed, if as there hand glides across the smooth top, wrapping around to the underside of the table, only to discover a rough unfinished piece of wood. When someone buys custom furniture, I believe part of what they are paying for is for the craftsman to pay attention to the details. I think finishing the underside of a table adds a nice detail.


Brian Benham has made his lifelong passion for woodworking his profession. He enjoys taking his clients’ ideas and combing them with traditional woodworking techniques to create a unique piece of furniture. You can find more about his furniture at http://www.benhamdesignconcepts.com/

May 152014
 

faceplateHighland recently added new faceplates from Easy Wood Tools!  I am excited to have another affordable option for quality faceplates.   These are anodized aluminum faceplates for 1”x8 tpi and 1-¼”x 8 tpi lathes.  The thread size is etched on the face plate which makes it easy to identify the faceplates. The diameters range from 2” up to 4-½ “.  Each plate has 8 large screw holes for a more secure attachment to the blank.  They also have set screws for reverse sanding and a 5/16” hole for use with a spanner rod (tommy bar or knockout rod)which makes it easy to remove  the faceplate from the spindle. I have enjoyed using two Easy Wood Tools for my large lathe for some time. I will order at least two for my small lathe and dedicate one to my sanding disks so no more swapping face plates!

CLICK HERE to check out Highland’s selection of Easy Wood Tools Faceplates.

Apr 102014
 

metzler1About 30 years ago, I was very new to woodturning. A friend was moving out of town and wanted to leave his old 12″ Delta lathe in my garage. I had an extra few feet of space between the front of the cars. He gave me a one hour lesson on how to use it, as well as some tools. They were all scrapers.

I turned a few small bowls and in spite of a good amount of catches with the scrapers, I thought I needed a bigger challenge. Living in Atlanta at the time, I had seen a number of Ed Moulthrop’s bowls and admired them greatly. That had to be my next bigger challenge. I soon found a “how to” article in Fine Woodworking on Moulthrop as well as  an 18″ diameter piece of poplar or “Tulip Wood” as Moulthrop called it. The poplar had a purple streak in it caused by a lightning strike just like Ed’s. All was perfect to go.

Luckily, I had a large face plate. I attached it to the end grain of the log just like the pictures in the article showed. I heaved it onto the lathe bed, cantilevered it from the spindle and turned on the lathe…. The big piece of wood went flying off the face plate, screws at great speed, spinning wildly between our two cars and slammed into the post between the two garage doors. Still spinning, it stood itself up like a top in place and finally came to rest!  Maybe the screws were too short or too thin? Or maybe I needed to set the lathe belts at a slower speed?

Thicker screws and slower speed and it ran fairly smoothly. Unaware of potential bearing damage, I even added bags of sand on the lathe stand to dampen any wobble. All was good. The outside turned easily but slowly. The form was off some, but never mind that, I had to keep going.

The inside proved to be more challenging especially with a dull 1″ scraper. Once I was well into it, I had to move the tool rest inside the bowl as the scraper was too short to meet the interior. I got a few catches and bangs, hurting the back of my hand each time. Who knew you had to hold the scraper tip at a slight downward angle as well as keep it sharp?

metzler2Now hot, shirtless and almost cutting the back of my hand wide open on the next catch, I wisely devised a scheme of a cloth glove with several layers of aluminum flashing over the back of it to absorb the shock to my hand. The flashing was held in place with, of course, duct tape. It worked! Catch, bang, no pain. Wow! What a great idea.

Luckily, I finally finished the piece with my hand still a part of my body. The cloth part of the glove never caught on the bowl rim and ripped my hand off. My hand just had a few deep bruises on the back. Also, miraculously no damage was done to my wife”s car, nor mine. All was good, right?

The purple streak in the wood turned out to be from a big poison ivy vine that had been on the tree, not from lightning. Deep poison ivy all over my chest and arms. Apparently it is true, you have to suffer for art-even when it is mediocre.

I have since learned many things about woodturning, especially about safety. Being young, inexperienced and stupid is no way to be a woodturner. Go get some help!

Feb 132014
 

This will sound like a commercial and in a way it is, but I think it should be told.

My kids are now parents of our grandchildren who are out in the world working, going to college, and the youngest is in High School.  At Christmas time we send checks to all of them so they can shop for themselves.  My oldest daughter asks me every year what gift she can get for me and I respond by sending a list of tools etc. currently on my shopping list, and insist that she surprise me with what she selects. This past Christmas things took an unusual turn.

One of the items on the list was an Earlex Steam Generator needed for bending wood. I had provided her with a listing from The Highland Woodworking catalog  because I have always had a good relationship with them and their price was competitive.  And sure enough it arrived and was in perfect condition.  As it is my practice to bring my new acquisitions to my woodworking club to show new and interesting items to club members, I brought the steam generator along with several other items.  The next morning I was unloading my truck and the bag with the generator slipped out my hand and crashed to the concrete floor.  When I unpacked the bag I found the plastic case in hundreds of pieces. Ouch!

OK, I’ll call the Earlex factory and order replacement parts to repair it.  I cut all the connecting components from the plastic case ready to reinstall on a new case.  And then I called the factory and they said they did not have the plastic case and if I wanted a new one I would have to buy a whole new unit.  Ouch again.  Then I sent them a polite letter expressing my opinion that a company should backup their products with needed parts.  I got no response so I ordered an army surplus first aid box with a good rubber gasket around the top and planned to install the parts on it.

In the meantime I sent an email to Chris Bagby, the owner of the Highland Woodworking store with whom I had previously found to be a very helpful guy.  I retold the story to him, not really expecting him to do anything but be aware that a supplier was not backing up his merchandise. Chris replied that he would look into it.  About the same time the first aid box arrived I got word that a new Earlex steam generator was on the way to me.  And it arrived a few days later. I finally had the courage to send a thank you note to my daughter telling her the story and how much I appreciated the gift.  At the next club meeting I will take the broken box, all the component parts, and the first aid box, and offer it to anyone in the club if they will pay for the first aid box.  A win win conclusion.

For years I have verbally plugged Highland Woodworking as a great place to buy anything you need for your workshop. Their catalog is extremely well written to explain how the products shown work for you and why they are needed in your shop.  I can assure anyone who reads this that there is no better place in the world to buy woodworking tools and supplies.  The care!

And their online newsletter is fantastic!