

After three long years, Gränsfors Bruks has resume production of the classic American Felling Axes and we have both models IN STOCK!!
You can see the 31″ model here.
You can see the 35″ model here.
Blair
![]() In your catalog you’ve said more than once that “making the wheels coplanar” on a bandsaw is an important part of tune-up, but as far as I know you haven’t described how to do it. I have just a few questions: what is it, how do I know if I need it, and if so how do I do it?
In your catalog you’ve said more than once that “making the wheels coplanar” on a bandsaw is an important part of tune-up, but as far as I know you haven’t described how to do it. I have just a few questions: what is it, how do I know if I need it, and if so how do I do it?
![]() Hmm. Seems we’ve left a few details yet to cover, eh? The object of the exercise is to make your two bandsaw wheels lie in the same plane while you’re cutting wood. When your wheels are coplanar, blades tend to track stably, and perhaps best of all there’s little or no adjustment required when you change blades. It’s much more likely that your blade will be perpendicular to the saw table, and your upper guides are less likely to require adjustment when you change depth of cut significantly.
Hmm. Seems we’ve left a few details yet to cover, eh? The object of the exercise is to make your two bandsaw wheels lie in the same plane while you’re cutting wood. When your wheels are coplanar, blades tend to track stably, and perhaps best of all there’s little or no adjustment required when you change blades. It’s much more likely that your blade will be perpendicular to the saw table, and your upper guides are less likely to require adjustment when you change depth of cut significantly.
Are your saw’s wheels out of plane? A snap diagnosis might be easy: if you have to fiddle with the saw’s tracking knob every time you change blades, you are going to benefit distinctly from making the wheels coplanar.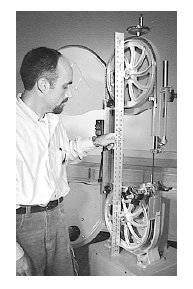 If you’re not sure, here’s another quick check: if there’s a blade on your saw now, go look at it. Is it in the same position on the upper wheel as on the lower? If you can see a difference without measuring, then your wheels are almost certainly running in different planes.
Put a 1/2″ blade on your saw and tension it as if for work. Don’t bother tracking it; you’re just going to take it off again in a minute. Lay a 4 ft. straightedge against the lower wheel, as close to the center as possible. With the straightedge touching the wheel’s rim at both top and bottom, check the upper wheel. Use the tracking knob as needed to make the rim parallel to the straightedge. If the upper wheel doesn’t touch the straightedge, or if it pushes the straightedge out of contact with the lower wheel, then adjustment is called for.
On Delta and Jet bandsaws, the upper wheel can be moved outward by dismounting it and installing a 5/8″ i.d. spacer on the shaft. A hardware store 5/8″ washer will work if you need to move the wheel at least 1/16″. Some hardware stores stock machine bushings, narrow-rim washers available in a variety of useful thicknesses. Be sure the bushing already on the shaft is reinstalled last, just before the wheel. On Sears 12″ and Inca 10″ saws, the lower wheel can be moved by unlocking a set screw and shifting the wheel on its shaft. For other saws, have a good squint and figure out which wheel is adjustable.
It’s easy to set the wheels coplanar, and the payback is mighty convincing. When you can put any blade on your saw, tension it and turn on the saw without worrying about tracking, you’ll be a believer, too.
Visit Highland Woodworking’s Library for more tool tips and information.
 Diamond stone fans will now be able to hone a fine edge on their tools without switching abrasive types. The 3-micron grading makes this stone similar in performance to a hard Arkansas, a 6000-grit waterstone or an extra-fine ceramic stone, plus there’s no break in period. It’s ready to go right out of the box. The mono-crystalline diamond abrasive is bonded to a solid steel plate which measures 8″ x 3″ x 3/8″ thick. Because it won’t chip, crack or dish out, it may well be the ultimate jobsite toolbox stone. Diamond stones can be used wet or dry, but for best results lubricate with soapy water. Occasionally scrub the surface with a scouring powder to unclog the surface.
Visit Highland Woodworking for more information.
![]() I had a mahogany front door installed on my house about 8 months ago, and the finish is already peeling off. The installer said they used an exterior finish purchased at a home center. Why didn’t the finish last longer, and how should I go about fixing it?
I had a mahogany front door installed on my house about 8 months ago, and the finish is already peeling off. The installer said they used an exterior finish purchased at a home center. Why didn’t the finish last longer, and how should I go about fixing it?
![]() I can think of several possible reasons why the finish failed on your door. In general clear finishes don’t hold up as well as opaque finishes. A properly prepared surface coated with an oil-based primer and several coats of high quality modified acrylic paint will usually last years longer than clear or stained finishes. The farther south you live and the type of sun exposure you get can also affect the longevity of a door’s finish. Most contractors do a good job of hanging doors, but don’t have as much knowledge about finishing materials or how to use them. This is especially true with exterior finishes. As a result they will purchase finishing products from home centers that are of poorer quality than those available at specialty shops.
I can think of several possible reasons why the finish failed on your door. In general clear finishes don’t hold up as well as opaque finishes. A properly prepared surface coated with an oil-based primer and several coats of high quality modified acrylic paint will usually last years longer than clear or stained finishes. The farther south you live and the type of sun exposure you get can also affect the longevity of a door’s finish. Most contractors do a good job of hanging doors, but don’t have as much knowledge about finishing materials or how to use them. This is especially true with exterior finishes. As a result they will purchase finishing products from home centers that are of poorer quality than those available at specialty shops.
If you choose to refinish your front door, the most durable option is painting. As for staining and clear coating, the process is more involved and time consuming. Here are some basic instructions.
Thanks for your question,
Chris Black
Highland Woodworking
Visit Highland Woodworking’s WoodNews Online Archives for more tips and information.
The Georgia Association of Woodturner’s meets in our Seminar Room tonight at 6:30pm. They are open to visitors, so come by and check it out. Alan Leland will be demonstrating.

Alan grew up in New Canaan, Connecticut, then attended East Carolina University. After budget cuts prevented him from pursuing corrections as a career, he worked in carpentry. During his carpentry career, he developed and interest in fine woodworking and a passion for woodturning. He served as the Vice President of The Triangle Woodturners of North Carolina.(They have a new name now.) You can even see his profile on their website here.
In 1995, he started Sliding Dovetail Woodworks, now Leland Studios. These days, he focuses on teaching woodturning.
Our store is open until 8:00pm on Thursdays so you can do some shopping, too.
Blair
The more skilled you become at resawing, the more you take it for granted that any stock thickness your heart desires is yours for the making. Resawing isn’t difficult, but it is a skill, which has to be learned just like any other. As usual, practice is the direct route to expertise—and as usual, the better you understand the tool the more effectively practice will teach you what you need to know. Of the main factors that go into successful resawing (blade selection, tension, feed rate and accommodating lead angle), understanding the blade’s lead angle is by far the most critical part of setup.
"Lead angle" describes the direction in which wood must move in order for a given bandsaw blade to cut a straight line. As fingerprints are to fingers, so lead angle is to bandsaw blades. There’s so much variability in bandsaw blades, even blades made on the same machines from the same coil of band stock, that you can expect to see a perfectly good blade lead as much as 1/2" out of parallel to your saw’s miter slot—and the next blade you install may lead that far out in the other direction. As long as the results are good, of course, it doesn’t matter one bit whether you feed the wood northeast or northwest. Lead angles, even strange ones, cause trouble only when you attempt to enforce your own preconceptions instead.
Point Block
 When you make a freehand cut along a straight line marked on your wood, you have to figure out lead angle as you go, adjusting your feed direction back and forth as the blade wanders off the line, gradually zeroing in on a direction that lets the blade follow the line consistently. That’s a fair description of a common resawing stock control method, where you use what’s commonly called a point block fence. The radiused point block helps you keep your stock vertical but leaves feed direction entirely up to you. It’s an efficient way to resaw one or two pieces of wood: mark the line you want to cut, leaving a generous margin for error. Set the point block to the width you’ve marked, and then watch the cut closely, adjusting your feed direction as needed to follow the line. The technique is usually a little more wasteful of wood than ideal, but its appeal lies in minimal setup. Very experienced point block users can make consistent cuts with little waste, but for many sawyers it may be more practical to use a straight fence.
Straight and Narrow
When you have more than a few pieces of wood to resaw, you can do the work quite accurately, repeatably and efficiently with a straight fence tuned precisely to the blade’s lead angle. Begin as described above, making a freehand rip along a straight line. Once you’re sawing straight down the line, stop the saw and pencil marks on your saw table along the edge of the stock. Set your fence to the marks. Now make a resaw cut, if not in the work at hand, then in a short scrap of roughly similar hardness and width. Begin the cut gently, so initial impact doesn’t twist the blade and start the cut wrong. As the cut proceeds, notice if the stock wants to wander away from the rear of the fence—if so, stop and adjust the fence angle accordingly. If the wood stays tight against the fence and the saw begins to labor, stop and ease the rear of the fence away from the wood.
Take a Bow
With the cut completed, stand a straightedge against the resawn face of the board. Unless you’re just plain lucky, you’ll see that the blade bowed left or right within the stock. You know that the solid body of a blade can’t simply move sideways through solid wood. To create a bowed cut, the teeth must lead right or left within the wood (where they’re free of the lateral guides’ constraint), twisting the blade and making it saw its way out of vertical. To keep the cut vertical, adjust your fence to match the way the blade twisted. If the blade bowed to the right, adjust the rear of your fence slightly to the left; if the blade bowed left, reset fence angle slightly right at the rear. Make another test cut and check the face of the wood again. It may take as many as three or four tests to get the fence set for flawless sawing, but once that’s done you can resaw piece after identical piece, with cuts so straight that one pass through the planer is all it takes to produce clean, flat wood at your target thickness.
Visit Highland Woodworking’s Library for more tool tips and information.
 This sandpaper-based sharpener is a good value for the budget conscious woodworker or the enthusiast who wants to forego the learning curve of other methods. The Work Sharp is designed to sharpen carving tools, chisels and plane irons up to 2″ wide. The 1/5 HP motor spins at a comfortable 580 rpm, so you can easily sharpen other tools freehand.
When sharpening chisels and plane irons, an air-cooled heat sink prevents burning and eliminates the need for messy lubricants. You flatten and polish tool backs on top of a 6″ diameter x 3/8″ thick piece of tempered glass coated with adhesive backed sandpaper. You then hone the bevel from underneath the glass on the angle port. The angle port adjusts to 20°, 25°, 30° and 35° for predictable and repeatable sharpening.
Carving tools are ground underneath a slotted backer disc, so you can see the tool’s bevel as you sharpen. Just color the edge with a black marker, and grind sharpen until the mark disappears. The slots in the backer disc keep cool air flowing over the tool to prevent burning.
Strip paper and clean glass and plastic backers with acetone. 2-year manufacturer’s warranty.
NOTE: The Work Sharp comes with some 400 grit paper that attaches to the angle port to remove any burr left by the sharpening process. We recommend not using this paper, as it will scratch the back of your polished tool. To remove any leftover burr, just lightly rub the back of the tool over the 3600 or 6000 micro-mesh paper with the machine off.
The Work Sharp 3000 Sharpening Center includes:
Visit Highland Woodworking for more information on this and all of our fine woodworking products.