George T. (Terry) Chapman

Terry Chapman is a Professional Engineer (Civil) and Land Surveyor who lives south of Atlanta. He has done woodworking for many years and particularly enjoys bowl turning and making Windsor Chairs. He currently works as Site Development Manager for a local affiliate of Habitat for Humanity and has one son who pastors a Church in Connecticut. You can email him at cdeinc@mindspring.com.

Nov 062014
 

I was riding around with a contractor one time and we saw a sign advertising “Ten Famous Nails”.  I immediately wondered who would celebrate 8d, 10d, 10d brite finish, double head form nails and all the rest.  I could think of many more than ten nails and had a vision of bins full of nails like the candy bins in the M&M store we found in Las Vegas one time.

Course it really wasn’t those kinds of nails, but it reminds me of lists like that which I have always liked.  Try this carpentry list and see how many of these numbers you can identify without looking them up:
16″.  19.2”.  1.618.  73.  3.141593.  1.414.  16.97.


How did you do?  Ok, there’s one trick one in there, but all the rest are good ones.   Here you go:

a.  16 inches.  Easy one.  Standard spacing for wall studs in residential construction.  Noted by little red blocks on your carpentry tape.

b.  19.2 inches.  Still pretty easy but much more uncommon.  That is the little black diamond on your tape measure and is the spacing for floor trusses in particular.  Designed to save material when framing and is known as “five bays in eight feet”.  If you set floor trusses on 19.2” spacing then five times 19.2 equals 96 inches or eight feet.  Your sheets of flooring will fit.

c.  1.618.  A ratio, known as the golden mean and called phi.    Mathematically it is (a +b)/a = a/b.   In rectangles, it is the ratio of longer side to the shorter side and we   perceive that as beautiful.  Works on beautiful faces, buildings, drawers in desks, and in the  Fibonacci number series where every number is the sum of the previous two numbers.

d.  73.  From Sheldon on  “The Big Bang Theory”

Sheldon: What is the best number? By the way, there’s only one correct answer.

Raj: 5,318,008?

Sheldon: Wrong! The best number is 73. [Short silence] You’re probably wondering why.

Leonard & Howard: No no, we’re good.

Sheldon: 73, is the 21st prime number, its mirror 37 is the 12th and its mirror 21 is the product of multiplying, hang on to your hats, 7 and 3. Did I lie?

Leonard: We did it! 73 is the Chuck Norris of numbers!

Sheldon: Chuck Norris wishes! In binary, 73 is a palindrome, 1001001, which backwards is 1001001, exactly the same. All Chuck Norris gets you backwards is Sirron Kcuhc!

Sorry ‘bout that.


e.  Pi.  Redneck joke.  Pi are square?  Everybody knows pi are round.  Cornbread are square.

f.  1.414.  If you have an equilateral triangle then the hypotenuse is 1.414 times each leg.

g.  16.97.  When you lay out rafters on a house, you use a run of 12 inches and whatever pitch you have.  When you lay out the hip rafter, you use a run of 16.97 inches with the same pitch since the hip runs at 45 degrees from the corners of the building and the diagonal of a 12” square is 16.97 inches.


Guess that is not ten famous numbers, but hey it’s close.  If you insist, we can add c, e and i, but you will have to Google those (hey, that’s another one!).   And if you really want to get technical, remember the old Indian Chief SOH-CAH-TOA for your trig functions.  After all these years as an engineer, I still use him.


Got any more?


Oct 292014
 

Got my new dust mask yesterday.  I have not had a chance to really give it a trial yet, but it appears to be a real gem.  I used to have a Dustfoe brand mask and I used it so much I actually wore it out.  Unfortunately, they quit making them and you can’t buy one any more.  Highland has been looking for a replacement for many years.

Masks tend to fall into two categories, i.e. the whole face, gas mask type, or the little cloth mask which fits over your mouth and nose and fogs up your glasses. Prices range from over $300 down to $1.80 with effectiveness commensurate with the price.  What is needed is a good effective mask somewhere in a price range which does not interfere with usage.

The solution is the new Elipse P100 Dust Mask available now from Highland.  I tried mine on yesterday and it is a remarkable piece of equipment.  I happen to wear a beard, so getting a good airtight fit is sometimes problematic for me.  I have to tighten it up a bit more than I might if I were smooth faced, but the inhale valves are so flexible and smooth that it does not leak around the sides as I was afraid it might.  The exhale valve is totally flexible so there is no back pressure, therefore no effort to push air out of the mask.  I expect no problem with moisture in the mask and even with the beard it does not fog my glasses.  ( In fact, as I write this, I am sitting here wearing the mask to test it.  Good thing I live by myself, right?)

117301-1

Elipse P100 Dust Mask

Technically, the mask is rated NIOSH P100 (National Institute for Occupational Safety and Health) and captures 99.97% of airborne particles and is resistant to oil.  For your own safety if you are doing something besides woodworking, then go look up the ratings and make sure you are being safe with this mask. For folks with a beard – or any facial hair – like myself, any respirator you see on the market is less effective so you can assume the claims of 99.97% won’t apply.

To put it on your face, grasp the front of the mask and then pull the bottom strap over your head and down onto the back of your neck.  Take the other strap with the wide headband and stretch that one onto the top back of your head and then adjust the straps to fit.  Cover the exhale hole with the palm of your hand, exhale, and you should get a bit of expansion in the mask before it releases air at the side of your face.  If you don’t get the expansion, then you need to tighten the straps to get a better seal.  Or shave.

When I bought mine, I went ahead and purchased an additional set of filters so I will have a replacement set if I ever need them.  The filters are made like an air cleaner in your car with a folded filter element which you should be able to clean by bumping it lightly or blowing it out with air pressure.  If it gets where you can’t breathe through the mask, then change the filter.  Duh!

All in all, an excellent piece of work and this one comes highly recommended.  Get you one and stop coughing.


Oct 132014
 

I went to Highland last weekend for a Saturday class on Spoon Making.  I have made a few spoons over the years, mostly by trial and error, watching Roy Underhill and some other videos on the internet.  It is always funny to me there is a mythos about many kinds of woodworking and Spoon Making has its share.   Generally speaking, you are pretty far down the handle if you use power tools.  The really good makers have a large beat-up stump in the middle of a brick floor, use a small axe to get the initial shape, and a curved knife made by American Indians on an island in Puget Sound. The rest of us use whatever we have in the shop and knives we buy from Highland.

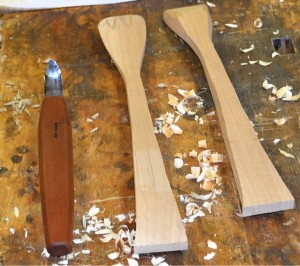
Curved Knife and Fork and Spoon Blank

Curved Knife and Fork and Spoon Blank

When I tried my first spoon, I took an old piece of dried wood and started hacking at it with my small axe and then with whatever knives and chisels I had in the shop.  It did not take me more than about two days of hacking to decide that the traditional methods were not for me.  My style degenerated into seriously considering using my chain saw to hollow out the bowl.  I figured if I could clamp the saw into my workbench vise with the chain facing my chest, then I could hollow the bowl by pressing the nose of the chain into the blank piece while holding it to my chest.  Of course, I would be wearing my leather apron just in case it slipped away.  (Do not try this at home, Ralph.  You do understand sarcasm when you see it, right?!!)  The point being that without the right tools and a little instruction, it is really easy to get tired and discouraged trying to make a spoon out of dry hardwood.

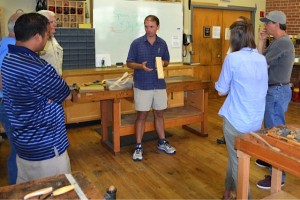
Instructor Jay Halinan and Our Class

Instructor Jay Hallinan and Our Class

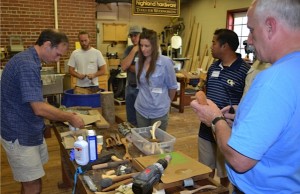
Our instructor, Jay Hallinan, met us at Highland early on Saturday and introduced our little  group to the art of Spoons.  Turns out there is more to spoons than you ever thought about.  The shape of the bowl, the shape of the handle, the shape of the end of the spoon to fit into a pot for stirring, all are more involved than you would think.  For instance, an eating spoon must be shaped so that when you put food in your mouth, you don’t have to scrape the bottom of the bowl with your teeth to use it.  Jay showed us some salad spoons, larger than eating spoons, which were too heavy on the handle end and tended to tilt out of the salad bowl flipping lettuce all over the table.  Who would have thought?

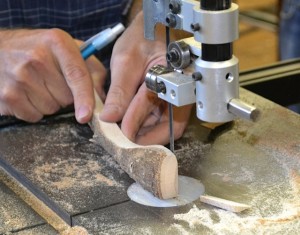
Rough Shaping

Rough Shaping

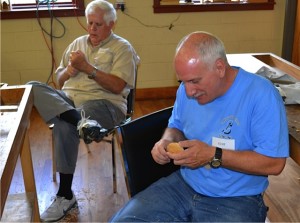
We went over tools and sharpening.  The best primary tool is the curved knife.  Used upside down so the blade comes out the bottom of the hand and with the thumb on the end of the handle for leverage, it is surprisingly effective in hollowing the bowl.  One of the best things I learned from the class is that the shape of the spoon does not have to be symmetrical.  You know me, Mr Engineer, I want things to be parallel and perpendicular, but who cares if the handle is curved.  The issue is how it feels in the hand and how it eats and how it stirs and your name on the back of the handle.

We used soft wood to do our spoons so no one would get discouraged with the difficulty of the carving and whittling.  Our first spoons were made from blanks Jay had prepared for us beforehand.  After that, we had plenty of scraps and fire wood we could choose from and begin to make another.  And the point is just that — you can use scraps, fire wood, found wood, fallen limbs and shrub trimmings to make a spoon.  Many people sit around and spread a cloth on the floor to keep the spouse happy and carve away while watching TV or listening to music.

Intensive Carving

Intensive Carving

All in all, it was an excellent class.  Coming to the Seminar Room at Highland is like coming home.  The workbench at the front of the class is signed by instructors who have taught there and you will recognize many of them.  The best thing about it is the camaraderie of like-minded people who come to learn a new old skill.  I am always pleased to have classmates ask about some other class I’ve taken or some blog I read that they have not yet discovered.  We all go to lunch together to one of the bars next door and the instructor generally goes along with us.  And on the way back from lunch you can shop in Highland Woodworking and buy a basic tool kit for making spoons.  You can even get the address of the guy in Puget Sound.

Basic Finishes

Basic Finishes

Sep 252014
 

Ok people, it’s time to get back in the shop. Summer is over, Labor Day is gone so you can’t wear the white apron any more this year. Holiday season is coming, and it’s time to make something.

Summer time is when we all head off in different directions, vacations at the beach, trips to the cool mountains, pool time with the kids at home. While you were gone, the shop dust settled, and those projects you were so hot to work on last spring may not look so good after you have not seen them for a few months.

Now if you are like me, you really don’t want to do anything but the woodworking you love.  I heard Mr. Norm say once on his show that everyday when he goes to the shop, he takes the first five minutes to pick up or clean up something.  I think that is an excellent idea.

I thought the floor was pretty clean.

So what do you do first?  I think we would all do well with a good sweeping.  I swept my shop a while back and thought it looked pretty good.  Right after sweeping I took some pictures for some turning projects and someone who saw them wanted to know when I was going to sweep the floor.  Hurt my feelings, but perhaps is an indication of how hard it is to get the shop really clean.  I think a good sweep, then a good vacuum down on your hands and knees to get all that fine dust, and finally a good brush with the trusty shop brush will do the trick.

We will continue next time with the rest of the steps to get your shop in shape for the New Woodworking Season.  It’s going to be all right!!

Sep 082014
 

It occurs to me that everybody may not have the opportunities for wood that I am fortunate to have.  People know I love to turn and they are always bringing me wood and asking if I need some more.  I am reminded of the young fellow who came to the shop one day and looked around in amazement and said,  “So, you just get a tree from the woods and make something?”,  “Well, yeah.”

Stumps in the walkway.  Saw for scale.

Stumps in the walkway. Saw for scale.

A few months ago a friend asked if I wanted some chunks of walnut.  I said does a bear brush his teeth in the woods?  Some people he knew took down some walnut trees and were cutting them up into firewood.  He got it and brought it to me.  Most of them were so big that we could not pick them up, and so instead we just backed his truck up to my gate and slid them off on the walkway.  I have been walking around them to get to the shop for about four months, so today I decided it was time to do something with them.

For all you people out there who think milk comes from the store, eggs come from the dairy case, and bowl blanks come from Highland, this is for you.

Break Time.   That's a plastic wedge.

Break Time.
That’s a plastic wedge.

There are many ways to do this, but this is my method.  These pieces are too heavy for me to do anything but slide them and tumble them, so I pulled out the trusty chainsaw and went after them.  I like bowl blanks with the rim of the bowl set vertically at the pith of the tree and the bottom of the bowl near the outside bark edge.  The pith must be removed from the bowl because any crack which develops will run to the pith as the bowl dries.  One problem with these pieces near the stump of the tree is that several of them have up to three piths in them.  With that many piths, I try to cut so the piths come out near the edge of a blank.

I made a bowl blank from one of these chunks a while back and it is coming out so deep that I don’t like it.  So today I decided to limit the bowl depth to about five and a half inches.  That is a pretty good bowl — if you are going to use it for salad, you better have a big family.

Perfect Blank Slice

Perfect Blank Slice

To begin, I sawed a piece in half and managed to get one piece on top of another chunk so I could get to it better.  I laid it down flat and then took a random board from the shop and marked a saw line with a yellow pencil at a depth of just under six inches.  I got a lovely slice with parallel sides that I could put on the bandsaw and make a round blank.  With the compass I made a circle on one side of the slice and then put it on my bandsaw with the Highland Woodturners Blade mounted on it.  This is a wonderful blade made for the purpose and it  zipped right through the circle.

Circle on the slice.

Circle on the slice.

IMG_1327

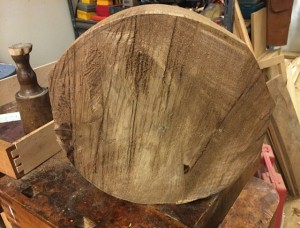
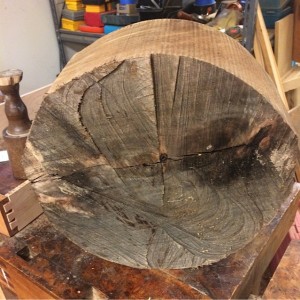
One side of the blank had some issues with the pith and the other seemed to be smooth, so I made the smooth side the outside of the bowl and most of that pith will be turned away.

Smooth Side will be the outside of the bowl.

Smooth Side will be the outside of the bowl.

The Pith Side

The Pith Side

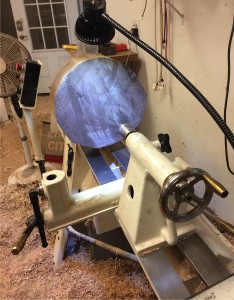
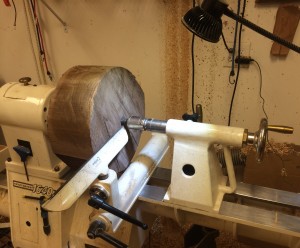
I mounted my face plate on the future inside of the bowl and stuck the blank on the lathe. My lathe is a Oneway 1640 from Highland, so it will handle a bowl up to 16 inches in diameter inboard and 24 inches outboard.  Since these stumps are only about 13 inches, it works beautifully.   I love that stripe up the wall behind the lathe by the way.  I turn green so that is moisture from the wet blanks.

Homemade Bowl Blank Ready to Go.

Homemade Bowl Blank Ready to Go.

Also note my magnetic LED worklight from Highland.  I love that light!

—–

Terry Chapman is a Professional Engineer (Civil) and Land Surveyor who lives south of Atlanta.  He has done woodworking for many years and particularly enjoys bowl turning and making Windsor Chairs.  He currently works as Site Development Manager for a local affiliate of Habitat for Humanity and has one son who pastors a Church in Connecticut.   You can email him at cdeinc@mindspring.com.

Aug 222014
 

Almost every time I go to Highland, my first stop is the book section.  I love the books for a couple of reasons, one of which is budgetary.  I have almost all the moderately priced tools in the store, so the books offer a chance for a little vicarious woodworking at a moderate price.

Last time I was there I bought a neat little book originally published in 1937 — “The Village Carpenter” by Walter Rose.  He writes about woodworking in England in the Victorian period when his father ran a woodworking business.  In the introduction they talk about carpenters:    “…  a child can watch a carpenter at work without risk of soiling;  sawdust is cleaner than snow and not unlike it, and the long curling crinkled shavings, that come off sweetly (as clean as a whistle) are lovelier than any manufactured  fabric.  Wood is tender stuff, too; you must not bang it about as you bang iron about, and, handling it gently, carpenters as a race are gentle.  They seldom shout; they never leave their tools about.”  I like that.

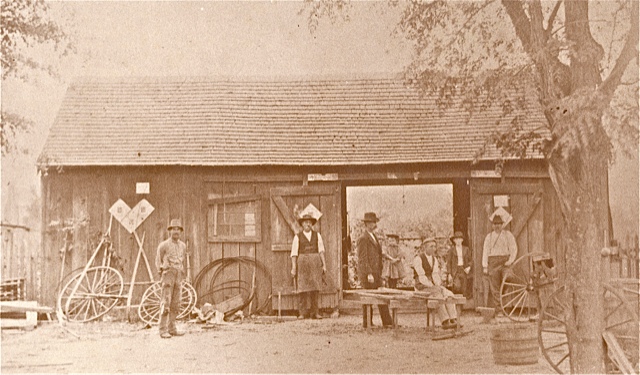
It’s a lovely little book, talking about times gone by in England.  But something hit me when I started reading it and particularly when I got to the chapter on Undertaking.   Let me explain.  My Great Grandfather John Nathan Chapman was a carpenter and woodworker and he made wagons and buggies in the backyard of my Grandmother’s house.  He was born in 1847 and lived until 1922, so his career spanned the era that Mr. Rose wrote about.  That would have been only a few generations removed from the family migrating from England/Ireland, so you know some of his traditions and tools had to come from the old country.   People don’t invent new tools and methods of work and traditions just because they go for a little sail.

Here’s his picture in front of the shop.  I’m looking at the wheel rims, and the wheel blanks and the buggy shafts and I love that apron he is wearing.  He would recognize all the tools in my shop if he walked in today, and I bet he would really love my table saw and the electric bandsaw.  I have this fantasy that one of his buggies or wagons is still out there somewhere.  How I would love to have one of them.  I do have a nameplate from the “Crawfordville Furniture and Buggy Shop”.

Great Grandfather at left center in apron. (c. 1920)

Great Grandfather at left center in apron. (c. 1920)

But back to the Undertaker chapter.  My family has been in the funeral business for a long time and the family story is that it came from the carpentry shop in the back yard.  As explained in the book, it was a standard part of the carpentry business.  After all, if not the carpenter, then who else would make a casket?  Making coffins evolved into the funeral business.  My Grandmother, a widow with three small children in the Reconstruction South, needed an income and continued doing funerals with her two sons, one of whom continued until his death a few years ago.  I remember when my brother or I spent the night at Grandma’s, it was not unusual for there to be a body lying in state in the room next to the bedroom.  In fact, we often asked permission to go in for a private viewing before going to sleep.  The room at the top of the stairs was where the coffins were displayed for sale and we loved to play in the coffin house next door.

I really related to this little book and it is one of hundreds available for sale at Highland.  They can’t list them all in the catalog, but look on the web site and there are at least 830 shown there.  If you don’t see what you want, call and ask. They’re here to help.

Aug 142014
 

Got a new toy in the shop and no, it’s not Festool.  Let me tell you about it.

Twenty five years or so ago, I designed sewage lift stations for land developers. One day a salesperson came by with a demonstration pump on a small trailer behind his truck.  All the trailer sides rolled up so we could walk around the pump and get a feel for size and installation issues.  I remember standing there with the distinct impression the pump was running, but there was no electrical connection or generator.  I could hear it running and feel the vibration through the floor of the trailer.  No sewage either, thank goodness.  (It may be sewage to you, but it’s bread and butter to me!)  I searched for a minute to see where the noise and vibration was coming from, and finally realized it was from a Bose radio down in the front of the  trailer playing a recording of a pump running.  I have wanted a Bose radio ever since.

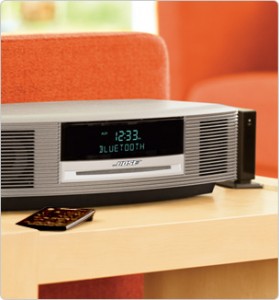
Bose Shop Radio

Bose Shop Radio

Finally sprung for one for my birthday last week.  I ordered the attachment for Bluetooth to go with it.  What that means for you Luddites out there, is that I can play music off my phone and my iPad and it comes through the radio.  It is a radio of course, but it will also play CD’s.  The sound is nothing short of fantastic and will rattle the walls of the shop.  It will drown out almost any power tool in the shop and it may drive bugs out of the sawdust pile, depending on what kind of music I play and how loud I make it.

I spend many hours at the lathe and I can hear my new radio while I am working.  I also listen to podcasts, (look on iTunes — ask your grandchildren to help you! )  and there is one particular podcast I really like called “Stuff You Missed in History Class”.  Excellent discussions on some really arcane subjects (did you know that only five people actually died at the Boston Massacre?), but very well done.  Podcasts typically download automatically once you subscribe and there are thousands out there on hundreds of subjects including many on woodworking.

Get yourself set up with a good radio or a Bluetooth speaker and enjoy music and a whole bunch of other good stuff while you work in the shop.

While you are out there, by the way, go look up Bluetooth and the connection with Hedy Lamar, the famous actress.  What a remarkable woman.

Editor’s Note: Some great woodworking podcasts include: Wood Talk and The Modern Woodworkers Association