Lee Laird

Lee Laird has enjoyed woodworking for over30 years. He is retired from the U.S.P.S. and works for Lie-Nielsen Toolworks as a show staff member, demonstrating tools and training customers. You can email him at lee@lie-nielsen.com or follow him on Twitter at twitter.com/is9582

Dec 192011
 

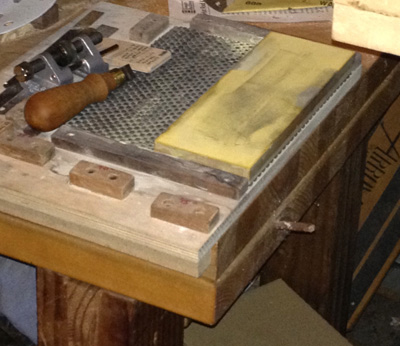
I’m always on the lookout for the “perfect” surface to help hold my sharpening stones, so they don’t have a mind of their own and walk around on me. A couple of years ago I made the Lie-Nielsen sharpening guide, which you can see at any of our events, and whose plans are available online. I love how it encompasses both the holding of stones as well as the stops for four or five angles most used in our sharpening. Occasionally, I’m using a stone that’s too large to work with this guide, so that is when I usually start looking.

I was out doing a bit of shopping with the family this last weekend, and it just so happened I found something that looked to be the answer (and ultimately worked great, after giving it a try). It is a cooking mat made from silicone. I was picking up something else, when I accidentally touched the mat. My eyes opened wide and I immediately knew it was going to follow me home for some trials. This mat is 8 1/4” x 11 3/4”, which they call 1/4 sheet in the cooking world and if needed, they had another twice this size. This one felt as if nothing could possibly slip on it.

I don’t know yet how long the “tack” will stay, but the mat was reasonable at $12.99, and a 10% coupon made it even sweeter. I’m expecting this material to last at least a year or two, and if it does, I’ll be a happy sharpener. Cleans up extremely easy, no matter how much swarf and stone material has gotten onto it, with just a splash of water and a paper towel.

I hope to see some of you at our upcoming events, listed on the Lie-Nielsen website.

Feel free to contact me at lee@lie-nielsen.com if you have any questions, or if you have suggestions for future articles you would like to see.

Click to see Highland Woodworking’s entire selection of Lie-Nielsen hand tools.


Lee Laird has enjoyed woodworking for over 20 years. He is retired from the U.S.P.S. and works for Lie-Nielsen Toolworks as a show staff member, demonstrating tools and training customers.

Dec 012011
 

I’ve been playing guitars for well over 35 years, and had always just bought guitars off of the rack, in music stores. A number of years ago, I thought I might try my hand at building a guitar. Not the type where you buy a kit with all the parts pre-cut, then just put it together, but one where I buy rough wood and some pre-made metal parts, and end up with a beautiful and playable guitar. Or at least that’s the idea! While I have acoustic guitars, the guitar on this build is an electric, and styled after Gibson’s solid body Les Paul Standard.

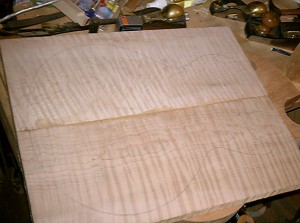
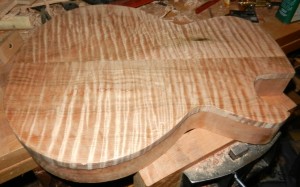
After buying some nice mahogany for the back of my guitar (this style of guitar traditionally has two types of wood glued together, for specific tonality), and some really figured maple for the top, I was ready to start working some wood.

I cut both the mahogany and maple into lengths that would be slightly longer than the intended body, so I would have room to lay out the shape of the body on my blank. I worked the long edge of each piece (both types of wood) so it was flat and square, preparing to glue the two like pieces together so I’d have the width necessary for my design.

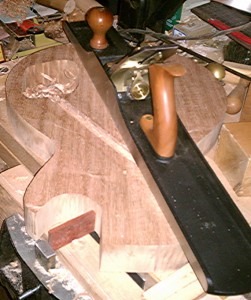
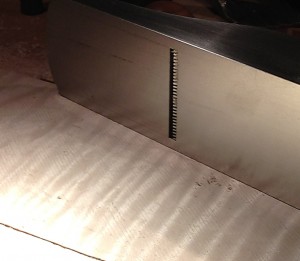
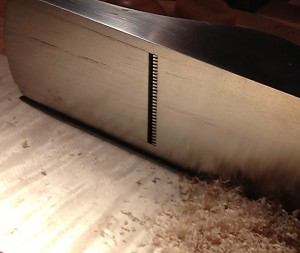
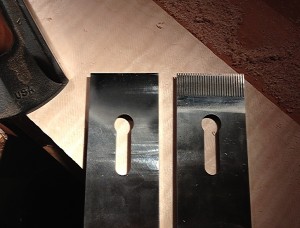
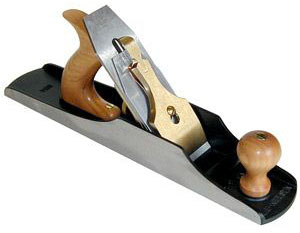
The next step was to work one of the large faces of each wood completely flat, so I could glue the maple blank to the mahogany, and have an extremely solid connection. I used my #8 Jointer Plane to prepare the mahogany, but quickly saw how the maple was tear out prone. I shifted over to my #62 Low Angle Jack plane, with a toothing blade installed.

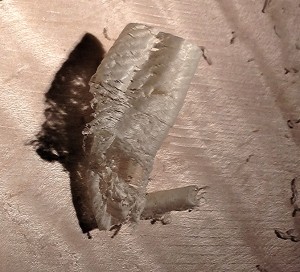
When using my toothing blade, I open the mouth of the plane wider than I normally would, and have the blade advanced further as well. This allows me to fairly rapidly work the figured wood down to flat, minus the tear out issue. The toothing blade has small chisel-like teeth that don’t share the same grain-diving propensity as a standard blade, making it ideal for this usage.

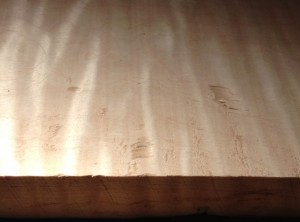
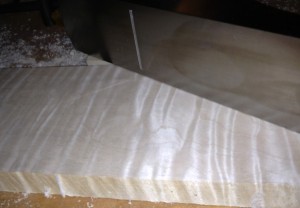
Following the toothing blade (since the toothing blade leaves a rough surface), I prepared my standard blade for my #62 with a micro bevel of 45 degrees, set it for a very light shaving, and closed the mouth down so there was just enough room for the shaving. This angle of sharpening, along with the 12 degree bedding angle, presents a fairly high 57 degree cutting angle to the wood. When I first go to the standard blade in my #62, I will get very little in the way of shavings. This is to be expected, and is similar when starting to work with a smoother set for an extremely thin shaving. Most people’s first thought is to advance the blade, but don’t do it! Stick with your settings for at least a dozen passes before re-assessing. As long as the blade is set properly, you’ll start to see more and more areas of shavings on subsequent passes. When you get full shavings, you are either finished, or a pass or two from finishing. Let your eye be your guide. You’re looking for a surface that is almost glass smooth, and of course, flat.

Now that the curly maple cap has one side surfaced, it’s ready to be glued to the mahogany back. That is all of the guitar building we have time for today. I’ll write about future sections of this build as interest directs, and as other tool usage opportunities present themselves.

I hope to see some of you at our upcoming events listed on the Lie-Nielsen website.

Click to take a closer look at the #62 Low Angle Jack Plane.

Click to see Highland Woodworking’s entire selection of Lie-Nielsen hand tools.


Lee Laird has enjoyed woodworking for over 20 years. He is retired from the U.S.P.S. and works for Lie-Nielsen Toolworks as a show staff member, demonstrating tools and training customers.


Nov 292011
 

Someone asked me recently what I saw as common between using hand planes and woodturning, and it occurred to me that there are quite a few aspects of the two disciplines that are somewhat similar.

The first and perhaps most important, in my view, is sharpening. If the user struggles with sharpening, they will likely never excel in either discipline. Finding a way to get a consistently super sharp edge can make all of the difference.

The next on my list is learning touch. There are many times a customer will pick up one of our planes that is already setup, and seem to struggle a bit. When I come over and show them a better way to possibly hold the tool, or stance, or using the legs to drive the tool, then they start to have better results. Some folks seem to think a hand plane is only capable of taking the same thickness shaving as long as the iron is set at the same depth. I can take the same plane, and without changing the setting, modify the cut in different touch related ways, from skewing the plane to applying different pressure on different areas. The touch thing is even more important in the turning world. Turners that are still learning (that’s me) can make the tools cut, but those with elevated skills can take the same tool and make it sing. It is a very, very important aspect of turning.

The last of my thoughts relates to the quality of the tools used. Now, there is nothing to say that you have to go out and buy the most expensive planes or turning tools, in order to do good work. Not at all. But I would suggest examining what you buy to make sure it is made well. When I first started out, I bought a brand new Sears hand plane for about $20 (this was a long time ago). It looked ok, but the iron material was such that it just never would hold an edge. Beyond that, the plane body was flexible (not a good thing in this work), so the flexing would change the iron’s depth and it was a continuous struggle. Soon afterwards, I bought a second hand Stanley hand plane from the 1930s, that had no flex and the iron would sharpen easily. I think I paid $5 for this plane. It worked much better than my first. Then when I put my hands on my first Lie-Nielsen plane, I wondered how I’d got along with just my old Stanley. Point is, a decently made plane is something you can work with. A better made plane (stiffer, more mass, better materials) seems to provide a better control over the wood. I believe that is primarily due to consistency of the tool, in all manners, while you work. If the tool is not completely static, then you have to modify your “touch” during your work, which just tosses in more barriers to doing your best work. On the turning side, well made tools may come down to the metals used in their making. Some of the early turning tools were made of metals that would both hold an edge for a short time, and were prone to quick damage during grinding, as a relatively low heat would cause loss of temper, and that means the steel won’t hold an edge. Some of the better tool steels are much better at both aspects. Some can become quite expensive, but again you can get by with the old steels, as long as you don’t mind sharpening frequently and are extremely careful when grinding, using a very light touch.

Click to see Highland Woodworking’s entire selection of Lie-Nielsen hand tools.


Lee Laird has enjoyed woodworking for over 20 years. He is retired from the U.S.P.S. and works for Lie-Nielsen Toolworks as a show staff member, demonstrating tools and training customers.

Nov 222011
 

When I first started out in woodworking, one of the techniques that really caught my eye was dovetailing. There was something about this type of joinery that was strong, efficient and yet still beautiful. Whenever I’d see an old piece of furniture, especially those containing drawers, I’d have to check to see if the maker used dovetails. After a bit of experience, I’d then focus in to see if they cut the dovetails by hand, or if they used a powered router setup. While the router cut dovetails are amply strong, and still look good, there was something about the hand cut joints that captured me. I looked for training materials, in print and video, and found Frank Klausz. This was back in the mid 1980’s.  After absorbing the instructional materials, I was ready to make some dovetails. Or was I?

I went to the one local woodworking store that featured “good” tools and with the help of their sales staff, bought a “dovetail” saw and a set of four chisels. I came home and was dying to make my first dovetails. As per Mr. Klausz’ video instruction, I cut the pins first, without any “layout”, other than a pencil mark for the depth of cut. I immediately noticed my saw didn’t seem to behave like what I’d seen in the video. Hmmm. I went forward, transitioning from saw to chisels, in order to remove the material between the pins. After what seemed like days later (an exaggeration, but not so far from reality), the pins were all that was left standing. I noticed something else that didn’t look like what I’d seen on the video. The end grain, between the pins, was all torn out and an inconsistent distance if measured from the end of the board. Well, I was in so far, I couldn’t see turning back. I placed my pin board onto the end of what was to be the tail board, and used a pencil to mark both the tails and the depth of cut. As might be expected, my sawing on the tails was worse than I’d experienced on the pins. I cut angles that looked like I should take off my blind fold! Those first dovetails never went together, nor ever looked like they should. At least I could see that wasn’t going to happen.

Fast-forward some large number of years.  My desire to make hand cut dovetails never waned, but my initial attempts (yes, there were more unsuccessful attempts, but I didn’t want to waste the electronic ink going into those), were never even close to my self-imposed standards. For dovetailing, I purchased one of the original Lie-Nielsen dovetail saws, a .020” (for more on this saw, compared to my first “dovetail” saw, check out my previous article on our dovetail saws), one of the great marking gauges made by Glen-Drake, a five piece set of Lie-Nielsen chisels and made a dovetailing template out of wood. I have subsequently purchased the new .015” Lie-Nielsen Dovetail saw, and converted my .020” Dovetail saw into a cross-cut saw, by re-sharpening the teeth in the correct orientation. I initially practiced cutting to both vertical lines as well as angled lines, so I could minimize the waste of good wood. I also watched the basic dovetailing video by Rob Cosman, which was about 180 degrees different from Frank Klausz’ video. Rob cuts his tails first, following up with the pins. For me, this made complete sense, especially for someone whose sawing skills are not highly developed (meaning me, not Rob!) When cutting the tails first, I will still lay out the angles I’d like to see, but it won’t matter if I’m off slightly, as long as my cut is square across the end of the board. The reason is, as long as the still-to-be-cut pins match up to my tails, I’ll have a good fit. Since the pins are laid out directly from the completed tails, and the pin cut is a vertical cut, its much easier to cut to the lay out lines. I find many people have more trouble cutting to a line that requires the saw plate off of vertical, as it is when cutting tails.
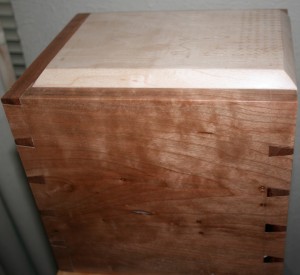
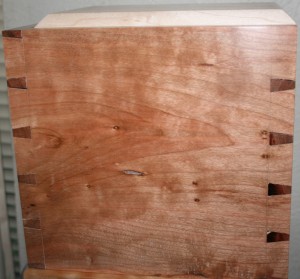
I already had a couple of sets of dividers in my shop, along with a thin marking knife. Rob’s technique for laying out the dovetails is easy, but can take a few tries to get your head wrapped around. One of the critical aspects is scoring the baseline with a marking gauge, so the chisel can register in the groove for the final paring cuts, as well as mark the sides of the tail-boards for the cross-cut saw. This provides consistency of depth for the tails, across the piece, which minimizes gaps or openings in this region. I also like to use my Lie-Nielsen 140 Skew Block plane, before cutting the tails, with the fence set so the plane will cut from the end up to the baseline. I remove about 1/16” of material (not a critical measurement), to aid in proper layout of the boards while marking the pins after the dovetails are cut. After cutting the tails, I use either a coping saw or a jeweler’s saw to remove the majority of wood between the tails, prior to paring to the baseline. I find this speeds up the process, and there is less chance of compression issues or slips of the chisel than when removing the remaining wood with a chisel and heavy mallet blows. I use my .020” converted cross-cut saw, to remove the two outside excess pieces, and then pare to the marking gauge line. I prefer a chisel that is wider than the board is thick, so I can have this base in a single plane.

After the tails are complete, orient the two boards for pin marking. One tip is to mark each end, of each board, uniquely so you’ll make sure only one set of pins are cut from each set of tails. I’ve used everything from an extendable box cutter to a beautiful marking knife made by Homestead Heritage woodworking in Waco, TX, to mark my pins. Whatever you use must be thin enough to fit between the tails, yet strong enough so it doesn’t deflect from the tail side-wall. I always start with a couple of lighter passes with the marking knife, before deepening with a bit more pressure. The light passes are to ensure the knife doesn’t have the chance to follow the grain on the pin board. After the end-grain is marked, I use a small square to mark from the end-grain to the baseline, using the same marking instrument. Remember not to mark the sides of the pin boards with the marking gauge. This wood is only removed on the tail-boards.

After completing the actual dovetailing, I mark where I will groove for the bottom of my box/piece, usually for 1/4” material, but that will depend on the scale of your project. I usually choose an area centered between the pins. This allows me to use my powered router, with a straight cutter, to remove this material, which will be covered by the tails when assembled. If I did the same through groove on the tail-boards, the ugly groove would be seen after assembly. For this, I use a stopped routed groove. I make sure to make a mark on my router’s fence, so I know exactly where the edge of the cutter is. I take the depth of cut of my groove, and add on about a 1/16”, and make a pencil mark that distance from the shoulder line across the tails. With the router bit spinning, I slowly pivot the board down onto the bit, just shy of the mark on the far end of the board, slowly move the board backwards to the point where the marks line up, and then feed the board through to the mark on the opposite end.

During the dry fit, I will measure from groove to groove, so I can cut the bottom material for a proper fit. Many times I’ll use 1/4” Baltic Birch plywood for the bottoms, as I don’t have to worry about it moving or expanding. I cut the material on my table saw, which gives good results.

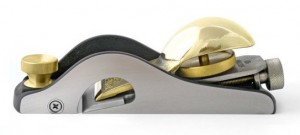
Depending on the woods used, I regularly use a yellow or white glue to assemble these projects. If I’m using all dark woods, I will sometimes either use liquid hide glue, or one of the plastic resin glues. Both seem to “disappear” in this usage. After letting the glue completely cure, I’ll come back with my #60 1/2 Low angle block plane to trim any tails/pins that stand proud of the sidewalls, as well as chamfering the sharp edges. When trimming the tails/pins, make sure to work from the end in, or you’ll risk chipout. I’ll take a final pass or two, in the direction of the grain, using either a #4 Smoothing plane, or my #8 Jointer plane set to take shavings in the .001” range.

When completed, I usually like to apply a Tung oil finish, followed by some fine wax. The Tung oil is applied using some small rags, and rubbed over the wood, making sure to completely cover all areas. I let it stand for a couple of minutes, then lightly wipe with a dry cloth. This makes sure there is no chance of ponding. Since I live in the hot South, I can usually apply a couple of coats of finish in an evening. I’ll lightly hit the surface with 320 grit sandpaper after the first coat, and then 600 grit between the subsequent coats. When I have applied 8 – 12 coats, I’ll apply Black Bison wax. Neutral is what I use for all but darker projects. Then I’ll use some of the dark colored Black Bison wax. Buff it out after it sets for 25 – 30 minutes. I think you’ll enjoy the oo’s and ah’s you get from those who touch your work.
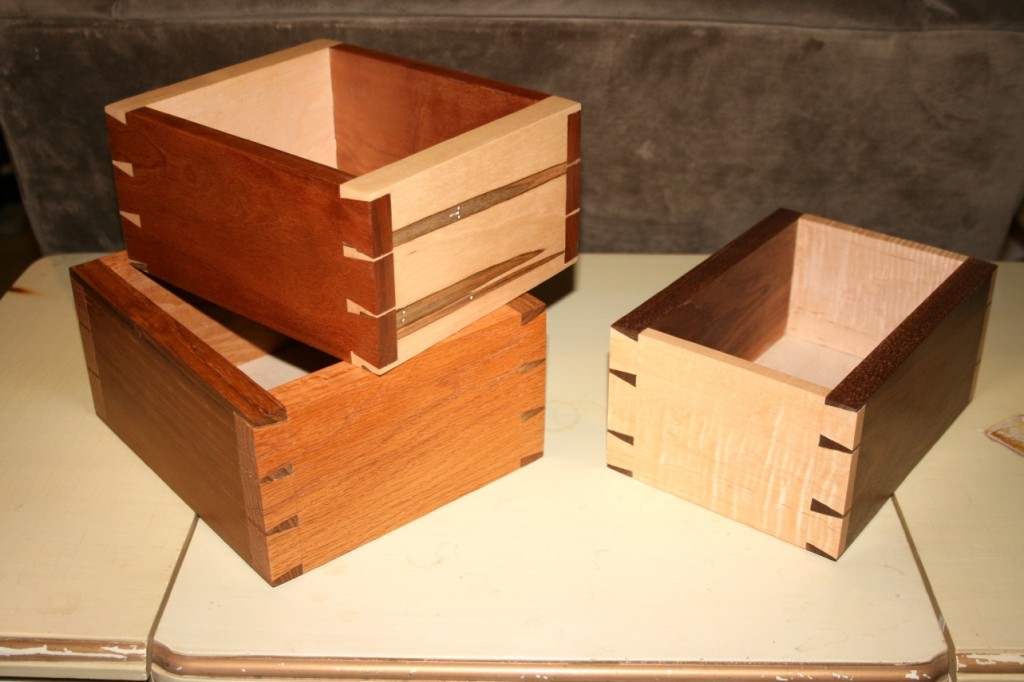
Videos on dovetailing are still available by both Frank Klausz and Rob Cosman, and are good sources of information and instruction. Remember to try different methods, no matter what you are doing, to find what works best for you. Whatever you do, keep reading and growing.

I hope to see some of you at our upcoming events listed on the Lie-Nielsen website.

To take a closer look at the Lie Nielsen dovetail saws, click here and here.

To see Highland Woodworking’s entire selection of Lie-Nielsen hand tools, click here.


Lee Laird has enjoyed woodworking for over 20 years. He is retired from the U.S.P.S. and works for Lie-Nielsen Toolworks as a show staff member, demonstrating tools and training customers.

Nov 012011
 

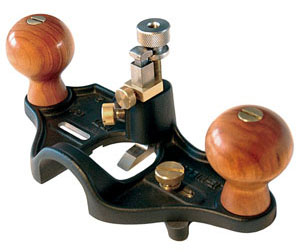
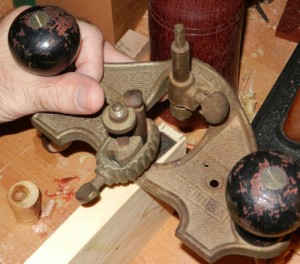
The Lie-Nielsen Large Router Plane is nicely upgraded from its Stanley roots. This plane comes with a cutting iron, fence, finely adjustable depth control, a very useful depth stop and some comfy handles.

As with just about any other plane, even though the #71 may not immediately trigger its plane heritage, sharpening is the first step to setting up this plane. I’ve had quite a few customers at our events, a bit perplexed as to how the iron is sharpened. The cause of this doubt usually originates with the shape of the iron.

Its “L” shape dictates hand sharpening, as it doesn’t readily “fit” in honing jigs or systems, at least those of which I’m aware. When I sharpen this iron, I usually stick to the original bevels, as they are fairly large and if you take your time, are not too hard to register on the stones.

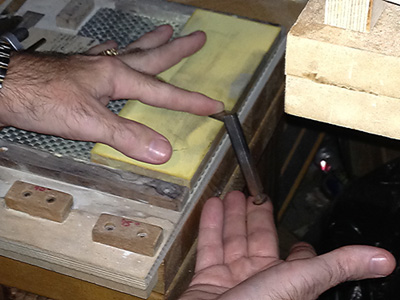
One “trick” I use when working the bevel of the cutter, is to move my sharpening stone so the long edge is flush with the sharpening table. This allows me to ride the bevel on the stone, while the other portion of the iron hangs off the edge.

I also prefer to hold the cutter so its body is about 45 degrees askew to the stone. There is less chance I’ll rock the cutter as I’m moving up and down the length of the stone, than if the cutter points directly across the stone (still moving the iron up and down the length of the stone). After working the bevel, it’s time to work the back. The back is easier, since there is more surface area on which to balance. I’ve worked the complete back of the iron for the majority of my woodworking experience, but recently have played around with adding in a back bevel, much like the concept of sharpening the back of my plane irons. When I work the complete back surface, it’s very easy to stabilize with either my thumb or finger, depending on what feels comfortable. Similarly to the bevel, I will work the back with the cutting edge about 45 degrees askew to the stone, even while still moving the cutter up and down the length of the stone. When trying the back bevel sharpening technique, it was readily apparent that the length of cutter was translating into a larger bevel, even with the very thin material we use when working the backs of plane irons. Knowing this, I’ll continue to work the complete back, until I find a good solid reason to change. I’ll report back if/when I do change.

The next part of setup is to re-assemble the iron in the plane. When preparing to use this plane, I will do one more step. Once I know the limit of the depth of cut for which I’m using the #71, I’ll set the iron to this depth. This makes it so I can gradually work my way down to final depth, without fear I’ll accidentally advance the iron too deep, and remove material that will either be unsightly or weaken my structure. Once the iron is at final depth, I move the depth stop so it is up against the plane body, and lock it tightly in place. Now I’ll retract the iron, so I’m prepared to take a light cut. Taking light cuts is good practice, since a heavy cut can have the potential for tear out and less than optimal results.

If the included fence is necessary for my project, I always set it up directly from my work piece, so no measurement errors are introduced.

That’s about it for setting up the Lie-Nielsen Large Router Plane, which I think everyone will find to be a very useful tool in his or her arsenal. I hope this helps get your plane prepped, so it is ready for all the action I anticipate you’ll find for it.

I hope to see some of you at our upcoming events, listed on the Lie-Nielsen website.

Click to take a closer look at the Large Router Plane.

Click to see Highland Woodworking’s entire selection of Lie-Nielsen hand tools.


Lee Laird has enjoyed woodworking for over 20 years. He is retired from the U.S.P.S. and works for Lie-Nielsen Toolworks as a show staff member, demonstrating tools and training customers.

Oct 172011
 

At one of our events, I had a customer who wanted to create heavier duty tongue and groove joints. We discussed the possibility of using our No. 48 or No. 49 and as good as they work, the scale was just too small. My customer asked me for suggestions as to an alternate method to using tongue and groove planes.

I suggested to the customer the option of using a back saw, if he felt comfortable with his sawing skills, since it would ultimately only require four length-wise cuts to make the tongue. Based on his facial response, I thought it best to move on to another possibility. (By the way, if the backsawing technique does interest anyone who is reading this, leave a note in the comments and I’ll look into writing a small step by step on this technique.) The second method only requires two tools. The No. 71 Router plane and a Marking Gauge that slices rather than scratches. I should preface by saying that this method is somewhat slow, but you can end up with a pretty decent final product.

Start with the two (or more) pieces of wood sized so they are the same thickness, square and flat. Take the board that will have the groove, and clamp it in a shoulder vise, so the work surface is facing up. I like to start out making the grooved piece first, since I find it easier to adjust the tongue to fit, rather than trying to adjust the groove. Now, before marking for the groove, setup your No. 71 with the iron you plan to use. (*Note: there are different sizes and shapes of irons for the Router Planes) I like to choose a square ended iron that is as wide as possible, fitting with your plans. If you have a fence for your No. 71, it can help prevent the damage caused by a momentary loss of focus, where you accidentally remove material outside your marked/scribed lines. At least when just starting, and the groove isn’t deep enough to “trap” the iron. Set the fence so the iron is centered on the board, or if the groove is more than double the width of the iron, set it so you remove material next to one of the marked lines. (NOTE: If you don’t want an overall centered groove, then a second marking gauge really comes in handy.) If you don’t have a fence, then measure so the two edges of the iron will be equal distance from both faces. Make a small mark on each side of where the iron will cut along the edge of the board.

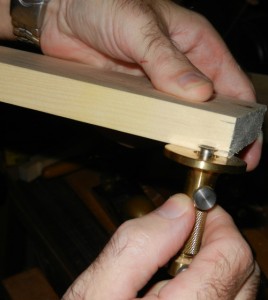
Set your marking gauge to these marks. Before assuming this setting is perfect, mark a small section, from each edge. Check to make sure the iron will not only fit, but also completely fill the area between the two marks, if you aren’t trying for really oversized tongues/grooves. I think about it similarly to when I’m making a mortise, the width of the mortise chisel should dictate the mortise/tenon widths. Once the marking gauge is set, mark the full length of the board, from each face. This will establish the boundaries for the material that will be removed, and the scoring will minimize tearout. Set the board you are working with so the No. 71 will cut with the grain. It makes it easier to get good results if you are not working against the grain. Before you start to remove material with your No. 71, mark the final complete depth of cut on the end grain at both ends of your board. This will be helpful as you approach your target depth.

Take a pass or two with your No. 71, with a sharp iron set for a relatively light cut, removing some material. Now come back in with your marking gauge. This time make two or three strokes on each side, with decent pressure. The idea is to score the wood fairly deep, so the No. 71’s iron can just remove the material between the scored marks. Some woods behave nicely and can handle a thicker shaving than others, so testing the wood early on will prevent problems later in your work. Continue to alternate between the marking gauge and the No. 71, until you are at your final depth.

With the marking gauge still set as it was for the boundary of the groove, readjust it so the cutter is just slightly closer to its fence. What this will ultimately accomplish is to increase the thickness of the tongue slightly, providing material on the tongue to sneak up on a perfect fit. Mark the long edge of the board that will fit into the previously made groove, working from both faces. Now adjust the marking gauge directly from the previously created groove, so it is set for the depth of the groove. With this setting, mark the tongue’s shoulders, from the edge that will have the tongue. This will establish a clean shoulder. For the cleanest shoulder, repeat this marking after every couple of passes with the No. 71.

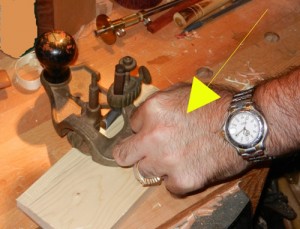
Now, to create the tongue. Check to make sure you are working with the grain on this board. To use the No. 71 for this portion of the process, make sure you apply pressure to the handle that is riding on the face of the board. This will keep the No. 71 level and ultimately the side of the tongue parallel to the face of the board. Incrementally remove material until you are getting close to the depth mark on the tongue. Flip the board over and continue removing material until you are close to the mark. Check to see if the tongue is close to fitting in the groove. Likely it will still be too thick. If it does not yet fit, advance the cutter slightly and remove a small amount of material. Check the fit after working each side, as it is easy to overshoot a good fit. Continue this process until the tongue fits as desired. One thing to remember is that working one side at a time can sometimes lead to one side having a bit more material than the other. Make sure to test your depth of cut when shifting to the opposite side of the tongue. If you don’t check this setting, when moving to the other side of the tongue, you may end up removing too much wood. And we all know it’s easier to take it off, than put it back on!

FYI – for the picture shown just above to the right, I should note that the cutter I used was much too large for the wood. Unfortunately I couldn’t find a cutter that matched exactly what I wanted for demonstration purposes.

When both boards are finished (one with the tongue, the other with the groove) it is time to see how things fit. If the tongue is too long, so there is a gap at the shoulders that doesn’t close up, take a few light shavings off of the end of the tongue. Again, take baby steps. Here’s another tip you can use if you are uncomfortable trying to keep the end of the tongue square while making this adjustment: Lay the board that has the tongue onto a very flat bench or table, so the tongue is horizontal. Set one of your planes for a very light shaving. I tend to like a Jointer plane # 8 for this, but it isn’t usually that critical, especially since you hopefully won’t need to remove very much. Lay the Jointer plane onto its side, with the iron towards the tongue. Slide the plane along the tongue, allowing the orientation to keep the tongue square on its end. Test often and take very light shavings.

I hope to see some of you at our upcoming events, listed on the Lie-Nielsen website.

To see Highland Woodworking’s entire selection of Lie-Nielsen hand tools, click here.


Lee Laird has enjoyed woodworking for over 20 years. He is retired from the U.S.P.S. and works for Lie-Nielsen Toolworks as a show staff member, demonstrating tools and training customers.


Oct 032011
 

Many of my customers have come to me, wanting advice on which of our many block planes they should buy. Often this is prefaced by the fact that they would like the plane they buy to provide a great deal of functionality, as this may be the only plane they purchase. With this in mind, I frequently find myself suggesting our Low Angle Rabbet Block Plane ( 60-1/2RN with nicker). When you first see this plane, you’ll notice it looks a little bit different from the majority of block planes. Just in front of the bronze cap, there is a half circle of metal on both sides of the blade. Since the blade on a rabbet plane reaches the full width of the plane (plus about .005″), this unique structure is the most efficient way to attach the front section of the plane.

This block plane will obviously perform admirably in most of the “normal” uses, such as taking wispy thin shavings from long grain or applying a quick chamfer. With the low bedding angle (12 degrees), it can also handle end grain quite well, too. Now since the blade reaches all the way to both edges of the plane body, you can also use it to clean up rabbets and the face side of tenons up to the shoulder. A rabbet is a groove cut at the edge of a board, often so another piece of wood will fit into the removed section at 90 degrees, like the back of a cabinet. When working on rabbets or tenons, the blade should be set exactly flush with whichever side of the plane will be working against the edge. This is so the plane will remove material all the way up to the mating edge, without scoring the connecting face. A quick and easy setup method is to lay the plane on its side, on a known flat surface, making sure the side that will be used against the edge is the side that is down. Loosen the spin wheel just enough so you can push the blade laterally. Then gently press the opposite edge of the blade (the flat, non-sharp section), while keeping the side of the plane flat, so the side of the plane and the blade line up together.  Don’t forget to re-tighten the spin wheel before using the plane. Just add about a 1/4 turn after reaching the point where the blade doesn’t move around.

The Lie-Nielsen 60-1/2RN (with nicker)

The nicker on the 60-1/2RN is a small cutter that is almost completely round, attached to both sides of the plane body in front of the mouth. A portion of the nicker’s edge is flat, allowing it to line up flush with the sole of the plane, ultimately disengaging it from cutting. You would set the nicker in this position when using the plane to work flat areas, not up against a raised edge/shoulder. To set the nicker when working against an edge/shoulder, like the rabbet and tenons scenarios I spoke about earlier, first loosen the nicker’s Phillips screw. With the screw loosened, but not removed, rotate the nicker enough so the non-flat portion is down below the sole, on the side of the plane you’ve already set the blade flush to the body. Now re-tighten the screw. With the nicker(s) in this position (normally only one is set to cut at a time), it only protrudes by about .010″. The nicker, when engaged like this, will score the wood fibers just in front of the edge of the iron, and just slightly deeper than the iron is normally set to cut. This creates a very clean rabbet or shoulder/tenon face intersection, depending if you are working on a rabbet or a tenon, without the need to follow after the plane with a knife or a chisel. If you do not have nickers, the wood doesn’t get scored in the corner/shoulder area, leaving a ragged surface. After using the nicker for a while, they may stop cutting as cleanly as they did originally. To resolve this, just loosen the screw slightly and rotate the nicker about 90 degrees, which will present another fresh sharp surface. After rotating all the way through the arc, you can quickly resharpen the nicker. Remove the screws and nickers. Get out an 8000 grit stone (or equivalent) and lay the nicker on the stone, with the nicker’s flat outside facing surface down. With light pressure and circular movements, it only takes about 15 – 30 seconds to hone. Reattach each nicker, with its Phillips screw, and you’re back to work. It usually takes me longer to put the nicker back on than to do the actual honing.

Now that everyone understands what the nickers are, and the basics of what they do, I’ll share a technique I use on occasion, but don’t ever recall reading anywhere. There are times that I’ve had multiple rungs on the back of a piece, that ultimately were nothing more than long dowels. Each of these required a hole of a precise size to allow the end of the rung to fit snuggly when glue was applied. Who hasn’t drilled a series of holes, (in a test piece of course!) only to find none of their bits provide that exacting fit? Well, here is a work-around that can get you your desired results, but you can probably find some other uses for it as well. To start out, I find whichever drill bit is closest to the correct size, while still being smaller than the ideal. I drill my holes both in a test block, and in my final project. Then I’ll set up my 60-1/2RN so it is removing shavings of about a thousandth of an inch. I take this plane, flip it on its back, and clamp the sides of the sole in my face vise. Now, from my plans, I determine how long the portion of the rung is that needs to fit into each hole. I mark each end of the rung with this measurement, and take it to the plane (instead of the other way around). You’ll need to be extra careful on this next part, so the rung is the only thing the plane removes. Lay the rung down on the plane, so the depth line you marked is in line with the nicker, while the end needing adjustment is against the cutting iron. Now, while applying just a small amount of pressure on the back-side of the rung (on the portion that will contact the plane iron), slowly rotate the rung in the direction that allows the iron to engage. Check your progress regularly, since you don’t want to overshoot your target. I like to use the test block for checking. And since I’ve planned to glue each rung and am not looking for a friction fit, it is easy to test simply by presenting the end to the hole. If it doesn’t go in with easy hand pressure, just continue removing small amounts until it fits. Since this plane cuts all the way up to the marked depth, what is now ultimately a shoulder, you can remove material exclusively at the ends that fit into the holes. The remainder of the rung continues to stay at the pre-existing diameter, so others may never know you used this technique.

Always remember to sharpen the blade on any newly purchased tool. We grind the blades to 400 grit at our factory, which will cut wood, but a quick honing to 8000 grit will provide results that will make you smile, and utter uncontrollable little things like “Wow” or “Amazing”. Feel free to take a look at our sharpening demonstration video on Youtube, or stop by any of our events, and we’ll be glad to show you in person.

*One caveat I like to bring up, especially for those of you who may not have any other planes besides the No. 60-1/2R(N) Rabbet Block Plane. Do not use a rabbet plane on a shooting board. The small band of metal on both sides of the mouth on regular planes is what prevents those planes from continually cutting into the edge of the shooting board. Since the rabbet plane’s blade cuts full width, it would continue to remove material, ultimately destroying your shooting board.

I hope to see some of you at our upcoming events, listed on the Lie-Nielsen website.

To take a closer look at the low angle rabbet block plane with nicker, click here.

To see Highland Woodworking’s entire selection of Lie-Nielsen hand tools, click here.


Lee Laird has enjoyed woodworking for over 20 years. He is retired from the U.S.P.S. and works for Lie-Nielsen Toolworks as a show staff member, demonstrating tools and training customers.