Lee Laird

Lee Laird has enjoyed woodworking for over30 years. He is retired from the U.S.P.S. and works for Lie-Nielsen Toolworks as a show staff member, demonstrating tools and training customers. You can email him at lee@lie-nielsen.com or follow him on Twitter at twitter.com/is9582

May 082012
 

Recently, I wrote an article primarily focusing on using free-hand scrapers. In this article I’ll talk about the other main scraper category, Scraper Planes, where the scraper rides in a plane body. In the Scraper Plane category, there are multiple types, but the commonality rests with most excelling at retaining a flat surface. The free-handed style scrapers require more focus and skill to obtain similar results. In this article I’ll focus on two specific scraper planes.

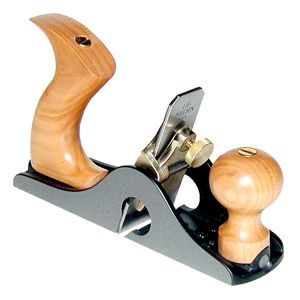
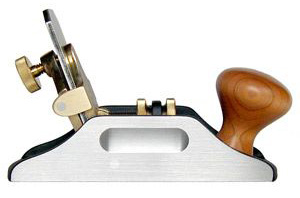
The first scraper plane is the model 212-Iron scraping plane, which is based on the Stanley No. 212. This is a small format scraper plane, and the Lie-Nielsen version has a plane body made of ductile cast iron. The blade is 1/8” thick A2 steel, which is thicker than the original Stanley irons, and helps minimize chatter. The iron’s adjuster, on this plane, allows the user to change the angle at which the iron sits in the plane, and dial in the sweet spot. I set my iron so it leans forward (away from the wooden handle) approximately 15 degrees, which seems to be the optimum angle. If the wood I’m working doesn’t cut well with the normal setting, I’ll carefully take the iron out of the body. I always remove the iron through the sole of the plane, to reduce chances of dinging the sharp iron. By holding the iron as if it were a card scraper, I can quickly find the angle where the wood cuts best. There are three options I’ve used to transfer the new angle to the plane. While holding the iron at the new angle, I can either: move the plane body up beside the iron and adjust the frog so it matches this angle; grab my protractor, so I know the angle that works with this wood; or instead, put a piece of light colored scrap wood against the edge of the iron, and draw a line I can again reference when I replace the iron in the body. To replace the iron in the body, I always come up through the sole of the plane body, again working towards saving my sharp edge. I choose the No. 212 when I’m working small flat pieces, like one might expect in boxes, picture frames or even small tables. There is nothing to prevent one from using the No. 212 on a larger flat surface, like a large table, but it would just take more passes with the smaller width of this iron. There is something about this sized scraper plane that just feels good in the hand, much like reaching for that favorite block plane.

The other scraper plane is the model 85, which again is based on an original Stanley model; The No. 85 Cabinet Maker’s Scraper. This plane body is also made of ductile cast iron, which strengthens the body, and will likely save the tool from the accidental fall to the floor. The iron again is 1/8” thick A2 steel, but it is shaped somewhat like an upside down “T”. There are some unique features in the No. 85. First, this plane has a full width iron, so it can work against an adjacent vertical surface. Another unique feature, which dovetails with the first, is the handle adjustability. Both the front and rear handles can rotate (after loosening) either left or right, to help prevent the user’s knuckles from contacting adjacent wood. The No. 85 does not have the angle adjuster for the iron, and with the iron’s angle hardwired, can be a bit easier to set up.

The irons on both of these scraper planes are quite a bit easier for most beginners to sharpen, at least compared with the hand-held scrapers. This is due to almost identical techniques as are used to sharpen a regular hand plane’s iron, and a light camber is also an option on both. As a matter of fact, the primary difference between the scraper iron and the hand plane iron is the angle of the bevel. Most scraper planes have a primary bevel angle of 45 degrees, and as I do when sharpening my bench plane irons, I use an additional 5 degree micro bevel, to expedite the sharpening process. In order to allow the honing guide the ability to reach these higher angles, it is important to modify a section of its body. A quick suggestion, when working a bevel with this high of an angle, is to only use pull strokes on the water stones. You might get away with a light push stroke, if you already have great skills and a light touch, but I find it’s not worth the chance of digging into the stone. User beware! I prepare the back of the iron exactly the same as when I prepare a hand plane iron, using  David Charlesworth’s ruler trick to hone out at the very tip of the iron, rather than spending unnecessary time honing a large section of the back. I hone both the bevel and back of the iron to 8000 grit. I get questions from someone at almost every training session, as to why I’m not turning a burr on the scraper’s iron. I find the scraper planes are aggressive enough as is, without the addition of a burr, but this is ultimately up to the end user. Besides that, the lack of what I tend to describe as an inconsistent burr reduces any tweaking needed between sharpenings, to again find the sweet spot.

To set the shaving thickness, I place the plane body on a known flat wooden surface, which for many may be your workbench. I loosen the thumb screw, disengaging the iron. While holding the plane body flat on the bench top, I apply light to firm pressure to the midpoint of the iron’s back, and while holding this pressure, re-tighten the thumb screw. Similar to the method used when setting the iron in a bench plane, I test the iron’s setting on scrap wood, prior to using the scraper plane on my project wood. If the iron needs some tweaking, laterally or deeper, I tap the iron very lightly with a small hammer. This usually works easier if I just slightly reduce the pressure on the thumb screw. Once I find my setting, I’ll again snug up the thumb screw. As a reference, I am usually looking for a very wispy shaving from my scraper planes. If I’m working (or fighting) some difficult wood, I find most will give up their best surfaces when stressed the least.

Now go make some shavings! Let me know if you have any questions or suggestions for future articles.


Take a closer look at the Lie Nielsen #85 Cabinetmaker’s Scraper and the Small Cast Ductile Iron Scraping Plane.

To see Highland Woodworking’s entire selection of Lie Nielsen hand tools, click here.


Lee Laird has enjoyed woodworking for over 20 years. He is retired from the U.S.P.S. and works for Lie-Nielsen Toolworks as a show staff member, demonstrating tools and training customers.

May 042012
 

Over the years, I’ve owned a couple of band saws, but getting the saws to work at their best was always questionable. I started with a Delta 14” from the around 1990, new in the box. It worked ok, but it didn’t quite do what I’d both expected nor truly wanted. I started out going through all of the setup processes, to make sure the saw itself was tuned properly. After that, I tried different types/brands of blades, in an attempt to find the missing piece to my puzzle. Some of the blades were better than others, but even the best I’d tried was still not providing what I was after. I transitioned towards working with some larger pieces of wood, and finally decided to move up to a larger capacity saw.  My new saw had the ability to properly tension all the way up to a 1” blade, which was completely different than my old Delta.

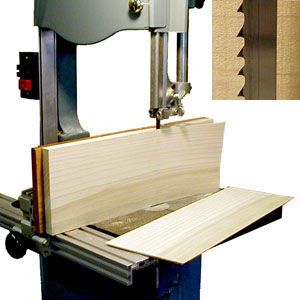
The blade that came with my MiniMax was just something to allow it to cut, but wasn’t providing super results. After trying a number of blades, I happened to be in Atlanta for one of our events, so we stopped at the Highland Woodworking store. Wow, what an amazing store, and a huge selection of band saw blades. I spoke with one of the folks working at Highland and asked for their recommendation on a band saw blade. After finding how I was intending to use my saw, they suggested I try one of the Wood Slicer blades. I had read about this brand of blade, but since I’d never used one, I decided I’d just get a single blade to try it out. I picked up a 1/2” blade with a 3/4 teeth configuration, which would allow multipurpose use. I wanted this for both some curved work (not like a scroll blade, think more like the gentle curves on a guitar), as well as taking small log sections and cutting them into bowl blanks.

When I got back home, I set the new blade to the side, as I was doing some ripping operations and my 1” blade was doing OK. Well, that didn’t last too long. My 1” blade is the one that came with my saw. It was cutting very similar to how it had always cut, since I’d purchased the saw. All of a sudden, there was a bang, and the blade was gone from sight. I’d actually broken it. After pulling the old blade from my saw, I made sure there was no damage to the saw and especially the tires. Luckily, all was fine. Time to try out my new Wood Slicer blade. After installing the blade, and tensioning it properly, I was ready to finish up the ripping. As soon as the blade touched the wood, I knew I’d received some great counseling from Highland’s staff. This Wood Slicer was completely amazing. I was cutting some 8/4 maple and then some 6/4 oak, both of which the blade treated as if it was cutting butter. Seriously. I was completely dumbfounded. I’d never experienced anything like this on either my 14” or my 16”, no matter what blade I’d used. I was having one of those moments, when I sit back and wonder where a tool has been all of my life. This Wood Slicer blade absolutely fit into one of those moments.

There is no doubt I’ll continue to buy the Wood Slicer blades for my saw, for all but possible super specialized cutting. I wish I’d tried one of these in my Delta, as I’m sure it would have elevated its results as well. Just in case someone reading this article also has a MiniMax 16, the info on the blade wrapper is as follows: 154 1/2 022 3/4T HP #51004002.

I hope to see some of you at our upcoming events, listed on the Lie-Nielsen website. Feel free to come up and say hi. Also, feel free to contact me if you have any questions, or if you have suggestions for future articles you would like to see.

Apr 032012
 

For the woodworker who has built items in wood with reversing grain, or super figured woods, it might seem that sandpaper is the only real option to tame the beast. It doesn’t seem to matter how long someone has been woodworking, as I’ve met both those who have been woodworking longer than I’ve been able to wipe my own nose, to those just starting out. When I start to talk about scrapers as a potential fix, I’ve received such a range of looks, from insanity, to coolness, to just complete disbelief. There are those, though, who specifically ask for scraper setup, usage, and information. Many of these woodworkers already own some form or fashion of scraper, but are frustrated with the actual results from their tool. I believe it is similar to using a well-tuned hand plane: some folks have never had the opportunity to use their scraper both sharpened and tuned so it could do more than make dust. When I bought my first personal hand plane back in the early ‘80s, I worked and worked “sharpening” it, and still the negative results relegated it to a drawer for quite some time. Point being that I didn’t have the tools to recognize just how sharp was needed, nor anything to which I could compare it. This along with the very limited sources of shared information at that time, was enough to keep me guessing and stop my progress. I hope the following information will can help some of you succeed with your scrapers.
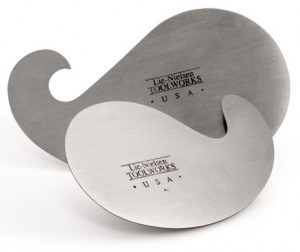
Lie-Nielsen offers two different sets of card scrapers, made out of high carbon Swedish Tool Steel, and hardened to Rockwell 49-51. These include a two-pack Hand Scraper Set and a four-pack Gooseneck Scraper Set. The scrapers in the two-pack Hand Scraper Set are both rectangular. One scraper is .032” thick and the other .020” thick. I like to choose the thinner scraper when I’m planning some super-light finesse type removal, even though I know I could still get the aggressiveness needed out of both.  The scrapers in the four-pack Gooseneck Scraper Set are comprised of one large and one small, with one each in the same plate thicknesses of .032” and .020”, as the rectangular versions. The different sizes afford different curves and shapes, to cover even more woodworking territory.

Before I proceed, let me answer the basic question: What is a scraper? I bet most people would likely imagine a card scraper. I know that was the case for me for a long time, although there are certainly other types. Ultimately, I define a scraper as a tool that removes material, in a manner other than via a knife type cutting action. Whether we are talking about a card scraper (rectangular or goose necked), a scraper plane, or anything else in the category, I’ll try to provide some useful tips and info.

One of the first things I do, when I get a scraper, is to spend time sharpening the tool. To lay some groundwork, both the narrow edges and face edges of a card scraper must both be honed to a high level. If either of these is overlooked or not worked to the same level, it will be the limiting factor of your final tool. Personally I work these surfaces up through my 8000 grit water stone, but some still hone to a higher grit. It is a great idea to have a 10X-magnifying loop, so you can SEE your work, rather than guessing a certain number of strokes automatically equals finished. Now, if it is the first sharpening, I expect to spend more time than on the subsequent trips to the sharpening bench. This may seem odd, but most new scrapers come with at least some mill marks, which you only need to remove the first time.

When I begin sharpening a rectangular card scraper, I first work the narrow edges with a fine file, which is a quick method to both verify a 90-degree juncture and that the narrow edge surface is without dips from end-to-end. The handle on this tool is what I call a thick oval, which helps me in the filing portion of this task. I clamp the scraper in my vise, so its height matches what is needed to keep the file flat and parallel, while the handle physically rides on the bench. This ultimately acts somewhat like a jig that can never get lost. With the fact that it is somewhat easy to negatively modify the scraper’s edge shape when using a file free handed, I think it wise to at least explore a jig at first. If you are using a file that is flat, you can cut a slot that is 90-degrees to the face into a piece of wood. Put the file into the slot, and then work the narrow edge against the file, while holding the face so it stays flush to the wood.

After removing any heavy mill marks with the file on both of the narrow edges, its time to move to the stones. When working the edges, I hold the scraper against a purpose-made 90-degree block of wood, on the water stone. This allows me to remove material while retaining the proper square orientation of the edge to the face. Just squeeze the scraper to the wood, and let both ride together over the stone. I push them straight up and down the stone, but with both wood and scraper rotated so they look like I would travel diagonally, so there is less chance of carving tracks into the stone. Check the progress until the scraper edge is a consistently flat matte grey. Depending on your setup, you can decide to move directly to a 8000 grit water stone, or if you have an intermediate like a 4000 grit, you can work through all three. Just let your eyes and loop guide when you’ve finished. After the 8000 grit stone, your narrow edge surface should look similar to a mirror, with no discolored areas.

The next step is to hone the faces of the scraper. From experience, this portion can go from good to bad in a heartbeat. What I mean is there is usually enthusiasm when first starting this phase, but that can turn into disgust quite rapidly when checking the progress. For those who have never sharpened the faces, you’ll usually see certain areas showing signs of your work, and others that will be completely devoid of contact, almost without regard for time spent. Part of this issue is related to unequal pressure along the face while honing. If you are just using finger pressure on the scraper plate, I’ve found no way to totally prevent the off/on contact points consistently. This is where David Charlesworth’s ruler trick, that I also employ when sharpening all of my plane irons, can play a role in the scraper sharpening. When using his trick in the sharpening of the backs of plane irons, it focuses the work out at the very edge, rather than spending time to polish the full back surface of the iron. Similarly, we can use it to focus on the face surface where it meets the previously polished narrow edges, since the edge/face combo is the only area that will interact with your wood. To make this work, the other component I use is a piece of 3/4” MDF that is about 2/3 as wide as my scraper. I try to have the MDF about the same length as the scraper, but it can be a little longer without causing problems. While the Charlesworth trick does an excellent job of focusing the honing work out towards an edge, the importance of the MDF in this application rises as the flexibility of the scraper increases. I used some thin double-sided carpet tape to apply the MDF flush to one narrow edge on my scraper. I place a thin ruler along the long edge of my 1000 grit water stone, which is held in place by water tension. To orient properly, the scraper portion left unexposed by the MDF will be on the opposite side of the stone from the ruler. This allows it to flex slightly and work from the edge in towards the centerline of the scraper. The movement is just front and back, as there are no thin edges to gouge the stone. It will produce a narrow surfaced area likely less than 1/8”, so don’t expect it to be very wide, and don’t worry if it is not. A consistent thin area is all that you need. Same as before, you can choose to work it on an intermediate stone, prior to the 8000 stone, or not. Let your results (and your loop) guide you.

Before moving to the next stage of preparation, I wanted to include some information that I hope users might both find interesting and useful, or at least expand their thoughts of scrapers. Recently, while building a very figured electric guitar, I had an area on the top where none of my scrapers “fit”, to resolve an issue. I recalled using a tool that many would think classified at the far end away from scrapers, once upon a time, that might just work. I picked up one of my recently sharpened bevel-edged chisels, that is about 3/16” wide. Without changing any sharpening aspect, nor apply a burr/hook, I stood the chisel upright, leaned it so the flat back was a bit towards the direction I meant to travel, and took a couple of light passes. It took some very controlled super light type shavings, and left a wonderful result. This obviously doesn’t work only with narrow chisels, but finding a tool that fits your needs is the main point. Beyond that, hopefully it points out that while there are times to use a burr/hook on a scraper, it is not always a necessity. Without the added burr/hook, a scraper is less aggressive, but this can be a good thing. If using a scraper to blend or finalize, I find it easier to remove exactly what I want. Another positive, and one I relish when using a scraper plane, is how I can set the cutting angle one time, and quickly have the same great results, without the need to dial in after each sharpening. If I added a burr/hook, there are much greater chances I’d spend extra time re-obtaining the sweet spot each time, but let your work dictate using a burr/hook or not. In the scope of a job, I find the setup operations are just part of woodworking. Keep your options open.

When applying a burr/hook to the prepared card scraper, make sure your burnishing tool is harder than the scraper. In the past this was much easier to accomplish, as many of the scrapers were pretty soft, but some of the newer scrapers are hardened to a higher degree, which while upping the ante for preparation, will help the edge last longer, too. Another important aspect relating to burnishers is their level of polish. The surface of the burnisher, where it contacts with the scraper, should have no scratches. I’m sure it’s easy to visualize that scratches on a hard tool will easily transfer over to the less hard tool. Before using my burnisher on a scraper, I like to apply a little Camellia or Jojoba oil to both. You can get by without, but the reduction in friction helps it work more smoothly. I start with the card scraper flat on my bench, with the narrow edge I’m working just inside the bench top edge so it doesn’t hang off. I take my burnisher and keeping it flat on the face edge of the scraper, move the burnisher from end to end, with just a small amount of pressure. After doing this for no more than 30 seconds, I’ll do the other three similar face edges. I look at this as minutely moving the metal towards the narrow edge of the scraper, setting up for the burr/hook.

One of the first times I was successful in creating a burr/hook, I handled the next step slightly different than I do now. That time, I’d placed the scraper into my tail vise at this point, to hold while I turned the burr/hook. I’d just installed a new light receptacle above the vise (totally coincidentally) and had the light on. I took my burnisher, and with it almost completely parallel to the narrow edge, ran it lightly over the scraper. My second pass is what caught my eye. I lowered the angle by a couple to maybe five degrees, and made a second light pass. With the light directly above the working area, I saw a very thin gleam grow across the scraper, behind the burnisher on that second pass. I felt the edge and the burr/hook was quite small, but consistent all the way across. I took the scraper out of the vise, so I could verify whether what I was seeing was truly usable feedback. It worked wonderfully, and lasted much longer than any I’d ever created before. I think this makes sense, as a longer burr/hook would seem to weaken quicker and easier, as length increases flexibility. Now that I knew the amount of pressure required to create the burr/hook was almost minimal, I regularly just hold the card scraper in my left hand, applying light pressure with the burnisher with my right, rather than placing it in a vise.

The goose neck scrapers have quite a bit of similarity to the rectangular card scrapers, but require a couple of different tools to handle similar issues. For the mill mark removal, some of the outside curved edges can still be worked with a straight file, but if you need to use the inside curved surfaces to work on small cylindrical pieces or similar, then I use a small round file. I try to make sure to use a file with either no taper in the section I’m using, or as little as possible. This helps keep the narrow edge at 90 degrees to the outside faces. Small cylindrical ceramic slips in different grits can allow this same section to get close to the results obtained on the rectangular scrapers, where you would use a water stone. When I’m ready to work the face edges of the gooseneck scrapers, I still utilize the Charlesworth trick, but I find it is a bit more piecemeal, due to the fact I’m working around a curve. Similarly, following up on the burr/hook requires more patience, and a smaller burnisher can be a necessity in certain areas. All in all, the gooseneck scrapers do require a bit more touch and finesse, but achievable results are within reach and are so very useful.

Scrapers will always have a place in my kit, as they can certainly save the day. Hopefully, you’ll give them a try and find they are a good addition to your present methods, providing some valuable options. Feel free to contact me at leelairdwoodworking@gmail.com if you have any questions, or if you have suggestions for future articles you would like to see.


To take a closer look at the Lie Nielsen scrapers, click here.

To see Highland Woodworking’s entire selection of Lie-Nielsen hand tools, click here.

To return to the August 2015 issue of Wood News Online, click here.


Lee Laird has enjoyed woodworking for over 25 years. He is retired from the U.S.P.S. and worked for Lie-Nielsen Toolworks as a show staff member, demonstrating tools and training customers. You can email him at LeeLairdWoodworking@gmail.com or follow him on Twitter at twitter.com/LLWW
Mar 072012
 

For those of you whom are not already familiar with the router plane, I’m sure the name could easily paint a picture of a tool with a spinning bit, possibly propelled by a hand crank. In actuality, the router plane is a tool with a flat base and a fixed blade. The blade extends down below the base, so it can remove material at a chosen depth, which is ultimately parallel to the surface of the wood.

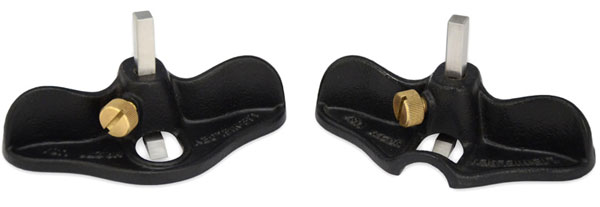
Lie-Nielsen #271 small router planes

Until recently, Lie-Nielsen offered a single small router plane, the #271 (above right). There is now an additional version in their arsenal, the #271-CT (above left). The difference between the original design and this new addition is in the base shape, in front of the cutting side of the blade. The original design has a section of the base that raises up in an arch shape on the “open throat” version, from one side to the other, providing additional view of the intended cutting area. The new addition, which augments the lineup, has the base continuing from side to side, without the arch, which is considered a “closed throat” design.

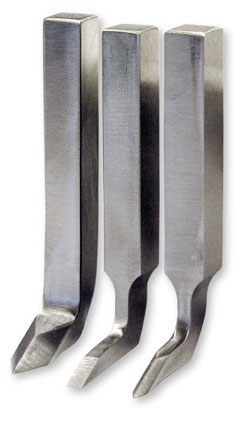
Pointed blades

The router planes, with smaller footprints, are very useful in smaller scale work, both in small joinery or inlays. There are a variety of blades available for the smaller router planes. From the factory, the #271 and #271-CT each come with a 1/4” square blade, but you can also purchase a 1/4” pointed blade (left), a 3/32” square blade (center) and a 3/32” pointed blade (right). All of these blades are made from O-1 steel, and are hardened to RC 60-62. If you still need a different sized blade, as long as it is not wider than 1/4”, you can buy a stock sized blade to modify. For instance, if you are working an area for some banding, that is narrower than 3/32”, I’d suggest removing a little material from each side of the blade, until the required size is reached. I would only remove steel from the portion of the blade below the bend, leaving the shank original sized. It is easy enough to modify one into a needed shape, or size, for a job. While it’s certainly not hard to do, I would suggest working carefully, and taking you time, so the temper of the steel isn’t accidentally lost. If you need help sharpening these blades, please look back at the article relating to the Large Router Plane setup.

Setting the depth of cut, on the small router planes, can be a bit more touch sensitive. They are not equipped with any mechanical advancement on the blade, like is used on the larger versions, so a different approach is needed. I personally like to start with the blade out a little less than my final needed depth of cut, for each pass. I set the adjustment knob firm enough to keep the blade from moving on it’s own, but not so tight that gentle hammer taps have no effect. This allows me to advance the blade in very small increments, using a very light hammer, and controlled tapping. When I have the blade advanced to the needed depth, I tighten up the knob with a screwdriver, so the blade won’t drift in or out. Another method of setting the blade depth, is to use shims under the plane body, on both right and left sides. With the body resting on the shims, loosen the adjustment knob and let the blade gently slide down until it contacts the surface. Again tighten the knob with a screwdriver and very rapidly, you have an accurate depth setting. No matter what method is used, it’s really pretty easy.

The hardest question may be which of the two styles of the #271 to get, which can ultimately come down to personal taste. Some prefer the open throat version, feeling they can more readily see in front of the blade, while they work. Personally, I find the closed throat version has enough viewable area in front of the blade, so I don’t feel like I’m working blindly. If you are working an area, on the edge of a thin board, the closed throat version would seem to excel. This is due to the extra material in front of the blade, allowing the plane to rest on the board, both in front and behind the blade. This makes it simple to keep the plane level, and the depth of cut consistent. When using the open throat version in this same scenario, I clamp an extra piece of wood on each side of the thin board, and level with the project board. This makes it so the body of the plane will ride on the two outside-boards, acting like an out-rigger, preventing the plane from accidentally tipping forward. Either way works fine, so it just depends on the users preferences.

Stay safe, keep making shavings and enjoy your woodworking. I hope to see some of you at our upcoming events, all listed on the Lie-Nielsen website. Feel free to contact me at lee@lie-nielsen.com if you have any questions or suggestions for future articles you would like to see.

Lee Laird


To take a closer look at the #271 small router planes, click here.

To see Highland Woodworking’s entire selection of Lie-Nielsen hand tools, click here.


Lee Laird has enjoyed woodworking for over 20 years. He is retired from the U.S.P.S. and works for Lie-Nielsen Toolworks as a show staff member, demonstrating tools and training customers.

Feb 082012
 

When I mention using a plane to shoot wood, during our events, I usually have at least a couple of customers whose eyes and facial expressions tell me it’s not a familiar term. So just in case, I’ll offer a brief history of this plane, so everyone reading is comfortable.

Lie-Nielsen No. 51 Shoot Board PlaneUsing a plane to shoot wood is usually accomplished by laying a plane on its side, so the cutting iron is presented on the left-hand sole that is now vertical (this is for a right hander, but would be opposite for a left hander). The wood is usually held up against a fence, to support the work piece, but also to support the fibers on the out-feed side of the cut. Most woodworkers either make or buy a shooting board that has both a “shoot” area and a fence, that are around 1/2” or so different in height. To better describe, the shoot is lower than the surface where the work piece and fence reside. I made my shooting board with three pieces of 3/4” Baltic Birch plywood, which is historically very flat, and doesn’t have much tendency to move. The bottom piece is approx 12” x 12”. The next piece is approx 12” long x 9” wide and is attached on top of and flush to the first piece on three sides, leaving the extra 3” of material on the bottom piece on the right side of my board. This is where my planes ride, or in other words, its shoot. The third piece is about 1” x 9”, and is used as my fence. If you think about this shoot board, and the area to the right is my plane’s shoot, then my fence is at the top of this setup.

Now that everyone is hopefully up to speed, lets talk about the planes we use to shoot. I’ve seen woodworkers use just about any plane in their arsenal in a shooting configuration. One really critical aspect of any plane used to shoot, is that the side of the plane must be 90 degrees with its sole. Beyond this, in the past, it’s mostly come down to what feels the best, but mass also helps. The 9 Iron (or just 9I) was the plane that many saw as the best shoot plane, since it has such a large bearing surface. This made the plane easy to use since it didn’t require much extra attention in keeping the plane flat, while moving through the cut. The other plane with a fairly large number of users was the #62 Low Angle Jack. The #62 has a great accessory available, called a hot dog, that allows you to comfortably grasp the plane while shooting. The hot dog’s looks don’t give it the credit it is due, in my opinion. It’s hard to tell the hot dog is solid aluminum, and turned on a lathe, before milling out the material that allows it to slip over the side of a plane. Much more high tech than it initially appears.


Lie-Nielsen no. 51 Shoot Board Plane
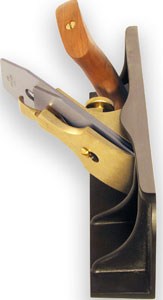
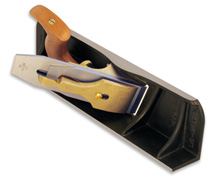
Woodworkers have been using both of these planes for many years, with good results, but the recent #51 plane from Lie-Nielsen will likely lead to large numbers of ship-jumpers. Stanley originally made a #51, but they are extremely rare. The #51 is a purpose-made shoot plane, and in my opinion, the best ever. I know what many of you are probably thinking: “What can possibly make this plane that much better than the 9I and #62”?  Well, since the #51’s sole purpose is to be used as a shoot plane, certain aspects could be modified without any negative consequence to any other functions. The #51’s body shape is that of a long “L”, which provides a super stable platform and an equally good bearing surface where the iron is presented. Unlike the other multi-purpose planes, the #51 has a wooden handle oriented with the intended function of this plane, and is comfortable enough to use for hours. And for me, the difference that really MAKES this plane, is the skewed orientation of the iron. Now this may make some wince, worrying how they’ll sharpen this bad boy, but worry not. The iron is our normal 2 3/8” straight iron, but the manner in which the frog is oriented creates the skew. This skewing does a couple of things. The iron enters the wood by slicing down through the fibers, starting with just a small section of the iron and working down across the remaining iron. It may not sound like a lot of difference, but when using the other planes, the portion of iron that will cut all makes contact with the full width of the wood. Basically, a lot more surface area making contact with the wood on the other planes, which feels like an impact of sorts. On the #51, since the contact area is initially so small, it doesn’t require as much force to enter the wood, and ultimately the impact isn’t felt. This is yet another feather in the #51’s cap, for those with lots of end grain to shoot.

Stanley also made a #52 shoot board, that was a perfect fit for their original #51. Stanley’s #52 was made of metal, had a track that fit the #51 perfectly, and had a fence that could move from 90 degrees to 45 degrees. These original 52s are quite hard to find, but just in case you have one, the Lie-Nielsen #51 will fit it, too. For those that don’t have an original #52, Lie-Nielsen is working on their own #52, for future release. The #51 will still work just fine in a home made shoot board, but in conjunction with the #52, it makes one heck of a combination. The #51 is presently available, but supplies can at times be limited. Let the end-grain shavings amass!

I hope to see some of you at our upcoming events, all listed on the Lie-Nielsen website. Feel free to contact me at lee@lie-nielsen.com if you have any questions or suggestions for future articles you would like to see.

To take a closer look at the #51 shoot board plane, click here.

To see Highland Woodworking’s entire selection of Lie-Nielsen hand tools, click here.


Lee Laird has enjoyed woodworking for over 20 years. He is retired from the U.S.P.S. and works for Lie-Nielsen Toolworks as a show staff member, demonstrating tools and training customers.

Jan 052012
 

*
I remember using some rasps that my grandfather had in his shop, back when I was a young kid. I’d always wonder when I’d use such coarse tools, as they just seemed to mess up my wood, rather than really seeming useful. Through the years, I’ve tried quite a few different brands, and even bought a few, but they still lived in the deepest, darkest places of my tool area.

What happened next is still not completely clear, but it somewhat reminded me of mad dash purchasing events from the past. (One specific instance involved a little toy called the Furby, when suddenly everyone with kids seemed to be on a crazed mission to obtain them for Christmas presents. Everyone who had kids back then likely gets this.)

So, all of sudden in late 2007, I was reading how a French company named Auriou was likely going out of business, and after the current supply, these wonderful Auriou rasps might never again be available. I had read many woodworkers describing how these rasps were like no other, and the resultant surface was truly amazing. Even with my previous negative rasp experiences, I decided to jump in. I was scouring any and all websites; both those in English and foreign languages. I felt quite lucky, after numerous rejected orders, to finally obtain a couple of different sized/grain Auriou rasps. I figured I’d put them to the test, and if they didn’t work for me, I could sell them to another woodworker. Well, they turned out to work just as well as others had described. I was (and am) stoked to have these great tools.
Auriou cabinet rasps
Fast forward close to a year, and as luck would have it, Michel Auriou was able to find a way to again make rasps. They are now made under the company name of Forge-de-Saint-Juery. Not all styles of Auriou rasps that were made in the past, are available at this time. Michel continues to assess the marketplace and woodworker’s needs, and has plans to add other styles as his company can tolerate, which is always a balancing act. The new rasps are made exactly the same as those before, which will likely keep all the craftsmen continuing to work as they have for years. The new rasps are works of art, just like their predecessors.

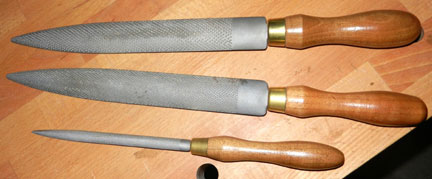
After the “re-opening” I was able to fill in a couple of gaps in the sizes of rasps I owned, which brought me to four. Three of the Auriou rasps I purchased, are each flat on one side and curved across the width on the other, which are called Cabinet Makers (except for the smallest, which is called a modelers).These have stiched teeth on both flat and curved sides. The rasps are available from Grain 1 to Grain 15, with 1 being the most aggressive and geared more for stone work, and 15 the most fine. My first is a Grain 5 for initial hogging off of wood, second a Grain 9 for getting close to the final shaping, and then a Grain 15 that cleans up many signs of any rasp usage. I love the control these rasps afford, and with the range of aggressiveness, I can determine where in my process I want to put them to work.
Auriou curved rasp
Now I did say I bought four, didn’t I? Well, the fourth is a bit more specialized, but one that I’m glad to have. This one is Grain 13 and used when making handles, like those on a handsaw. Oddly enough, this rasp didn’t come with a handle, so I turned one out of some wood that came from bushes that died in front of my house. The wood had been sitting for about 6 months or so, but still decided to check dramatically, after some of the turning. Luckily, I had ample amounts of super glue around, so I could keep it together. Even with the checks, this wood seems to add extra character to my rasp, but I could always replace it with a store made handle, if it doesn’t last the test of time. This rasp has teeth on one side, while the opposite is completely smooth, with the toothed side similar in shape to the curved side of the Cabinet Makers rasps. It also has a curve at the tip of the rasp, along the length of the rasp, so it makes it easier to get to areas on the piece you are working, while the lack of teeth on the opposing side limits any damage from accidental contact.

The Auriou rasps are hand stitched, which is to say a skilled craftsman takes a blank of metal, held down on a very special work bench, and using a special barleycorn pick and a heavy hammer, work their way across and down the blank. It is truly amazing to watch their skill in this process. I was lucky enough to have Michel Auriou give me a demonstration at our Open House in July 2010. If there had been a little bell sound, at the end of each line, I might have mistaken the tap-tap-tap sound of the stiching process as that of an old manual typewriter.

With this method, the raised rasp teeth from each line don’t form a straight line with the teeth above and below, as they will in most machine made rasps. With this, there is little chance to find a spot where the rasp leaves behind multiple parallel lines, rather than the intended complete consistent coverage. The teeth are stiched all the way to the tip, and across to both edges. Auriou rasps are available in both right and left-handed versions, and with the orientation of the stiched teeth, work best when the correct version is used. This is due to the teeth being stiched at a small angle relative to the length of the rasp. On right-handed versions, the rasp is held with the handle to the right and the tip to the left. This engages the teeth properly and most effectively. Left-handed versions are exactly opposite. All Auriou rasps come with a hardwood handle, except for the smallish carving type examples.

I hope to see some of you at our upcoming Lie-Nielsen hand tool events, as listed on the Lie-Nielsen website. Stop by and say hi. You can reach me via email at LeeLairdWoodworking@gmail.com .

Lee Laird

CLICK HERE to see all the Auriou Rasps available at Highland Woodworking

Dec 272011
 

When I’m working at our Lie-Nielsen events, we are asked a wide range of questions about hand planes. Most are somewhat typical, like: “Can you show me how to sharpen a plane blade?” One question that does seem to resonate with a fairly large number of woodworkers, and perhaps even more for those just starting out, is which are the first three planes one should buy for their toolkit. There is no hard and fast rule which three are best, but I’ll share my thoughts on this question.

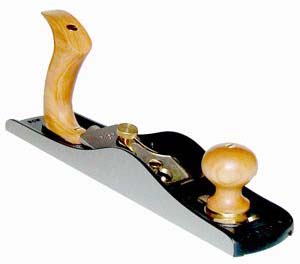
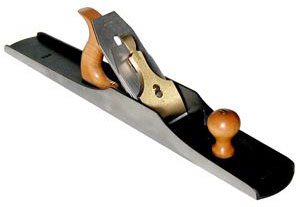
I lean towards a #60 1/2 Low Angle Block Plane (swapping out for a 60 1/2RN if the customer is planning to do a lot of mortise and tenon work), a #62 Low Angle Jack Plane, and a #8 Jointer Plane. These three planes together provide a good base for working wood.

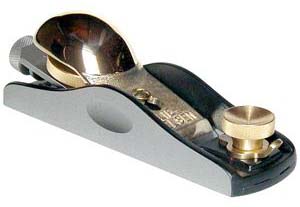
So why did these make my top three? Well first, I think every shop should have at least one really good Block Plane, as they are go-to tools for such a wide range of applications. From a quick chamfer, to breaking the edges on a project, to touch-up smoothing a small area on a project that may not be quite as flat as you’d like. And with the short body length, you just might get away with a few passes with this plane instead of coming back in with a large smoother, and ultimately having to flatten the piece quite a bit for the smoother to “reach” the problem spot. A couple of nice things about the #60 1/2 is the heft of the tool, which equates to mass that helps in planing operations, and the adjustable mouth that only requires a spin of a knob to modify. If I’m changing from some easy-to-work wood like Walnut, over to some tougher curly Maple, I’ll usually close the mouth down to the point where the shaving just has room to pass through. This is much more critical on woods prone to tear out. If on the other hand, I need to take a bit heavier shaving, I’ll just open the mouth as required. I also use this quick adjustability every time I sharpen the blade. After sharpening the blade, I’ll open the mouth up all the way, so I can reduce the chance I’m going to accidentally bump my fresh blade into something that would damage it while positioning it in the plane.

My next plane could be seen as a compromise, but I really think it has so much going for it, it makes more sense to think of it as a multiplier. I’m talking about the Low Angle Jack Plane. This sized plane can play a range of roles, from smoothing, to more traditional Jack Plane duties, shooting plane duties, and if you are working small scale work, even as a short Jointer. This plane has the blade bedded at 12 degrees, and the bevel is facing up. With this setup, it is easy to modify the honing angle of the blade to accommodate straight grained woods all the way to super figured hard woods. Since the bevel is up, the honing angle directly affects what the wood “sees”. When using this plane for smoothing or jointing, I’ll adjust the mouth so the shaving will just fit through, and use either a slightly cambered blade or one with the corners relieved. When used for shooting, I use a blade honed straight across, as I’m always working on boards that are thin enough so the blade’s reach is higher than the top edge of the board. For more traditional jack plane duties, I prefer a blade with more camber than I use for smoothing. Since I’m removing more wood with each pass, I open the mouth to provide sufficient clearance for the expected thicker shavings.

Lastly, the full sized #8 Jointer Plane is a tool that is not easily replaced. The level of flatness a Jointer plane can provide is limited by the length of its sole. A Jointer plane ultimately rides across the tops of any undulations, much like you might imagine a large ship spanning across multiple waves. A longer sole will span wider undulations, and obtain a flatter surface. With its 24” length, it is capable of handling flattening duties on relatively short pieces as well as lengths that include the largest most woodworkers would consider working. I recently used my #8 to flatten the top of my workbench, which it handled easily. The #8 Jointer Plane weighs in at 10 lbs, which sounds like it would be difficult to handle. Surprisingly, the weight and mass of this tool works in your favor. It’s not hard to initiate movement on this plane, and once moving, even easier to keep moving through the cut. I usually keep a small block of paraffin near my bench, and that facilitates an even easier time using the Jointer Plane. A very light swipe of paraffin along the sole of the plane body makes all the difference. A tip I regularly provide at our events is to make sure you are certain that you are holding onto the plane tightly when using paraffin for the first time. Initially, it can truly feel as if the plane will race away from the user.

These three planes are a great place to start, and can handle many of the tasks that woodworkers need for their projects. I suggest adding specialty planes to your core kit as projects dictate. With this strategy, none of your planes should gather dust for long, as they are all truly users.

I hope to see some of you at our upcoming events, listed on the Lie-Nielsen website. Feel free to contact me at lee@lie-nielsen.com if you have any questions, or if you have suggestions for future articles you would like to see.

Click to see Highland Woodworking’s entire selection of Lie-Nielsen hand tools.


Lee Laird has enjoyed woodworking for over 20 years. He is retired from the U.S.P.S. and works for Lie-Nielsen Toolworks as a show staff member, demonstrating tools and training customers.