Jim Randolph

Jul 102017
 

How do you feel when non-woodworkers call you a carpenter?

I suppose I was a woodworker in 7th grade, when I took wood shop in Mr. Boney’s South Park Junior High class, but I wasn’t very good at it. It seems I could never get anything square, or make good-looking joints. That was 1964, and I’m not even sure the term “woodworker” existed then. “Woodwork” dates to 1640-1650.

I was a framing and trim carpenter for a time after my Air Force stint. That was really fun work, and I learned a lot.
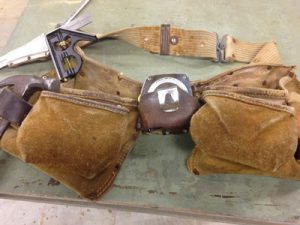
This was my very first nail apron, purchased from Sears. Our local Sears is scheduled to close its doors after 45 years in Edgewater Mall.

I remember a homeowner asking our foreman, Jack English, whether he knew any carpenters who could make her some bookshelves. One of my coworkers, older and more worldly than I, said, “What she wants is a cabinetmaker, not a carpenter.” I didn’t know that there was such a thing as a cabinetmaker, much less a difference, but I didn’t let my ignorance show, I just filed the information away for future use.

When I went to the University of Mississippi, Ole Miss, I was carrying a heavy class load, so there wasn’t time for a job, but I did spend some of my weekends making picnic tables to sell. Po’ Boy spruce studs were 10¢ each, and were straighter and had fewer barked edges than today’s studs at 33 times the price. Treated pine, with real arsenic, made a premium dining surface, unless you wanted to spring for heart cedar or redwood, and even that was affordable.
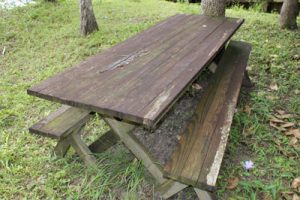
Today, 23 treated pine 2x4x8′ boards to make this picnic table and matching benches would cost you about $110.00. In the 70s, I sold the completed table with benches for about $50.
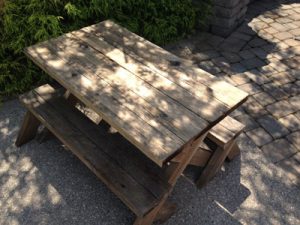
Cedar’s price has gone up a bit. When I made this rectangular heart cedar table for our eldest granddaughter, the wood cost about $200. But, it was pure heartwood, and has stood up well to brutal Kentucky summers and winters…
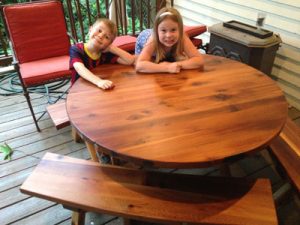
…The lumber for this little round job, with curved benches, on the other hand, cost around $400, and I had to do a lot of selecting to minimize sapwood use in crucial parts. Fortunately, it will live on a porch, where it will have a bit more protection from Kentucky weather, though it will still have to stand up to the two youngest grandchildren.

In the time between the end of the spring semester in Oxford, MS, and the fall start time in Auburn, AL, I needed income. I couldn’t make a long-term commitment to an auto mechanic’s job, and it didn’t occur to me to look for a nearby dairy farm, but there was a lot of home construction in Auburn, and it was easy to find a job on a home-building crew. So, for a time, I was a carpenter again.

We established in a previous poll that most woodworkers are DIYers. Therefore, we’re doing a lot of carpentry on our own homes and businesses, and maybe some for customers, too.

For me, then, I’m proud to be considered a carpenter. Still, when I think of my role as furniture-builder, I consider the difference between what my wife, Brenda, produces, which is fine art, versus what you can buy at a flea market, which are craft-level items. Not every piece of furniture I build rises to the level of art, but it’s always what I strive for.

In carpentry, on the other hand, art is not usually my goal, but I still give it my best.

Jul 092017
 

Welcome to “Tips From Sticks-In-The-Mud Woodshop.” I am a hobbyist who loves woodworking and writing for those who also love the craft. I have found some ways to accomplish tasks in the workshop that might be helpful to you, and I enjoy hearing your own problem-solving ideasPlease share them in the COMMENTS section of each tip.  If, in the process, I can also make you laugh, I have achieved 100% of my goals.

Sometimes you have a little job, but you just don’t want to do that job with a hand tool.

Take this little canoe repair. A crossmember needed a single rivet to supplement the existing rivets, but I ran out of the proper size and needed to put the canoe into storage instead of leaving it in the way until I went to the store.

Four rivets down, one to go. Darn the luck! I ran out of rivets when I originally repaired this crossmember, turning the final, single rivet installation into a separate job.

When I finally got the right fastener, I first reached for the manual rivet gun to pop it into place. Then, I remembered the pain in my arm, shoulder and neck from having hurt myself during a garage renovation project. That’s when I decided to put in a little effort now in order to achieve a long-term savings.

As you can read in my Highland Woodworking Blog post, after the injury I purchased an inexpensive, air-powered rivet tool. While it seems like overkill to pull out an air tool for one rivet, I’ve discovered that I can still aggravate that old injury with the wrong squeeze of my hand. The canoe repair was uneventful.

One of the ways I made it easy was by taking my air with me, instead of running a hose all the way to the canoe.

Enter: the portable air tank.

If your job isn’t too terribly big, you may be able to accomplish all you need to do with one good filling.

First, pump it as full as the attached gauge shows is safe. My compressor goes to 125 psi.

Fill the tank all the way, but don’t exceed the safe pressure limit.

Let your imagination fly! I finished my little riveting job in far less time than it took to set up, but, gained the two weeks that I would have been in pain. I’ve used the tank for impact wrenches and blowing small jobs that didn’t lend themselves to a brush or broom.

Of course, the original intention of an air tank purchase was to pump up flat tires, but it’s far more versatile than that!


Jim Randolph is a veterinarian in Long Beach, Mississippi. His earlier careers as lawn mower, dairy farmer, automobile mechanic, microwave communications electronics instructor and journeyman carpenter all influence his approach to woodworking. His favorite projects are furniture built for his wife, Brenda, and for their children and grandchildren. His and Brenda’s home, nicknamed Sticks-In-The-Mud, is built on pilings (sticks) near the wetlands (mud) on a bayou off Jourdan River. His shop is in the lower level of their home.Questions and comments on woodworking may be written below in the comments section. Questions about pet care should be directed to his blog on pet care, www.MyPetsDoctor.com. We regret that, because of high volume, not all inquiries can be answered personally.

Jun 052017
 

No Southern-fried Southern boy wants to be called a Yankee, but we share the characteristics of shrewdness and thrift. Thus, each month we include a money-saving tip. It’s OK if you call me “cheap.

Free stuff is everywhere! Especially on garbage day. Just this very morning I picked up some perfectly good spruce 2x4s sitting on top of someone’s garbage can.

We’ve previously discussed using carpet padding as a “router pad.” The same free pad makes a good, cheap cushion to stand on while you work. You can find it on at the curb on almost any trash day, when people change out their carpet. With a regular office stapler, you can put two (or even three) layers together for some extra padding. Why not? There is no limit, no “one to a customer,” you can take all you want.

Anything that relieves stress and fatigue will allow you to stay in the shop longer.

If you use the same material for your router pad, be sure to keep it separate, so that you don’t introduce dirt, and thus, scratches, into your work.

If you’re willing to swallow your pride, or get up before dawn so as not to be seen by your neighbors, there is an unlimited amount of carpet pad, free for the taking on trash pickup day.


Jim Randolph is a veterinarian in Long Beach, Mississippi. His earlier careers as lawn mower, dairy farmer, automobile mechanic, microwave communications electronics instructor and journeyman carpenter all influence his approach to woodworking. His favorite projects are furniture built for his wife, Brenda, and for their children and grandchildren. His and Brenda’s home, nicknamed Sticks-In-The-Mud, is built on pilings (sticks) near the wetlands (mud) on a bayou off Jourdan River. His shop is in the lower level of their home.Questions and comments on woodworking may be written below in the comments section. Questions about pet care should be directed to his blog on pet care, www.MyPetsDoctor.com. We regret that, because of high volume, not all inquiries can be answered personally.

Jun 022017
 

Welcome to “Tips From Sticks-In-The-Mud Woodshop.” I am a hobbyist who loves woodworking and writing for those who also love the craft. I have found some ways to accomplish tasks in the workshop that might be helpful to you, and I enjoy hearing your own problem-solving ideasPlease share them in the COMMENTS section of each tip.  If, in the process, I can also make you laugh, I have achieved 100% of my goals.

Linguists don’t agree on the exact origin of the word lag. It may have been a variation on “last,” or it may have originated from the Norwegian word lagga, meaning “go slowly.”

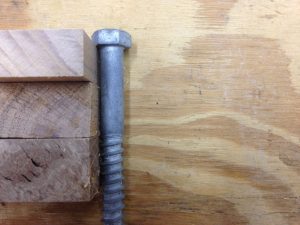
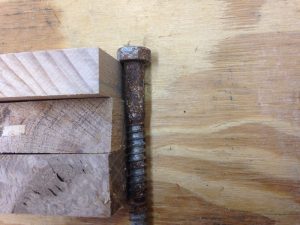
For woodworkers’ purposes, we mostly use the term in relation to lag bolts or screws, meaning a fastener without threads on the upper section of the shaft, which allows one or more of the fastened parts to not be constrained by that section of the shaft.

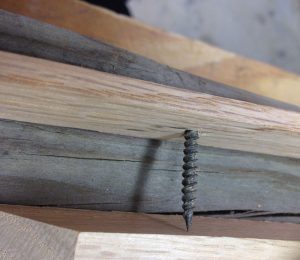
In this example, a properly-drilled hole would allow the threads of the lower part of the screw to engage wood block #3, while lagging, or slipping through blocks #1 and #2. All three blocks would be tightly bound together.

In this example, unless block #1 and block #2 are overdrilled, threads may engage block #2 and prevent a snug fit.

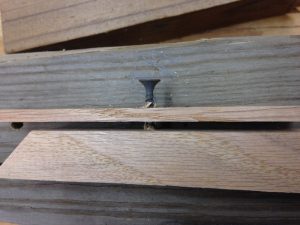
Here, the top piece of oak was predrilled with the same diameter pilot bit as the bottom piece, which allowed the threads to engage, holding the two pieces apart.

An alternative to using a lag fastener is to overdrill the workpiece, preventing the screw from engaging. That can be done with a drill bit of the appropriate size in a process called “lag technique.”

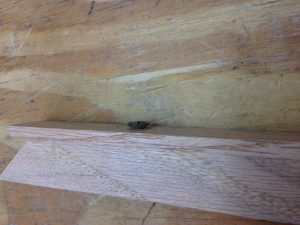
Even though this screw doesn’t have a lag (threadless) section, drilling a larger hole in the top piece of oak prevents thread engagement, allowing the two jointed surfaces to meet beautifully. The top piece of wood is ready for its countersink bit.

You drill a hole so that your screw can “lag” through one piece as you attach it the other. But, if you don’t have a drill bit handy or you don’t want to have to go down three flights of stairs just to make this one hole, here’s a way around that predicament:

Run a screw through the piece of wood you’re attaching. Drive it all the way in. If the wood is really soft you can often strip the threads it has created, and, voila, you have an unthreaded hole. If that doesn’t work, or if the wood is so soft that the head of the screw just continues to get deeper, reverse your drill and back the screw out.

All it took for this thin piece of oak to strip is a quick reversal of the drill-driver.

When only the tip is in the hole, continue to run the drill in reverse, but push down like you were driving the screw in. In most cases it will push right through the wood, creating the hole you seek.

Note: this is a good technique for a DIY construction project, not recommended for fine furniture!

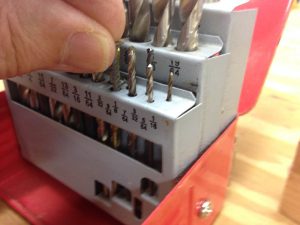
One of the best things about a drill index is having an accurate hole to help determine which bit to use for a specific screw. If the threads engage in the index, they will engage in the wood. If the screw slides through the hole, that bit will work for lag effect.


Jim Randolph is a veterinarian in Long Beach, Mississippi. His earlier careers as lawn mower, dairy farmer, automobile mechanic, microwave communications electronics instructor and journeyman carpenter all influence his approach to woodworking. His favorite projects are furniture built for his wife, Brenda, and for their children and grandchildren. His and Brenda’s home, nicknamed Sticks-In-The-Mud, is built on pilings (sticks) near the wetlands (mud) on a bayou off Jourdan River. His shop is in the lower level of their home.Questions and comments on woodworking may be written below in the comments section. Questions about pet care should be directed to his blog on pet care, www.MyPetsDoctor.com. We regret that, because of high volume, not all inquiries can be answered personally.

May 052017
 

No Southern-fried Southern boy wants to be called a Yankee, but we share the characteristics of shrewdness and thrift. Thus, each month we include a money-saving tip. It’s OK if you call me “cheap.

I love my scrollsaw. I’m not completely convinced it loves me, but I’m working to make it more of a friend. Someday, when I have the time, I would like to move up to fretwork and other, more intricate scrollsaw projects.

For now, though, I mostly use it to carve out initials of grandchildren and others I make stools for. And, I can’t say I’m particularly good at it. Therefore, I had to develop techniques for sanding inside lines and curves to fix the problems I create on the scrollsaw.

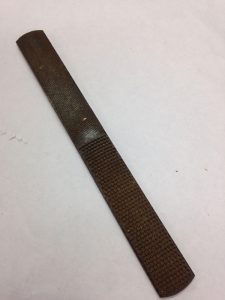
I use four main tools, three of which are, you guessed it…free! The first is a rasp (not free), and I use mine for the roughest beginning work inside letters.

A four-sided rasp like this is extremely versatile. Two round surfaces, two flat surfaces, coarse and fine.

By the time I get to this stage, I’ve created a panel, sanded close to a final finish, not-so-rough-sawn the letter or letters the stool needs, and I’m really not wanting to have to back up and make a new panel. Therefore, I’m taking no chances that I cut too far or suffer tearout. I’ve tried to fix minor tearout in a damaged letter before. Because it’s a focal point of the stool, the damage is nearly impossible to hide. What rasping I do is performed with a little angle, directing the cut to the middle of the board.

With patience in mind, I turn next to sanding, not being too concerned about how long it takes.

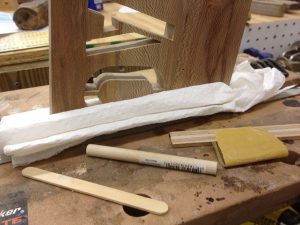
For straight lines, nothing beats a popsicle stick. It’s as flat as you need it to be, narrow enough to fit almost anywhere, and stiff enough to stand up to firm pressure while sanding.

If I need to cover more real estate in a hurry, I make a stick out of plywood. With the panel in a vise, you can even get a two-handed grip on either kind of stick.

Another universal sanding/shaping tool is the disposable foam brush handle. They come in a variety of diameters, so they can fit the broadest to the tightest of curves.

Wrap your sandpaper around and get to work.

With these three makeshift tools you’re ready for flat and round sanding. You can even alter the size.

Sycamore can be tricky to sand, so it’s best to start with a high grit and be patient.

Return to the May 2017 issue of Wood News Online


Jim Randolph is a veterinarian in Long Beach, Mississippi. His earlier careers as lawn mower, dairy farmer, automobile mechanic, microwave communications electronics instructor and journeyman carpenter all influence his approach to woodworking. His favorite projects are furniture built for his wife, Brenda, and for their children and grandchildren. His and Brenda’s home, nicknamed Sticks-In-The-Mud, is built on pilings (sticks) near the wetlands (mud) on a bayou off Jourdan River. His shop is in the lower level of their home.Questions and comments on woodworking may be written below in the comments section. Questions about pet care should be directed to his blog on pet care, www.MyPetsDoctor.com. We regret that, because of high volume, not all inquiries can be answered personally.

May 042017
 

Welcome to “Tips From Sticks-In-The-Mud Woodshop.” I am a hobbyist who loves woodworking and writing for those who also love the craft. I have found some ways to accomplish tasks in the workshop that might be helpful to you, and I enjoy hearing your own problem-solving ideasPlease share them in the COMMENTS section of each tip.  If, in the process, I can also make you laugh, I have achieved 100% of my goals.

Rules.

There are a lot of rules in woodworking, and most of them exist for good reasons.

Wear eye protection. Use hearing protection. Don’t start the table saw until you take off your tie.

Some rules, however, are about protecting equipment. One of those is bandsaw blade tensioning. Don’t leave the tension on when not using the saw, lest you cause flat spots on your tires. Apply proper blade tension before starting the saw, lest your blade go flying.

These are important rules, but how many of us follow them? Some woodworkers risk flutter-inducing tire flat spots rather than remove tension at the end of the day.

Why? You can blame it all on that frustrating little handwheel most manufacturers provide for tensioning.

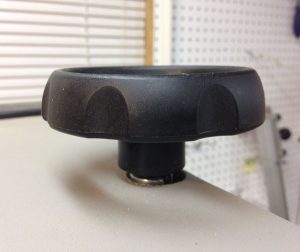
This is the culprit. Who has the time, the arm stamina or the patience to crank this knob until the bandsaw blade is tight?

Let’s put a stop to that.

And, of course, not spend a lot of money in the process.

I’ll even give you two choices, and neither involves buying a new saw.

The quickest fix, if it will fit your equipment, is to purchase the Quik Crank Bandsaw Tensioner. Just compare the parts in the product description to the components on your saw to know if it will work.

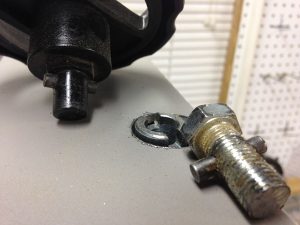
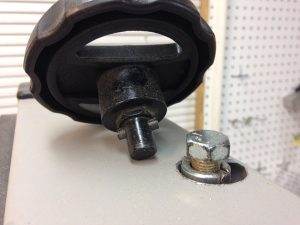
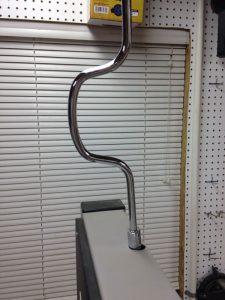
If not, you can do what I did, and make your own. My Craftsman saw’s knob engages a slotted end on an adjusting rod. I cut a 7/16″ bolt to a length of 1-1⁄2″ and drilled a hole perpendicular to the long axis, the same distance from the end of the original. A drift pin engages the adjusting rod, and the original 5/8″ hex head on top of the bolt faces up.

Check the opening in your saw’s adjusting rod, but a 7/16″ bolt fit mine perfectly. Accurately drill a perpendicular hole for a tight fit for a pin. Drive in the pin. You’re almost there.

Your modified bolt should fit much like the original equipment handle’s shaft.

Initially, I used my good Craftsman speeder handle, just to prove that the concept was going to work. I left it like that for several months, then replaced it with an inexpensive brand of handle and socket I could just leave in place all the time.

From a distance, no one can even tell this speeder handle came from “that” store, but the price was right, and, just how good does it have to be to tension and de-tension the bandsaw blade?

A discarded milk crate close by allows me to safely get up to a good working height.

Return to the May 2017 issue of Wood News Online


Jim Randolph is a veterinarian in Long Beach, Mississippi. His earlier careers as lawn mower, dairy farmer, automobile mechanic, microwave communications electronics instructor and journeyman carpenter all influence his approach to woodworking. His favorite projects are furniture built for his wife, Brenda, and for their children and grandchildren. His and Brenda’s home, nicknamed Sticks-In-The-Mud, is built on pilings (sticks) near the wetlands (mud) on a bayou off Jourdan River. His shop is in the lower level of their home.Questions and comments on woodworking may be written below in the comments section. Questions about pet care should be directed to his blog on pet care, www.MyPetsDoctor.com. We regret that, because of high volume, not all inquiries can be answered personally.

May 032017
 

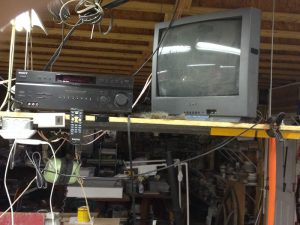
For me, my favorite non-woodworking tool in my workshop is my stereo. I’d be lost without the music, but, my television is hooked up to the stereo, so I can get caught up on the latest news, too, which is especially important when there is a late-breaking event.

This stereo setup is nothing to look at. A big, powerful amp in a box for AM/FM and video switching, connected to a 7.1 Surround Sound speaker system.

One night my wife came down while I was working and asked me to turn the music down some. The living level of our home is just above the garage and the stereo speakers are immediately below the living room. Too much garage volume makes watching TV upstairs, shall we say, “difficult.”

The 7.1 speakers make good sound, but, for some real volume, you need real speakers…

…and these babies move some air. And the floor of the living room above.

I said I would, and she smiled, turned, and went back upstairs. A little while later she came back, said I had looked like “a hurt puppy,” and it made her realize how important my music was to me, especially while I was working. She said I should turn it back up.

Which, I did.
Thank you, Baby.

As often as not, I listen to audio through headphones, especially when noisy equipment would drown out stereo speakers. Still, it isn’t the same. Sometimes, I’m just in the mood for those big speakers to rattle some sheet metal.

One day, when I was at Ole Miss, I was working on genetics homework and playing some Neil Young. The Harvest album. Later in the day I saw my across-the-street neighbor in his front yard. I went over to chat.

“I heard you had the Stray Gators (Neil Young’s band on the Harvest album) on earlier, Jim.”

“Genetics. It’s more than the brain can handle without some dilution.”
“You were studying?”
“Homework.”
“OH! I was hoping you weren’t inside the house. Are your ears bleeding?”
OK, so I like my music a little loud. It started with our generation, but it didn’t end with us. Electronics were/are so enabling. And, electronics are cleaner than ever, which means loud can sound better than ever.

What about you? What is your favorite or most important non-woodworking tool in your shop? If your answer is “Other,” leave us a comment with some details.

Return to the May 2017 issue of Wood News Online