At one of our events, I had a customer who wanted to create heavier duty tongue and groove joints. We discussed the possibility of using our No. 48 or No. 49 and as good as they work, the scale was just too small. My customer asked me for suggestions as to an alternate method to using tongue and groove planes.
I suggested to the customer the option of using a back saw, if he felt comfortable with his sawing skills, since it would ultimately only require four length-wise cuts to make the tongue. Based on his facial response, I thought it best to move on to another possibility. (By the way, if the backsawing technique does interest anyone who is reading this, leave a note in the comments and I’ll look into writing a small step by step on this technique.) The second method only requires two tools. The No. 71 Router plane and a Marking Gauge that slices rather than scratches. I should preface by saying that this method is somewhat slow, but you can end up with a pretty decent final product.
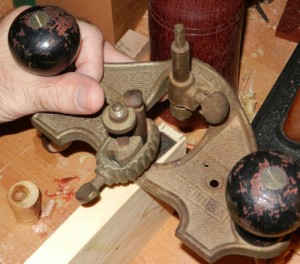
 Start with the two (or more) pieces of wood sized so they are the same thickness, square and flat. Take the board that will have the groove, and clamp it in a shoulder vise, so the work surface is facing up. I like to start out making the grooved piece first, since I find it easier to adjust the tongue to fit, rather than trying to adjust the groove. Now, before marking for the groove, setup your No. 71 with the iron you plan to use. (*Note: there are different sizes and shapes of irons for the Router Planes) I like to choose a square ended iron that is as wide as possible, fitting with your plans. If you have a fence for your No. 71, it can help prevent the damage caused by a momentary loss of focus, where you accidentally remove material outside your marked/scribed lines. At least when just starting, and the groove isn’t deep enough to “trap” the iron. Set the fence so the iron is centered on the board, or if the groove is more than double the width of the iron, set it so you remove material next to one of the marked lines. (NOTE: If you don’t want an overall centered groove, then a second marking gauge really comes in handy.) If you don’t have a fence, then measure so the two edges of the iron will be equal distance from both faces. Make a small mark on each side of where the iron will cut along the edge of the board.
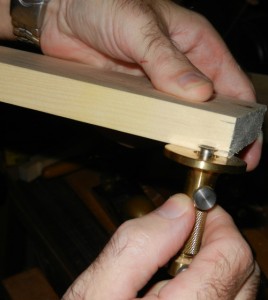
 Set your marking gauge to these marks. Before assuming this setting is perfect, mark a small section, from each edge. Check to make sure the iron will not only fit, but also completely fill the area between the two marks, if you aren’t trying for really oversized tongues/grooves. I think about it similarly to when I’m making a mortise, the width of the mortise chisel should dictate the mortise/tenon widths. Once the marking gauge is set, mark the full length of the board, from each face. This will establish the boundaries for the material that will be removed, and the scoring will minimize tearout. Set the board you are working with so the No. 71 will cut with the grain. It makes it easier to get good results if you are not working against the grain. Before you start to remove material with your No. 71, mark the final complete depth of cut on the end grain at both ends of your board. This will be helpful as you approach your target depth.
Take a pass or two with your No. 71, with a sharp iron set for a relatively light cut, removing some material. Now come back in with your marking gauge. This time make two or three strokes on each side, with decent pressure. The idea is to score the wood fairly deep, so the No. 71’s iron can just remove the material between the scored marks. Some woods behave nicely and can handle a thicker shaving than others, so testing the wood early on will prevent problems later in your work. Continue to alternate between the marking gauge and the No. 71, until you are at your final depth.
With the marking gauge still set as it was for the boundary of the groove, readjust it so the cutter is just slightly closer to its fence. What this will ultimately accomplish is to increase the thickness of the tongue slightly, providing material on the tongue to sneak up on a perfect fit. Mark the long edge of the board that will fit into the previously made groove, working from both faces. Now adjust the marking gauge directly from the previously created groove, so it is set for the depth of the groove. With this setting, mark the tongue’s shoulders, from the edge that will have the tongue. This will establish a clean shoulder. For the cleanest shoulder, repeat this marking after every couple of passes with the No. 71.
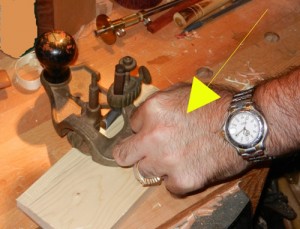
 Now, to create the tongue. Check to make sure you are working with the grain on this board. To use the No. 71 for this portion of the process, make sure you apply pressure to the handle that is riding on the face of the board. This will keep the No. 71 level and ultimately the side of the tongue parallel to the face of the board. Incrementally remove material until you are getting close to the depth mark on the tongue. Flip the board over and continue removing material until you are close to the mark. Check to see if the tongue is close to fitting in the groove. Likely it will still be too thick. If it does not yet fit, advance the cutter slightly and remove a small amount of material. Check the fit after working each side, as it is easy to overshoot a good fit. Continue this process until the tongue fits as desired. One thing to remember is that working one side at a time can sometimes lead to one side having a bit more material than the other. Make sure to test your depth of cut when shifting to the opposite side of the tongue. If you don’t check this setting, when moving to the other side of the tongue, you may end up removing too much wood. And we all know it’s easier to take it off, than put it back on!
FYI – for the picture shown just above to the right, I should note that the cutter I used was much too large for the wood. Unfortunately I couldn’t find a cutter that matched exactly what I wanted for demonstration purposes.
When both boards are finished (one with the tongue, the other with the groove) it is time to see how things fit. If the tongue is too long, so there is a gap at the shoulders that doesn’t close up, take a few light shavings off of the end of the tongue. Again, take baby steps. Here’s another tip you can use if you are uncomfortable trying to keep the end of the tongue square while making this adjustment: Lay the board that has the tongue onto a very flat bench or table, so the tongue is horizontal. Set one of your planes for a very light shaving. I tend to like a Jointer plane # 8 for this, but it isn’t usually that critical, especially since you hopefully won’t need to remove very much. Lay the Jointer plane onto its side, with the iron towards the tongue. Slide the plane along the tongue, allowing the orientation to keep the tongue square on its end. Test often and take very light shavings.
I hope to see some of you at our upcoming events, listed on the Lie-Nielsen website.
To see Highland Woodworking’s entire selection of Lie-Nielsen hand tools, click here.
Lee Laird has enjoyed woodworking for over 20 years. He is retired from the U.S.P.S. and works for Lie-Nielsen Toolworks as a show staff member, demonstrating tools and training customers.


Thank you Lee for the very informative article. And, yes, I would like to see an article on the Backsawing Technique.
Dean,
Thanks for your feedback. I’m glad you enjoyed the article.
I’m currently prepping for one of our events this Friday / Saturday in Houston, but I should be able to work the backsawing article into my planned writing, when I return.
Best,
Lee Laird