This is the fourth post in a series – to go back to the first entry in the series, click here. If you just want to go back to the most recent entry, click here.
It’s been awhile since my last day in the shop with my windsor chair kit, so I take the opportunity to go back through the instructions from the beginning and make sure I did everything right. I might have missed some sanding somewhere – better to catch it now while only the base is assembled than after I get all the spindles glued in.
Amazingly enough, it appears that my workshop ADD has not kicked in yet and I’ve followed most of the steps up to this point pretty thoroughly. It is pretty satisfying reading back over the descriptions of everything I’ve finished. Makes me feel more accomplished and confident to face the rest of the build. I pull out the sander and go over a few surfaces again, just to make sure they are as perfect as they can be.
The chair is still sitting in the dry-fit state I left it in at the end of my previous work day, and as I slide the arm off the spindles, I try to do it such that all the dry-fit spindles will stay in their holes, to get a sense of how tight a fit it will be to slide the arm back on once the spindles are glued in. Doing such a complicated operation makes me very nervous, so I figure a practice run is a good idea. And I’m glad I tested it because it does look like it will be a challenge that I should prepare myself for. But that’s okay – I like challenges! What would be the point otherwise?
The next step is to finish sand and do any shaping and carving on the arm before attaching it. I know my limitations as a carver (i.e. many!), so I round the edges, make sure the hands match and feel comfortable to grip, and go over it with several grits of sand paper to make it as pleasant as possible for when I’m finally leaning back in my finished chair. I practiced some careful sanding around the pre-drilled spindle holes. I don’t want to be too aggressive with the sander or I may hit one of the holes at a bad angle and knock off a chip.
Next, the instructions tell me to dry fit all my spindles and the arm posts so I know where they go when gluing up. Even with the previous dry fit, I go ahead and do this again, if only so I can take them out in order and lay them on the ground in the positions they will eventually take in the chair. Hopefully this will ensure that I don’t end up with any extra pieces or anything in the wrong spot! And now to another big glue-up. Breathing easy, I get started. The arm posts go in easily. I wedge the bottom of the post from the other side, sand it down, flip the chair back over, and start gluing the spindles in.
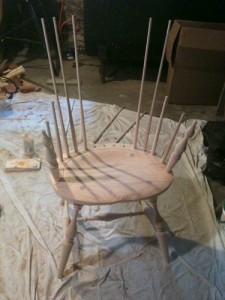 I firm up the first few spindles by hammering them in: after gluing the hole, I insert the spindle as far as it will go pushing it by hand, after which I hit it with a mallet a few times and then with a hammer (with a small block of wood sitting between the hammer strikes and the top of the spindle) until the spindle won’t move anymore. I take heart in the fact that I’ll be cutting the tops off of most if not all of the spindles once the bow is on, so if I damage the tops of a couple of them while trying to hammer them in, it’s not the end of the world. However, i do sense there must be a better way to do this, especially once I get to the longer spindles that don’t take as well to the mallet/hammer approach.
On the second long spindle I insert, I figure out a much more effective method: apply the glue to the spindle hole, then insert the spindle and twist it. As there is a little space in the hole, it seems willing to spin and sink down comfortably to the bottom of the hole. This is probably most effective because it is done before any of the glue has had a chance to dry, and I’m working with easier forces of friction than I was with my other methods. In fact, the glue seems to help reduce the friction while it is still wet. A good lesson learned for future shop projects requiring gluing into a tight fit!
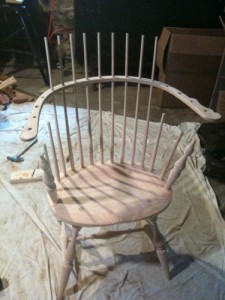 I am still experiencing some friction though, and most of that is taking its effect on my hands. By the time I am gluing in the second to last spindle, my hands are feeling the pain with every turn. Maybe I’ll try doing this with work gloves on next time…the wood does seem happier to be worked with finesse rather than brute force though, and I imagine this is a theme that carries through a lot of woodworking, and maybe what separates beginner woodworking from experience. Still, I’m not looking forward to installing that last spindle due to the minor wood burns I’ve accumulated on my hands – the only thing that keeps me working is that I know the glue is drying and it will only get harder as that happens! Turns out glue drying is the ultimate motivator for getting a job done, even if it hurts.
Perhaps this is where my idea of ‘woodworking training camp’ would be useful – my soft computer-based job hands are not equipped to be working this hard (and I know this isn’t even all that hard!) and some calluses sure would be useful right now.
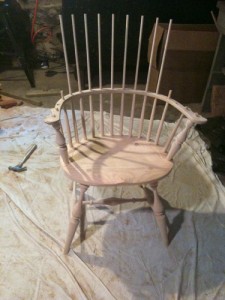 Once the last spindle is glued in, I give my hands a short break, because I am excitedly anticipating the next step: sliding the arm onto the chair! When I start this process, I hold my breath, thinking it will be a struggle, but it ends up working beautifully, and it is a moment of pure exhilaration! This seemed like a tenuous fit at best when I was doing the dry-fit, which probably contributed to my lack of motivation for getting back into the shop every day to finish this project. I was just sure it wouldn’t work!
I glue the arm post holes and the short spindle holes to hold the arm in place, then pull out the tape measure to check if the arm is resting at the right height. And it is here that I encounter a bit of stress, as once I have stretched out the arm to reach both arm posts and it is sitting low on all the spindles, the wood gets a lot less flexible. This makes the process of shifting the arm down the spindles a little more difficult, and right now it sits at about 9-1/2″ above the seat instead of the 8-3/4″ the instructions call for. Instead of my previous feeling of exhilaration, I am now overwhelmed with a sense of INeedToDoThisStepAsQuicklyAsPossible! (i.e. before the glue dries, of course!) My main fear is of breaking a spindle, or chipping a piece of the arm. Is it a bad sign that the main standard I have set for myself at this point is to not break this kit during its assembly? Maybe I should raise my expectations a bit.
In my panic to get the arm in the proper position before the glue freezes it in place, I return to my previous brute force methods and use the mallet and a piece of wood to hammer the arm down to the position called for in the instructions. When it is in position, I drill through the arm and center spindle and glue one of the supplied dowels in to support the arm position, then sand it down when the glue is dry so the dowel is barely visible.
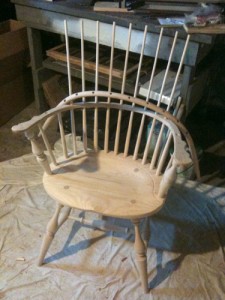
I also wedge and sand the tops of the arm post and the short spindle that are sticking up through the arm. At this point I can carefully sit in the chair with my arms up on the armrests and pretend it is all done, but I know there is one major step left, and I’m going to leave this one to another day: installing the bow. This one is going to require a lot of focus, so I’m dedicating a whole day to it. Looking forward to it, albeit with quite a bit of nervousness!
This is the fourth post in a series – to read the next entry, click here. To go back to the first entry in the series, click here.


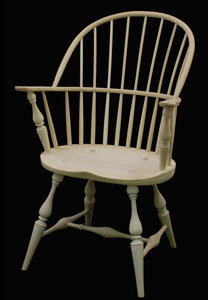
The fifth post is missing, server not found. Just getting ready to start on a chair!
Here is the link to the 5th post on the Newbie Chairbuilding Series: https://woodworkingtooltips.com/2011/08/newbie-chairbuilding-girl-bowing-out-but-only-for-this-week/