Lee Laird

Lee Laird has enjoyed woodworking for over30 years. He is retired from the U.S.P.S. and works for Lie-Nielsen Toolworks as a show staff member, demonstrating tools and training customers. You can email him at lee@lie-nielsen.com or follow him on Twitter at twitter.com/is9582

Oct 132010
 

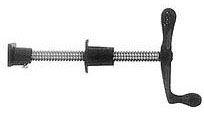
Some folks are lucky enough to have a fully stocked workshop, with a dedicated workbench to hold work pieces for hand cutting dovetails. For those who aren’t as lucky, I came up with a plan that allowed me to supplement my work holding abilities.  My shop was part of a garage, with a couple of go-to machines – Table saw, Band saw and Drill press. There was no extra room for a work bench, and I’ve been seeking a solution for my work holding situation.  After working on my table saw, I noticed the wings had pre-cut holes, since they are setup to work on either side of the table.  After seeing I had attachment points, I started looking for “screws” I could use in my “dovetailing vise”.  The solution I came up with was to use veneering press screws that had adequate capacity for dovetailing most projects.  These screws come with a mating piece which acts as a nut for the screw.

I cut a piece of 8/4 Maple, wide enough to attach just shy of flush to the table saw’s wing (didn’t want there to be a chance of wood movement that might throw off a cut on my saw) and to house the mating pieces for the screws. I clamped this piece of Maple to the edge of my table saw wing, so I could leave marks on the wood for drilling.  I drilled and countersunk holes large enough for the bolt’s head and washer to sit below the “clamping” surface. I used a washer and an aircraft nut on each bolt, so they would not loosen with vibration. Next I drilled three holes on my drill press just slightly larger in diameter than the press screws, in a location low enough that the screw’s “nuts” would not hit the table wing. The mating “nuts” for the screws required a slightly different technique, since they are not cylindrical.  I started by using a forstner bit to drill out a hole slightly larger diameter than the “nut’s” conical section and just slightly deeper than the “nut’s” depth, minus the thickness of the square lip. Once that was completed, I threaded the nut onto the screw until it was tight. This allowed me to mark for the two holes used to hold the “nuts” in place. Before I installed the two “nuts”, I cut another piece of 8/4 Maple to use as the outer vise jaw. I cut this second piece the same length as the first, but only about 2″ in width. I clamped the outer jaw over the previously drilled holes for the press screws. I took the same drill bit as was used for the holes, and put it into the holes from the back side, spinning lightly to leave a mark on the inside edge of the outer jaws. I took the drill bit and the outer jaws over to the drill press to make holes that would be in the same plane as those drilled earlier. I made sure to remember to slide a washer over each press screw, before putting everything together. After each veneer screw is almost completely inserted, I re-install the free rotating piece that comes with each screw. This will reduce the likelyhood that the screw will unscrew completely.
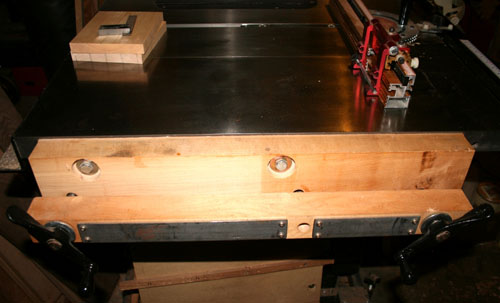

I’m sure someone will recognize that I drilled three holes, but am only using two press screws. In actuality, I initially bought two press screws. After setting the screws about 20″ apart, I noticed some flex in the outer jaw, even though I was using 8/4 Maple.  As many of the dovetailed items I make are less than 6″ in width, I decided to add another screw hole about 6″ away from one of the first screws. I purchased a third press screw so I would have the mating “nut” to install in the back side of the “extra” hole. This provides me flexibility. Since the mid hole isn’t centered, it provides me with openings in three sizes, to limit the flex that occurs when the opening is much larger than the work pieces.
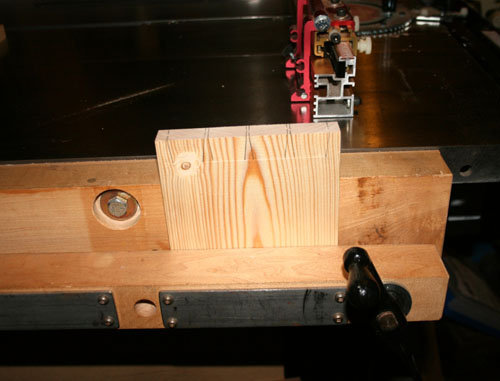
The press screws I purchased are the 12″ versions. If you follow this link:
http://www.highlandwoodworking.com/veneering-clamps.aspx
you’ll find three sizes available, 9″, 12″ & 18″.

Good luck!


Lee Laird has enjoyed woodworking for over 20 years. He is retired from the U.S.P.S. and works for Lie-Nielsen Toolworks as a show staff member, demonstrating tools and training customers.

Sep 232010
 

There are times when I need to cut a curve in some wood, but either don’t want to use the band saw or it’s not available.  In the past I’ve seen woodworkers using a bow saw to perform these types of cuts. Basically, this is a blade, placed in a frame with some mechanical means to tighten the blade.  Many of the older saws used string or twine wrapped around the upper “horns” with a piece of wood in the middle used to both twist the line and to maintain the tension. Some of the newer designs use a metal shaft (almost like a super long bolt) with some type of nut on the end to initiate and maintain the tension on the blade.

I decided I was going to build my own a bow saw.  I chose a design that was pleasing to my eyes (and would hold up with the tension required), found some good hard Maple for the uprights and some contrasting Padauk for the cross member. I drew out my design and cut the pieces to match. Historically, the cross member had tenons on each end, which matched up with a mortise in each upright.  The fit of these joints is critical, since no glue is used.  As the string/twine is tightened, it places great tension on the saw, and the joint changes its relationship slightly.  If it was glued, then it wouldn’t have the give required and could cause issues. With the demanding fit of these joints, I decided to “cheat” to make sure everything fit just right and all stayed in the same plane.  I used my Festool Domino to make mortises in each end of the cross member and also into the uprights.  Then it was just a matter of inserting a Domino at each end of the cross member and slipping the three pieces together.

As for the string/twine, I purchased some braided fishing line (65 lbs. Test), which is easy to work with and adequately strong.  I turned the handles for each end of the blade out of some Hard Maple, to a shape that was pleasing to my eye and hand.  The only parts that I purchased, other than the fishing line, were the blades and blade holders.  The blade holders were each epoxied into their respective handles and then I just slid the blade into the matching slots and I was ready to saw.

At present, I haven’t found any wide blades (for ripping) but I may cut a piece of band saw blade the correct length and insert an appropriately sized pin.  These saws work well.  One of the issues that many have is getting the blade set to the “proper” tension.  I’d love to tell you to tension it until you are an octave above middle C, but I haven’t yet found any directly associable means to make this happen.  When the blade is too loose, it will feel kind of spongy.  When it is too tight, you’ll have a bunch of smaller pieces of wood ready for the fire.  Seriously though, it is a fun build and yet another technique to learn.


Lee Laird has enjoyed woodworking for over 20 years. He is retired from the U.S.P.S. and works for Lie-Nielsen Toolworks as a show staff member, demonstrating tools and training customers.

Sep 072010
 

I don’t know about you, but I enjoy breathing new life into an older tool.

That’s exactly what I did with this older Japanese hammer I purchased off of eBay.  The old handle was nicked, burned and just overall rough.  I decided the cool hammer’s head deserved a new handle for the next segment of its life.

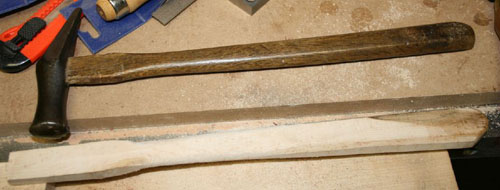
I didn’t need a large piece of wood, since the original was fairly slim. Luckily I had a piece of Birds Eye Maple, that was an off-cut from a previous build, and I wasn’t sure I’d find any other use for it. The old handle had a shape that felt right in my hand and fit the size of the hammer’s head.  I decided the new handle should mimic the old handle’s design.

My Birds Eye Maple

I simply traced the old handle’s shape onto my Maple blank, which was already similar in width and thickness.  I cut it just slightly outside the lines on my band saw, and then used my rasps to shape and bring the size down to final dimensions, including the chamfers on the lower section of the handle.  After I had the handle feeling the right size, I followed the rasps with sand paper, ranging from 100 grit up to 600 grit.

Old handle, meet New handle

After I finished sanding it, I applied a couple of coats of Tung Oil, followed by some Black Bison wax.  On tools like this, I prefer to actually feel the wood, rather than using a heavy film where it almost feels like plastic.

The final piece of the puzzle was to fit the handle to the hammer’s head.  Since the inside of the hammer’s head had a small ridge inside the opening all the way around, I left the top of the handle just slightly thicker than the width between the ridges. I didn’t need a wedge since the ridges do such a good job of keeping the handle in place I was able to drive the head of the hammer onto the new handle using a wooden mallet.

I’m very happy with my rejuvenated hammer, which now looks as good as it works.


Lee Laird has enjoyed woodworking for over 20 years.  He is retired from the U.S.P.S. and works for Lie-Nielsen Toolworks as a show staff member, demonstrating tools and training customers.

Aug 252010
 

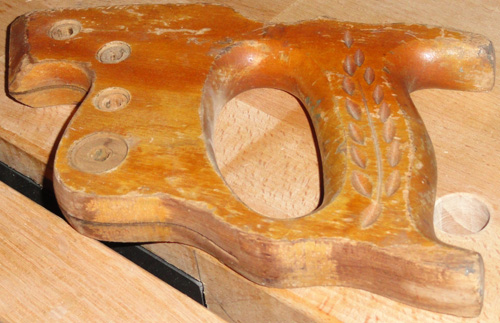
Here’s the story of an old saw handle that I restored.  It was actually a pretty lame handle, with the hard lines in the gripping area, which is pretty indicative of a low $$ saw.

The original saw handle

The saw plate was in decent condition, so I thought I’d see what I might be able to do to make the handle more friendly.  Actually turned out better than I anticipated.  Now it’s calling to me, wanting me to re-sharpen it. I guess I’ll do that to see if it ends up as a decent user.  At least now it won’t hurt and leave blisters when used.

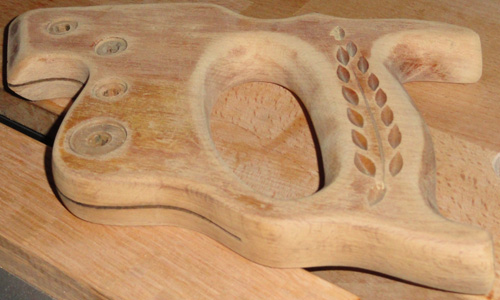
To restore the handle, I used sand paper from 100 grit to 320 grit for the shaping and then smoothing.

Partially sanded

After sanding, I applied about three coats of Tung Oil and when dried, a coat of some good paste wax.  Buffed it out and voila!

Saw handle: refreshed

Thought this might be a good technique to log away, in case you pick up a decent saw with an unfriendly handle.  There are quite a few decent old saws out there, that you can buy for just a little $. Always good to know how easy it is to modify and/or restore a handle. Hope you can use this some time in the future.


Lee Laird has enjoyed woodworking for over 20 years.  He is retired from the U.S.P.S. and works for Lie-Nielsen Toolworks as a show staff member, demonstrating tools and training customers.