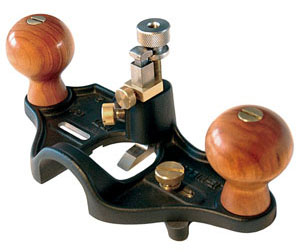
 The Lie-Nielsen Large Router Plane is nicely upgraded from its Stanley roots. This plane comes with a cutting iron, fence, finely adjustable depth control, a very useful depth stop and some comfy handles.
As with just about any other plane, even though the #71 may not immediately trigger its plane heritage, sharpening is the first step to setting up this plane. I’ve had quite a few customers at our events, a bit perplexed as to how the iron is sharpened. The cause of this doubt usually originates with the shape of the iron.
Its “L” shape dictates hand sharpening, as it doesn’t readily “fit” in honing jigs or systems, at least those of which I’m aware. When I sharpen this iron, I usually stick to the original bevels, as they are fairly large and if you take your time, are not too hard to register on the stones.

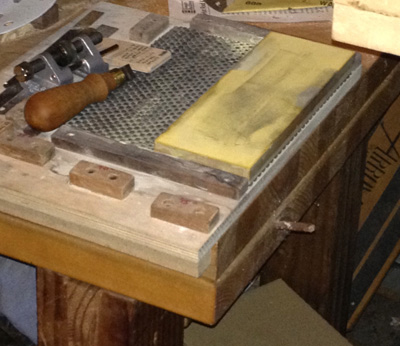
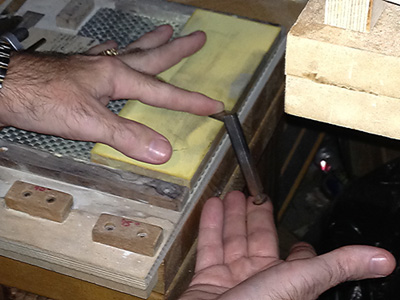
One “trick” I use when working the bevel of the cutter, is to move my sharpening stone so the long edge is flush with the sharpening table. This allows me to ride the bevel on the stone, while the other portion of the iron hangs off the edge.

I also prefer to hold the cutter so its body is about 45 degrees askew to the stone. There is less chance I’ll rock the cutter as I’m moving up and down the length of the stone, than if the cutter points directly across the stone (still moving the iron up and down the length of the stone). After working the bevel, it’s time to work the back. The back is easier, since there is more surface area on which to balance. I’ve worked the complete back of the iron for the majority of my woodworking experience, but recently have played around with adding in a back bevel, much like the concept of sharpening the back of my plane irons. When I work the complete back surface, it’s very easy to stabilize with either my thumb or finger, depending on what feels comfortable. Similarly to the bevel, I will work the back with the cutting edge about 45 degrees askew to the stone, even while still moving the cutter up and down the length of the stone. When trying the back bevel sharpening technique, it was readily apparent that the length of cutter was translating into a larger bevel, even with the very thin material we use when working the backs of plane irons. Knowing this, I’ll continue to work the complete back, until I find a good solid reason to change. I’ll report back if/when I do change.
The next part of setup is to re-assemble the iron in the plane. When preparing to use this plane, I will do one more step. Once I know the limit of the depth of cut for which I’m using the #71, I’ll set the iron to this depth. This makes it so I can gradually work my way down to final depth, without fear I’ll accidentally advance the iron too deep, and remove material that will either be unsightly or weaken my structure. Once the iron is at final depth, I move the depth stop so it is up against the plane body, and lock it tightly in place. Now I’ll retract the iron, so I’m prepared to take a light cut. Taking light cuts is good practice, since a heavy cut can have the potential for tear out and less than optimal results.
If the included fence is necessary for my project, I always set it up directly from my work piece, so no measurement errors are introduced.
That’s about it for setting up the Lie-Nielsen Large Router Plane, which I think everyone will find to be a very useful tool in his or her arsenal. I hope this helps get your plane prepped, so it is ready for all the action I anticipate you’ll find for it.
I hope to see some of you at our upcoming events, listed on the Lie-Nielsen website.
Click to take a closer look at the Large Router Plane.
Click to see Highland Woodworking’s entire selection of Lie-Nielsen hand tools.
Lee Laird has enjoyed woodworking for over 20 years. He is retired from the U.S.P.S. and works for Lie-Nielsen Toolworks as a show staff member, demonstrating tools and training customers.


Another tip I’ve heard on sharpening router plane irons:
With most blades we polish the bevel and work the burr off the face of the iron. This is tricky with router plane irons because of the L shape. Instead, why not work backwards? Polish the face of the iron, then work the burr off the bevel. This would minimize the amount of time spent with awkward holding,
Hi Torch02,
Thanks for your comment. I’ve used the technique I wrote about for a number of years with good results, and unless I’m needing to fix a bad sharpening, I won’t need to spend more than a couple of minutes of work. It is always good to test alternate methods to see what actually works best for each person, though. Plus, I always tell my customers to stick with any method they may use for sharpening, if they are getting good results. There are many ways to get to the same end result.
Best,
Lee Laird
Thank you for the article, very informative!
thanks just found this, good explanation of blade honing