Welcome to “Tips From Sticks-In-The-Mud Woodshop.” I am a hobbyist who loves woodworking and writing for those who also love the craft. I have found some ways to accomplish tasks in the workshop that might be helpful to you, and I enjoy hearing your own problem-solving ideas. Please share them in the COMMENTS section of each tip. If, in the process, I can also make you laugh, I have achieved 100% of my goals.
Not long after I cut my first Domino mortise with my Festool Domino Jointer, a realization hit me, “This is a slot.”
Right about now you’re probably thinking, “This guy’s a genius.” Just wait. Believe it or not, there’s more.
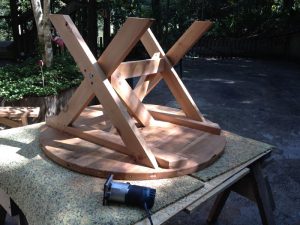
I was working on the youngest grandbabies’ round picnic table, cutting mortises to use Dominos to edge-join the boards for the top. While doing that, I was thinking ahead about attaching the cleats on the underside.
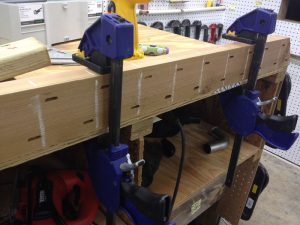
That’s when it hit me: “The Domino mortiser makes slots!” I figured I could make screw holes in the cleats with the Domino, using its built-in depth settings to make the slots go half way through the 2″ lumber. The slots would allow for wood movement, and there would be no risk of breaking drill bits, as frequently happens when making slots. And, even though the slots would be hidden, it would give me a warm feeling knowing that the holes would be neat and uniform.

Because screw heads are going to show, you want your Domino slots uniformly spaced. Use the Domino mortise depth setting to cut them halfway through, more or less. Because the Domino has a setting for slot width, you can provide for as much expansion as you think you might need.
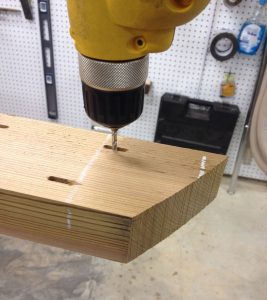
But, if the slots are set to go only half way through, how will that work with attaching screws? The second part does involve a drill bit. After making the mortises, go back with the appropriate-sized bit, right in the middle of the slot, to make the opening for the screw to go in. Using this technique also allows you to perfectly center your screw hole in the slot.

Your drill bit should be sized for a slightly snug fit as your screw passes through the resulting hole. You can countersink the head a little, if you prefer.
Because you’re coming out onto your finished surface, be careful to drill through slowly so you avoid a blowout.

You see the handsome effect of carefully placing holes for screws. The stainless steel heads are arranged like soldiers in a line.
Jim Randolph is a veterinarian in Long Beach, Mississippi. His earlier careers as lawn mower, dairy farmer, automobile mechanic, microwave communications electronics instructor and journeyman carpenter all influence his approach to woodworking. His favorite projects are furniture built for his wife, Brenda, and for their children and grandchildren. His and Brenda’s home, nicknamed Sticks-In-The-Mud, is built on pilings (sticks) near the wetlands (mud) on a bayou off Jourdan River. His shop is in the lower level of their home.Questions and comments on woodworking may be written below in the comments section. Questions about pet care should be directed to his blog on pet care, www.MyPetsDoctor.com. We regret that, because of high volume, not all inquiries can be answered personally.


The technique as documented will not allow for wood movement. The hole for the screw shank must also be slotted. 0/10