I’ve written a number of blog articles that include sections on sharpening, but in this article I’ll focus on one aspect that can make a huge difference in your results. Even though I’ll talk specifically about this technique for water stones, it is equally important on other sharpening media.
When I first started woodworking, I didn’t have a mentor to show me the ropes, and the Internet was still a glimmer in [whom ever you believe initiated the internet]’s eye. I had a small set of chisels that were so dull, it’s amazing they’d even scare the wood. I’d read an article about Japanese water stones functioning well, so I decided to invest in three stones. I soaked the two coarse stones in water and then started sharpening. I worked and worked, only to start seeing something happening to the ends of my chisels. For lack of a better description, it almost looked like the chisels were grinning at me. What I didn’t know, starting out, was the stones are made so the media breaks down with use. This continues to present fresh sharpening material, allowing the stones to continue to remove metal. I was working primarily toward the central area of the stones, since I was afraid I’d slip off an edge, and the center was the area that was breaking down. Ultimately, it made a dished area, and this made it so the next chisel would touch on the outside edges, but not the center, until enough material was removed from the chisel so it could reach the center. Hence, the nice smile-looking shape on the end of my chisels.
So what did I learn? It’s important to work as evenly as possible on the full surface of sharpening stones, and even more critically, flatten the sharpening stones regularly.
There are a number of ways to flatten water stones (Norton, Shapton, King, …), including sandpaper on a known flat surface such as plate glass, a granite plate, or even on a Table Saw or Jointer table. Another choice, which I prefer, is a diamond impregnated precision metal plate. Specifically, the DMT Dia-Flat Lapping Plate, which is certified flat to a tolerance of .0005” across its surface. This level of flatness is likely more flat than any of the previously mentioned “flat” surfaces. I’ve owned other diamond flattening plates in the past, and when used to flatten sharpening stones, they had a somewhat short life expectancy. Specifically, I have a 400 grit plate that transitioned into something closer to what I believe would be a 1200 grit, due to the diamonds losing their bond when used to flatten water stones. The new Dia-Flat plate has a new proprietary coating that will minimize this degradation, creating a longer lasting precision tool.
I’ve used one of the new Dia-Flat plates for over a year, and it’s still going strong. I can tell that it has a slightly less aggressive bite now, but I’m extremely happy with the present state, with all of the stones it has flattened. I’ve shared this plate amongst my peers, during training sessions this last year, so I’d likely equate this usage to 2 – 5 years worth of time in a one-person shop or possibly more for the hobbyist. Almost 100% of this usage was on Norton 1000/8000 grit water stones. The Dia-Flat Lapping Plate also excels at prepping tools not yet ready for water stones. The diamonds can remove the gross material much quicker and more efficiently than dropping down to a super coarse water stone like a 220 grit, and there is no need to flatten the Lapping Plate.
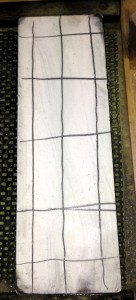
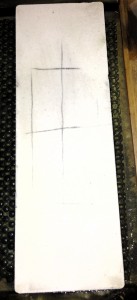
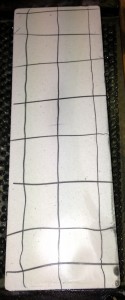
When I flatten a water stone, I take a #2 pencil, and draw a grid across the face of the stone, that has water just like I’d use it to sharpen.

After a couple of passes, I look to see if any of the grid lines are remaining.

If the outside edges of the stone are clean, but the middle area still has some of the grid lines, this indicates the stone has a hollow. Depending on the stone, the pencil lines can also degrade, from the water in the stone. Depending on how dramatic the hollow, I may re-apply the grid a couple of times.

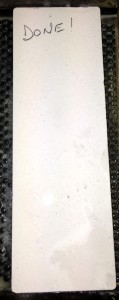
Also, pay attention to the look of the stone during this process. The stone that has made contact with the diamond plate will have a slightly different color, more dominantly in some stones than others, than the area not yet flattened. So, if the grid is all gone, but an area in the center isn’t consistent looking with the outer area, I’d re-apply the grid and just take one test swipe across the diamond plate. If the grid is gone in the center, you’re golden. If not, continue to work until the stone is truly flat. This quick visual makes it very easy to verify when the stone is flat.

You’ll end up spending much less time sharpening, and have a much better result if you flatten your sharpening stones regularly. I know this information would have helped me early on in my woodworking career. I hope it helps you as well.
Please let me know if you have any questions I may have missed.
Lee Laird has enjoyed woodworking for over 20 years. He is retired from the U.S.P.S. and works for Lie-Nielsen Toolworks as a show staff member, demonstrating tools and training customers. You can email him at lee@lie-nielsen.com or follow him on Twitter at twitter.com/is9582

