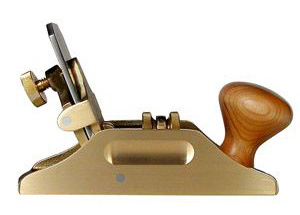
 I have a lot of customers who want to discuss which one of our planes will ultimately leave the best final finish on flat wood. Most of them are anticipating the comparison of our Low Angle Block plane v. our Low Angle Jack plane v. our 4 1/2. Many are surprised when I bring out one of our Scraping Planes. I think part of the surprise is that the visual of the Scraping plane is completely different from most of the usual planes which have a blade that lays back towards the user. Now with the scraping planes, the blade is angled forward, on the other side of 90 degrees, compared to the regular bench/block planes.
Many woodworkers will follow a smoothing plane with a hand-held scraper, which can leave an exquisite surface, depending on the skill of the user. Unfortunately, on the other end of the spectrum, it can leave scallops and other surface irregularities in the hands of the less proficient. This is where I see the scraping plane excelling, especially when working on flat surfaces. Since the scraper (scraping blade) is carried in a plane body, it is much easier to end work with this tool without the fear of negative surface consequences.
So how do we set up one of these scraping planes? Since it looks so different from the bench/block plane, it can seem like a completely foreign tool. In actuality, it can be one of the easiest planes to set up for great results. One of the first aspects of setup is the blade. The blade can seem strange for those who have previously used a hand-held scraper, and are familiar with the sharpening techniques for that tool. On the scraping plane, the blade comes with a 45 degree bevel, which when honed is completely sufficient for finishing cuts. That’s right. Without needing to create a hook. Sounds a little bit different than the usual hand-held scraper, doesn’t it? If you don’t yet own a scraper plane, and would like to see just how effective this can be, take one of your widest bench chisels. Hold it with the blade pointing straight down, with one hand on each side, and lightly pull the chisel across the wood, like you would a hand-held scraper. You can adjust the angle of the chisel, similarly to the adjustment of the scraper plane, to get the best results. Amazing what it can do without the hook. Some may still wish to apply a hook, which can make the plane a bit more aggressive. If you do this, you might have to play around with the angle of the blade so the hook engages properly, just like you do with a hand-held scraper. Now back to the setup of this plane: The blade is inserted into the mouth (some prefer to feed it up through the bottom to prevent any damage to the blade) with the bevel facing towards the rear of the plane. Just lightly snug up the thumb screw, to prevent the blade from slipping out and damaging the plane or yourself! With the blade in place, we can work on the angle of the blade. We’ve found that 15 degrees forward of 90 degrees, towards the front of the plane is what works best for most situations. Once the angle is set, place the plane on a flat wooden surface (which could be your workbench). Slightly loosen the pressure of the thumb screw, while holding the plane flat on whatever it is resting on, put a finger’s pressure on the middle of the dull end of the blade. This will just so slightly make the blade proud of the bottom of the plane. Now, while holding the pressure on the blade, tighten the thumb screw. You have successfully set up the scraping plane for nice fine final shavings, such that it can follow after a smoothing plane and leave a wonderfully smooth finish to the wood.
In my opinion, the Small Bronze Scraper Plane leaves one of the best surfaces one could ever hope to get.
I hope to see some of you at our events across the country. Feel free to come up and say hello.
Lee Laird has enjoyed woodworking for over 20 years. He is retired from the U.S.P.S. and works for Lie-Nielsen Toolworks as a show staff member, demonstrating tools and training customers.

